The trick is all in the timing. Catch them at the "milk stage," when the petals are just starting to wilt but the seeds inside are still soft, white, and creamy and their shells haven't hardened yet.
What you will need
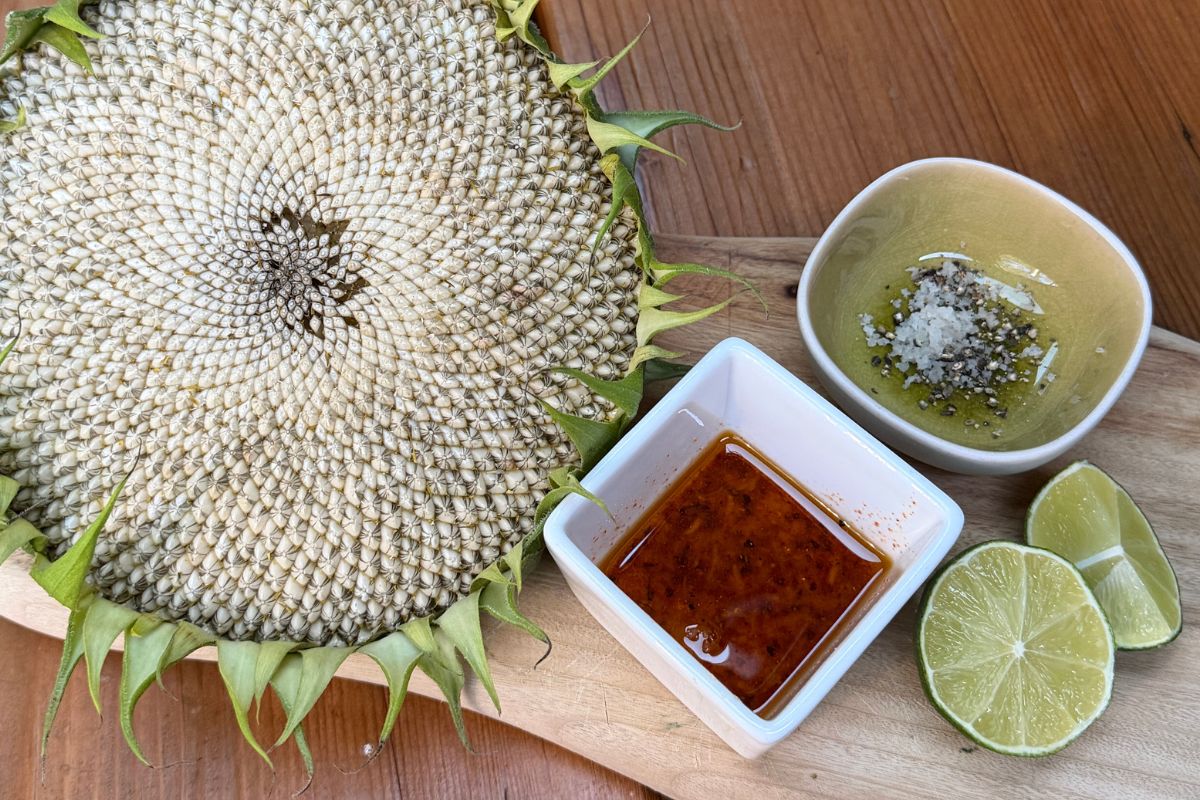
- Spent Sunflower Heads: Freshly harvested, approximately 15–20cm in diameter with petals removed. Best eaten at the “milk stage” before the shells have hardened
- Seasoning: Olive oil, paprika, cumin, onion, chilli, parsley, fresh grated garlic, salt and pepper
- Mexican Inspired Sauce: Whole egg mayonnaise and the same seasonings listed above
- Toppings: Fresh lime and coriander (feta optional)
How to Grill Sunflower Heads
Step 1- Prepare the Head: Start by removing all of the yellow petals from the edge of the sunflower. Rub your hand firmly over the "face" of the sunflower to remove any bits of pollen/florets (the fuzzy bits) until the creamy, white, immature seeds are exposed. Trim the stem so the head can sit flat.
Step 2- Season Generously: Brush the face of the sunflower head with plenty of the olive oil spice blend then sprinkle with sea salt and black pepper. These spices will toast against the grill, creating a delicious layer of flavour.
Step 3- Grilling: Pre-heat your grill or BBQ to a medium-high heat. Place the sunflower head face down directly onto the grates. After 5 minutesd, cover with a lid or a large metal bowl to trap the heat. Grill for an additional 5-10 minutes, or until the face has turned a nice brown with char marks and the seeds have softened.
Step 4- Final Flavour: Remove from the heat once the head is lightly charred and the back is light brown and soft. While the head is still hot, cover the entire face with the spice infused mayonnaise and top with fresh lime and coriander, feta a delicious option. Grab a fork and enjoy! Important: Remeber not swallow the shells if your sunflower is a little older and the shells have started to harden.
.jpg) Wilted sunflower head ready to pick
Wilted sunflower head ready to pick
.jpg) Cut the sunflower head off at the base
Cut the sunflower head off at the base
.jpg) Before removing the florets
Before removing the florets
.jpg) After removing the florets
After removing the florets
 Prepping the sunflower for the grill
.jpg) The seasoned sunflower head
The seasoned sunflower head
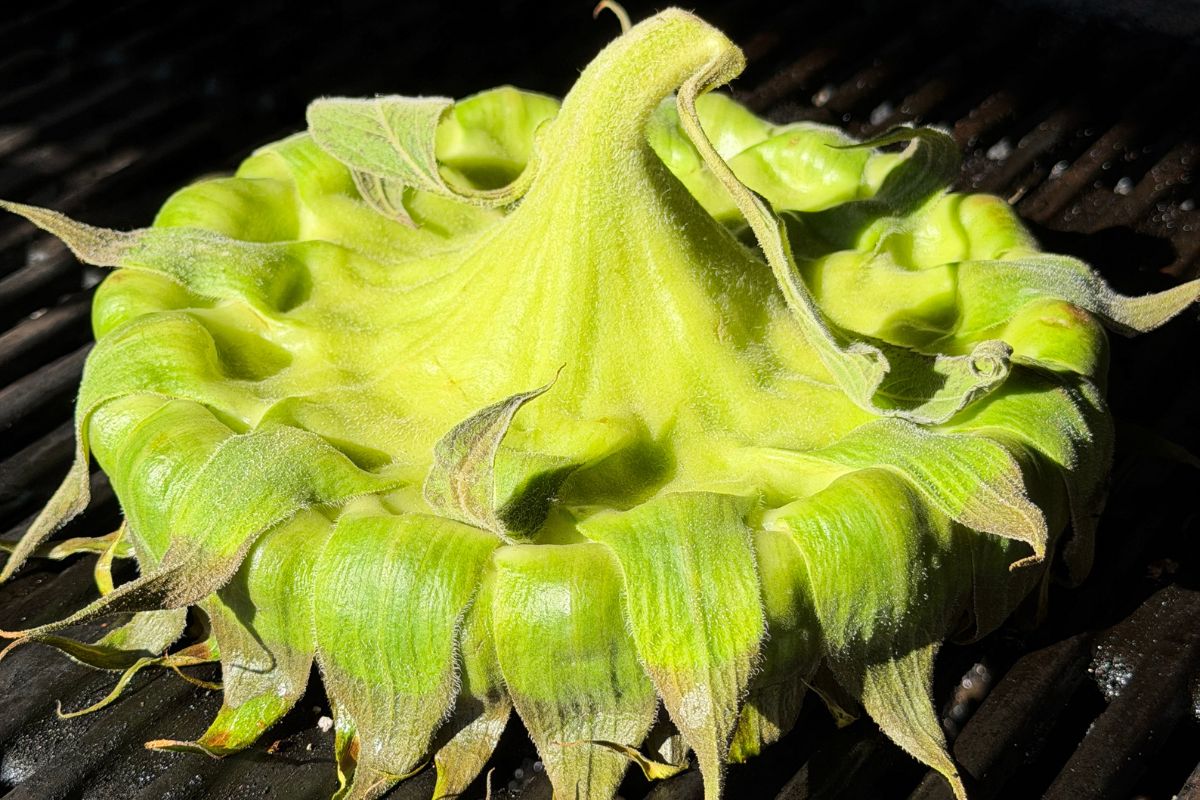 Placing the sunflower face down on the grill
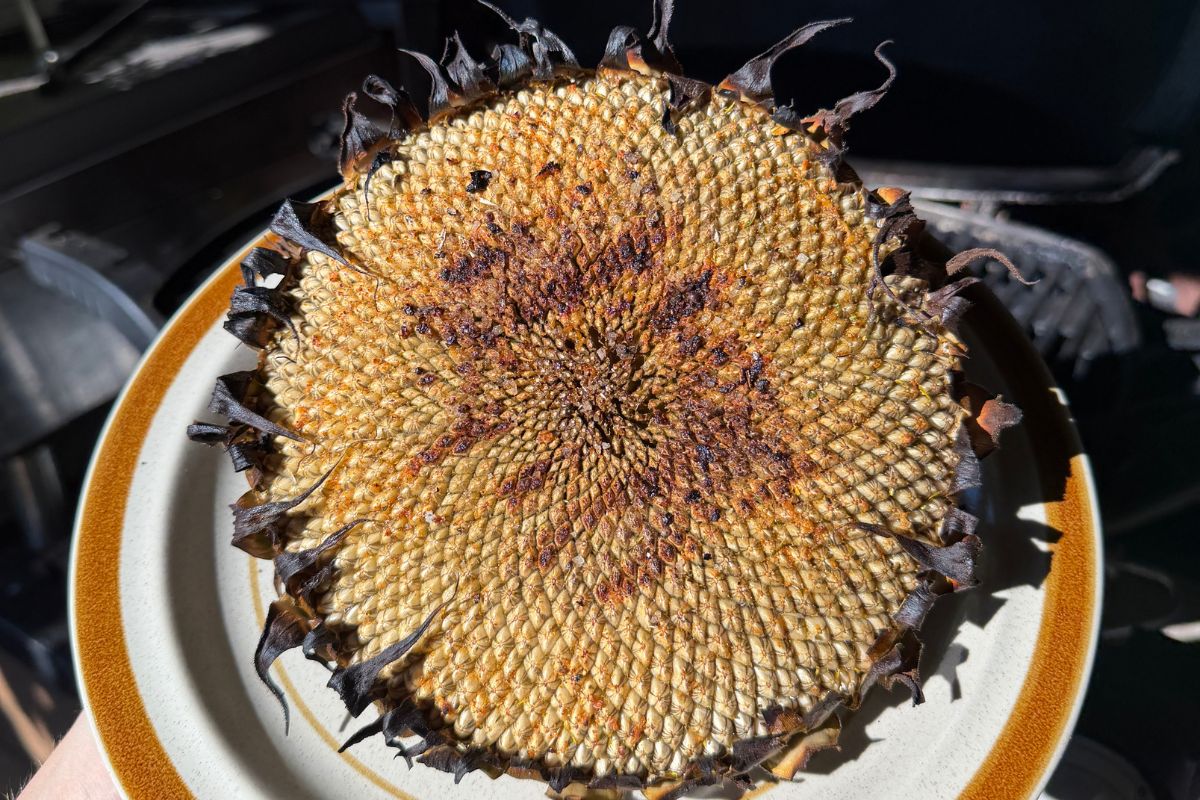 Sunflower is now ready to add toppings
 Adding the spiced mayonnaise, lime & coriander
 Sunflower is ready to eat
Growing your own garlic requires just a few simple steps and the right timing, making it an excellent project for gardeners of all skill levels.
What you will need
- Garlic bulbs: High quality, Australian grown (avoid supermarket garlic which may be treated) Browse all garlic here
- Location: Choose a spot that gets at least 6 hours of sunlight daily
- Soil: Ideally loose and well draining, enriched with organic matter such as compost or aged animal manure
- Mulch: Peastraw or Lucerne mulch is best for Garlic
How to Plant Garlic
Step 1- Prepare the Soil: Garlic loves a loose, rich bed. Weed the area thoroughly and turn over the soil to break it up. Mix in plenty of organic matter like compost and aged manure. If your soil is heavy clay, consider planting in raised beds or mounding the soil to ensure excellent drainage.
Step 2- Separate the Cloves: Carefully break your garlic bulbs apart into individual cloves just before planting, keeping the skins intact. Choose the largest, healthiest-looking cloves for the best results, and save the tiny ones for the kitchen.
Step 3- Plant Pointy-Side Up: Make small holes about 3-5cm deep. Space them 10-15cm apart, with 20cm between rows. Place one clove in each hole with the thick end at the bottom and the pointed end facing the sky.
Step 4- Water and Mulch: Smooth the soil over and water in well. Apply a thick layer of organic mulch like peastraw or lucerne. This keeps the soil temperature stable and prevents weeds from competing with your garlic. You should see green shoots appearing in 2-6 weeks.
Cultivation and Harvest
For more details on garlic cultivation, harvesting, and pest control, please view our full garlic growing guide.
.jpg) Breaking the garlic bulb gently in half
Breaking the garlic bulb gently in half
.jpg) Variation of clove sizes
Variation of clove sizes
.jpg) Spacing the garlic before planting
Spacing the garlic before planting
.jpg) Clove is facing upright
Clove is facing upright
.jpg) Covering the clove with soil
Covering the clove with soil
.jpg) Garlic Sprouting 2 weeks after planting
Garlic Sprouting 2 weeks after planting
Creating your own botanical paint requires just a few simple items, making it an excellent nature based play activity.
What you will Need
- Fresh or dried butterfly pea flowers
- A mortar and pestle (or a bowl and a spoon)
- Water and watercolour paper (normal paper is fine too)
- Paintbrushes, fingers, cotton buds or natural tools like leaves and sticks
- Lemon or lime juice (for acidity)
- Bicarbonate of soda or "bicarb" (for alkalinity)
How to Make the Paint
Step 1- Crush the Flowers:
Begin by placing your butterfly pea flowers into the mortar and pestle and crush them until they are broken down into small pieces. If you don't have a mortar and pestle, a bowl and the back of a spoon work just as well.
Step 2- Extract the Colour:
Slowly mix a small amount of water into the crushed petals. The water will draw out the anthocyanin pigments leaving a deep blue colour. You can adjust the amount of water you add depending on how strong you want the colour to be.
Step 3- Start Painting:
Now you have a vibrant, natural blue watercolour, you can start creating! If you'd like to know how to change the colours, keep reading.
The Colour Changing Magic
Exploring pH:
Once you've created the blue watercolour, curiosity really takes over. Because the watercolour is a natural pH indicator, adding new substances will cause the colours to change right before your eyes. You can mix these additions directly into the paint palette, or paint over your existing blue artwork with lemon or bicarb mixed in water.
Creating Purple and Pink (Acidic):
Add a few drops of lemon or lime juice to your blue paint. The acidity alters the structure of the pigment molecules, triggering a dramatic colour transformation through purple and into soft pink tones.
Creating Teal and Blue-Green (Alkaline):
To see the opposite reaction, dissolve a tiny pinch of bicarbonate soda in a small amount of water first. Add this alkaline mixture drop by drop to the blue paint and watch as the colour shifts towards earthy blue-green and teal tones.
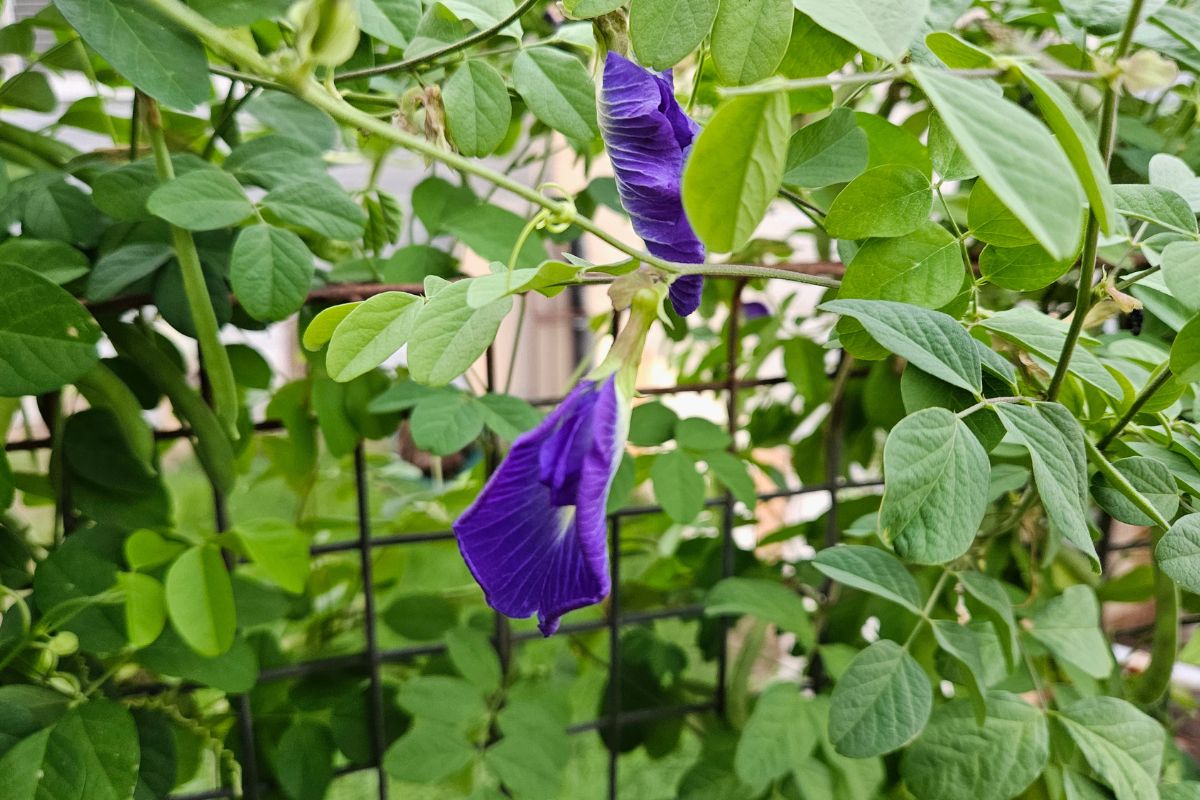 Blue Butterfly Pea flowers on the vine.
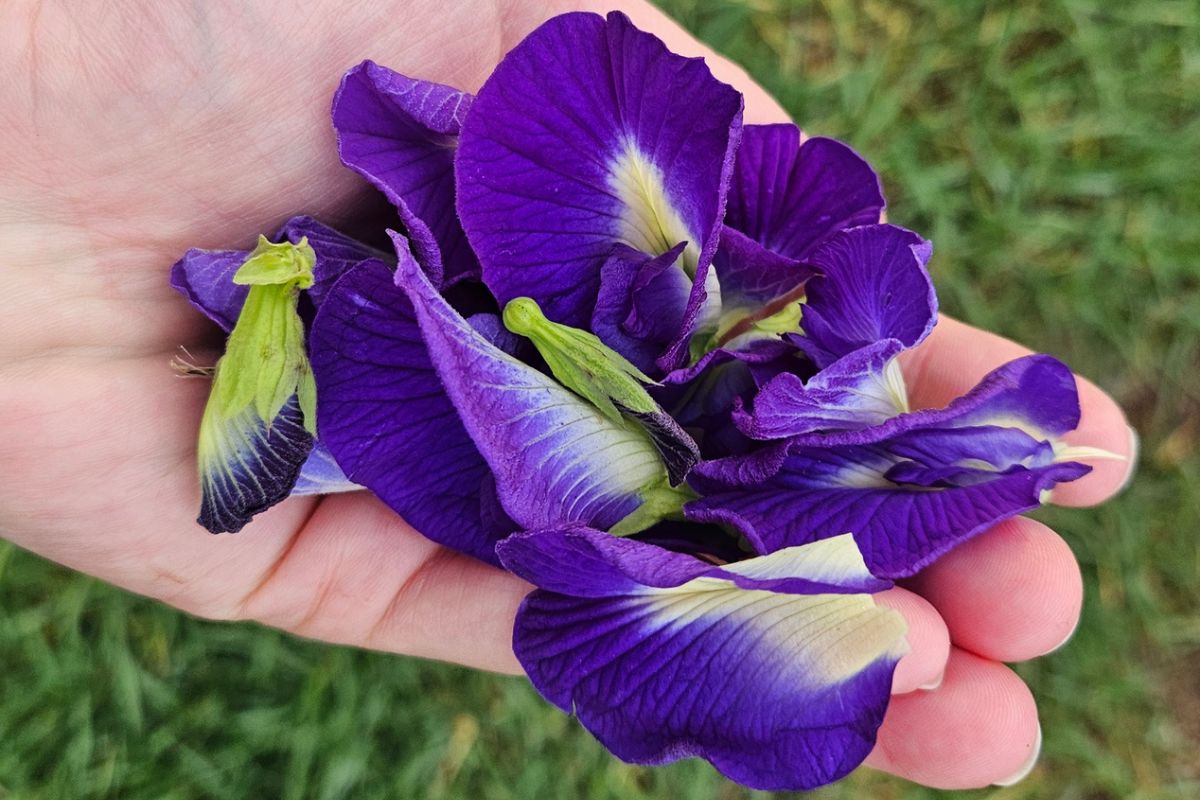 Pick some fresh flowers.
 Crush the flowers well to form a paste.
 Add water to dilute the paste.
.jpg) Add an acid or alkali to each colour space to create different colours.
Add an acid or alkali to each colour space to create different colours.
.jpg) Examples of the colours you can create.
Examples of the colours you can create.
.jpg) Now it's time to start painting.
Now it's time to start painting.
Inspiration & Media from our customer Joy
 @our_joyful_home.
Identifying the Stages
1. Petals
Once the petals have started to die back, you will be left with a green, closed bud.
2. The Bud
The green bud will then start to dry out. You will notice the dark, charcoal seeds will start to fan out and the plant will still be green.
3. What to look for
Depending on your climate and conditions, roughly a week or so after you see the seeds emerging, you will notice the green bud has turned brown and you will then be left with only the dried seeds, in a formation that resembles the spikes of an Echidna.
4. How to know when it's ready
You will know when they are ready to collect, as the seeds will fall off with a gentle swipe of your hand.
Tips for Maximising your Seed Collection
Label: Always label & date a brown paper bag before collecting and stick with one variety at a time.
Drying: Lay the seeds out flat on some paper towel or fine mesh, indoors for 3-7 days to ensure they're completely dry.
Storage: Place them in a paper envelope or a glass jar. Keep them in a cool, dark and dry spot.
Longevity: If you're wanting your seeds to store longer, make sure they're completely dry and you can freeze them in an airtight container.
Quality Control: If you see seeds that are pale, paper-thin, or feel hollow - they likely weren't pollinated. Keep only the plump seeds.
More Seed: Deadheading encourages the plant to keep flowering, however if you'd like to start saving your seeds, you have to stop deadheading toward the end of the season to allow the plant to complete its life cycle.
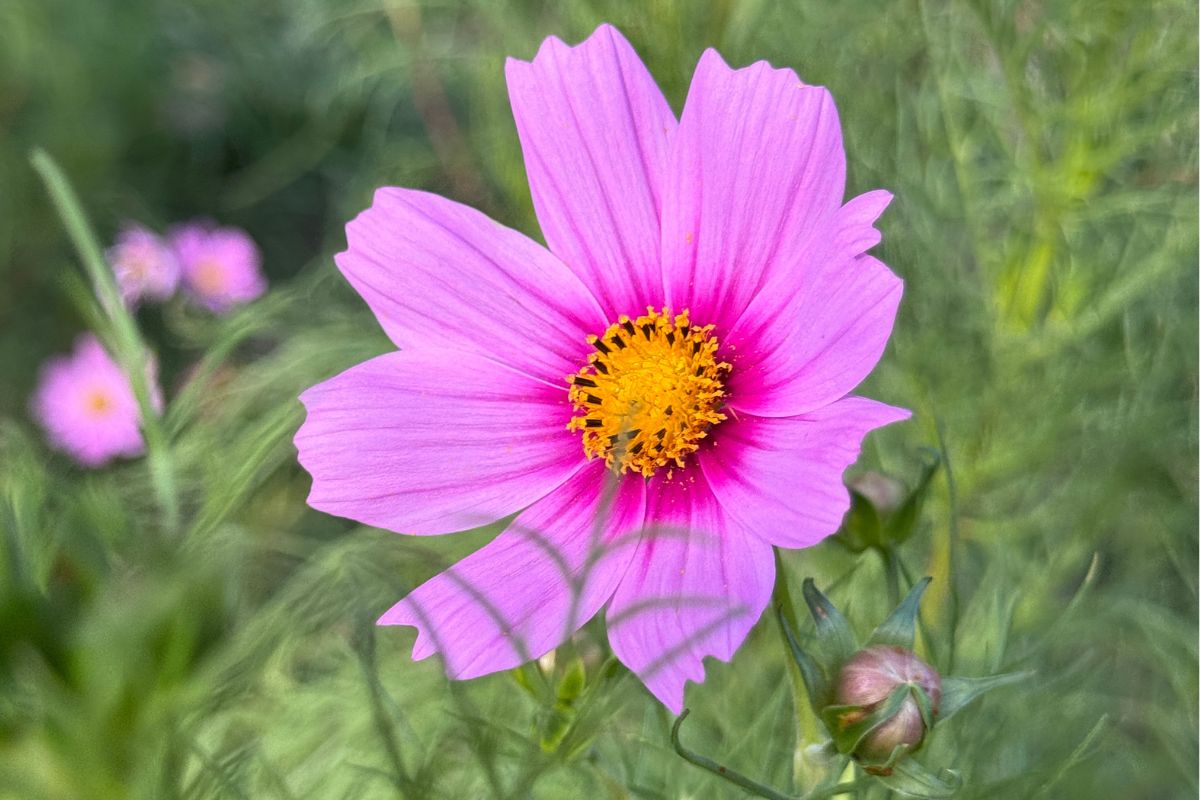 Cosmos in full bloom.
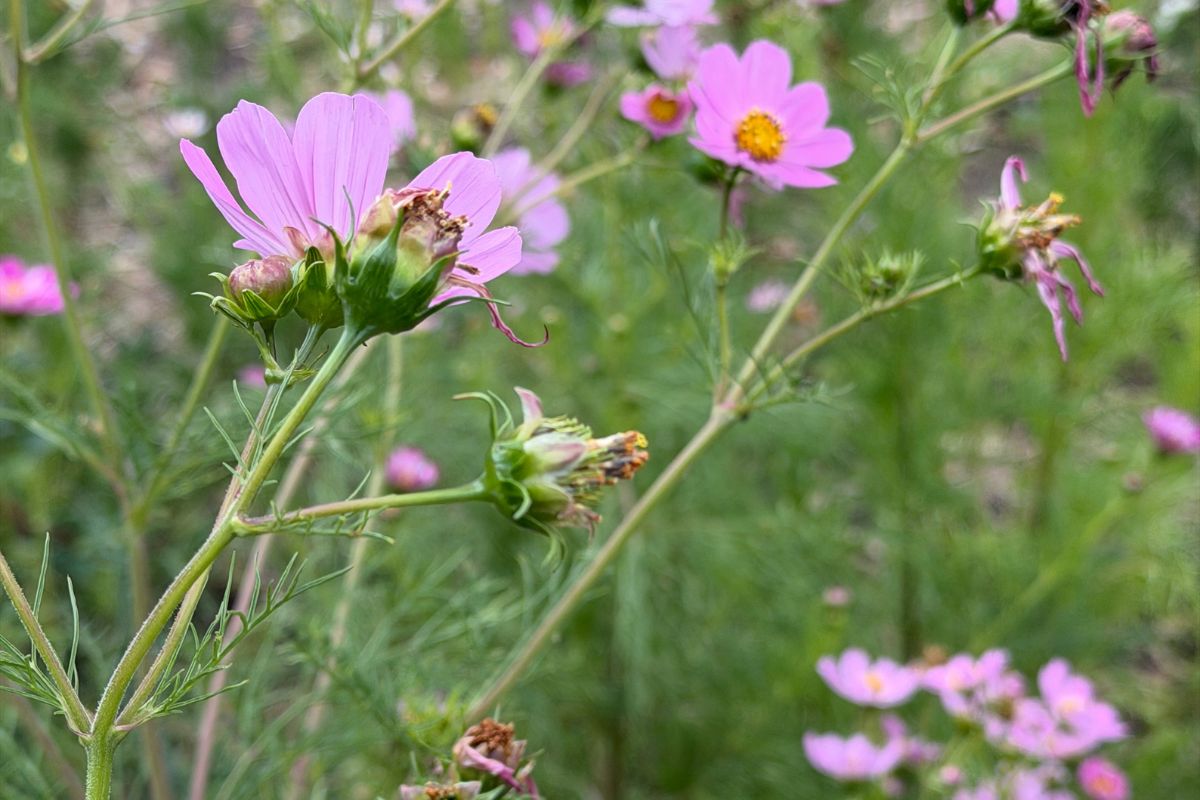 Cosmos flowers at different stages of life.
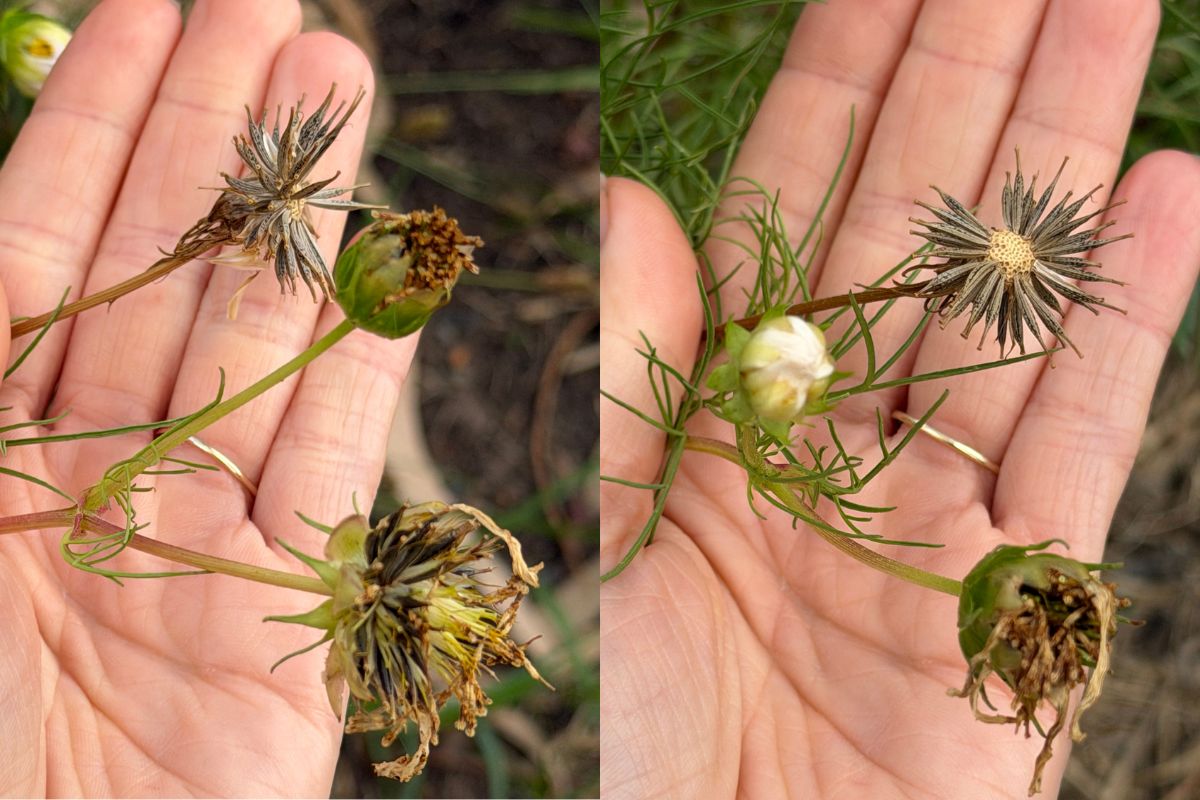 Identifying the 3 main stages after blooming.
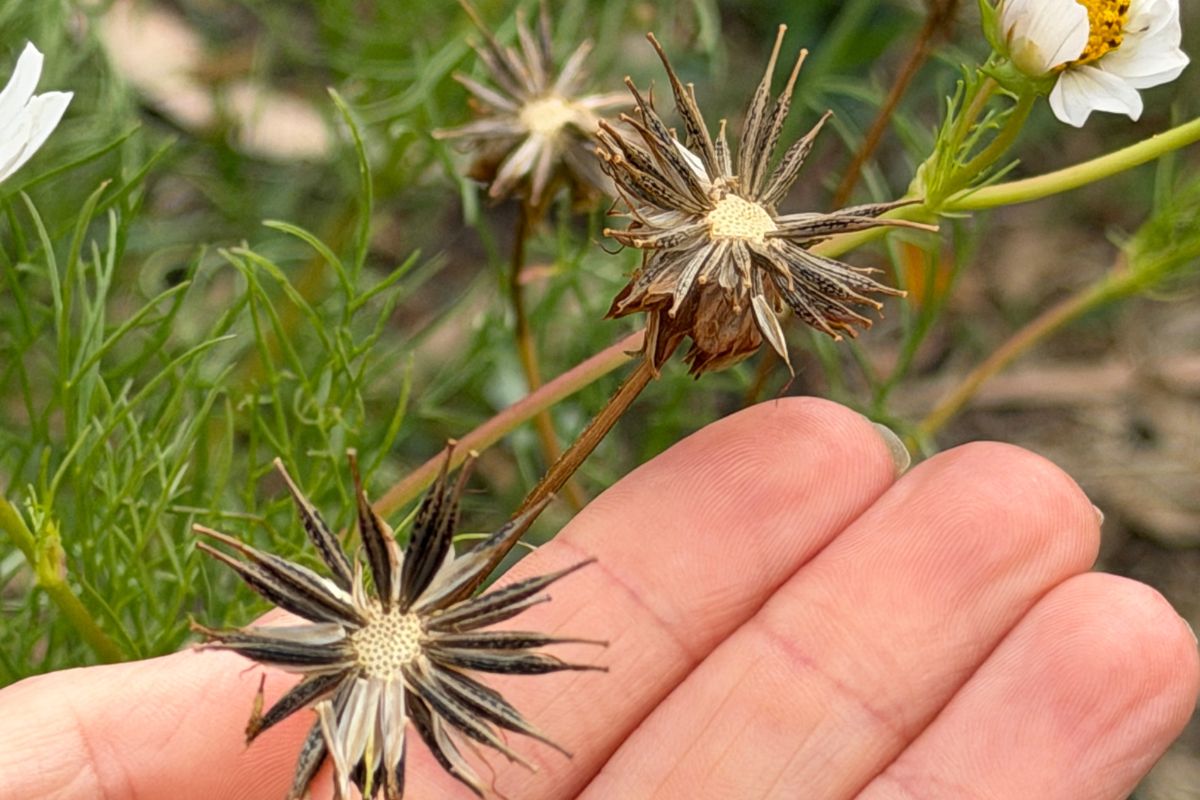 The 'Echidna' stage.
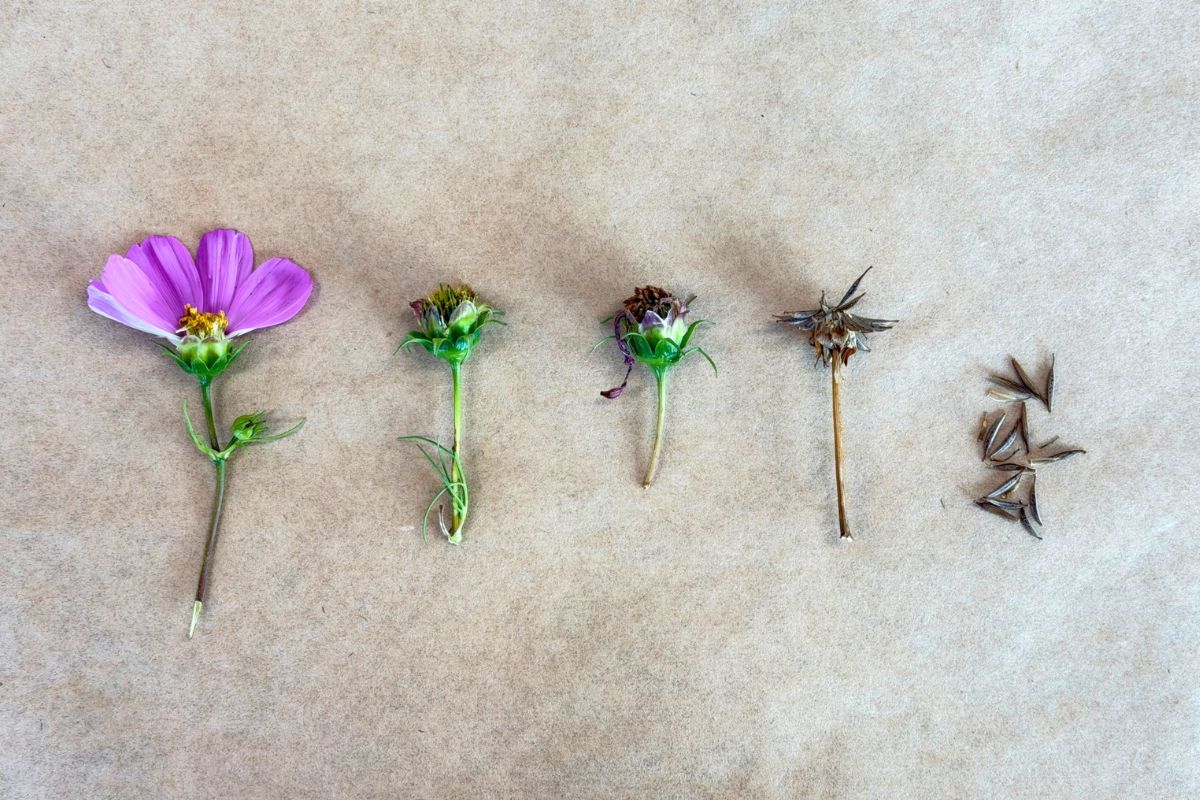 Cosmos from full bloom to seed.
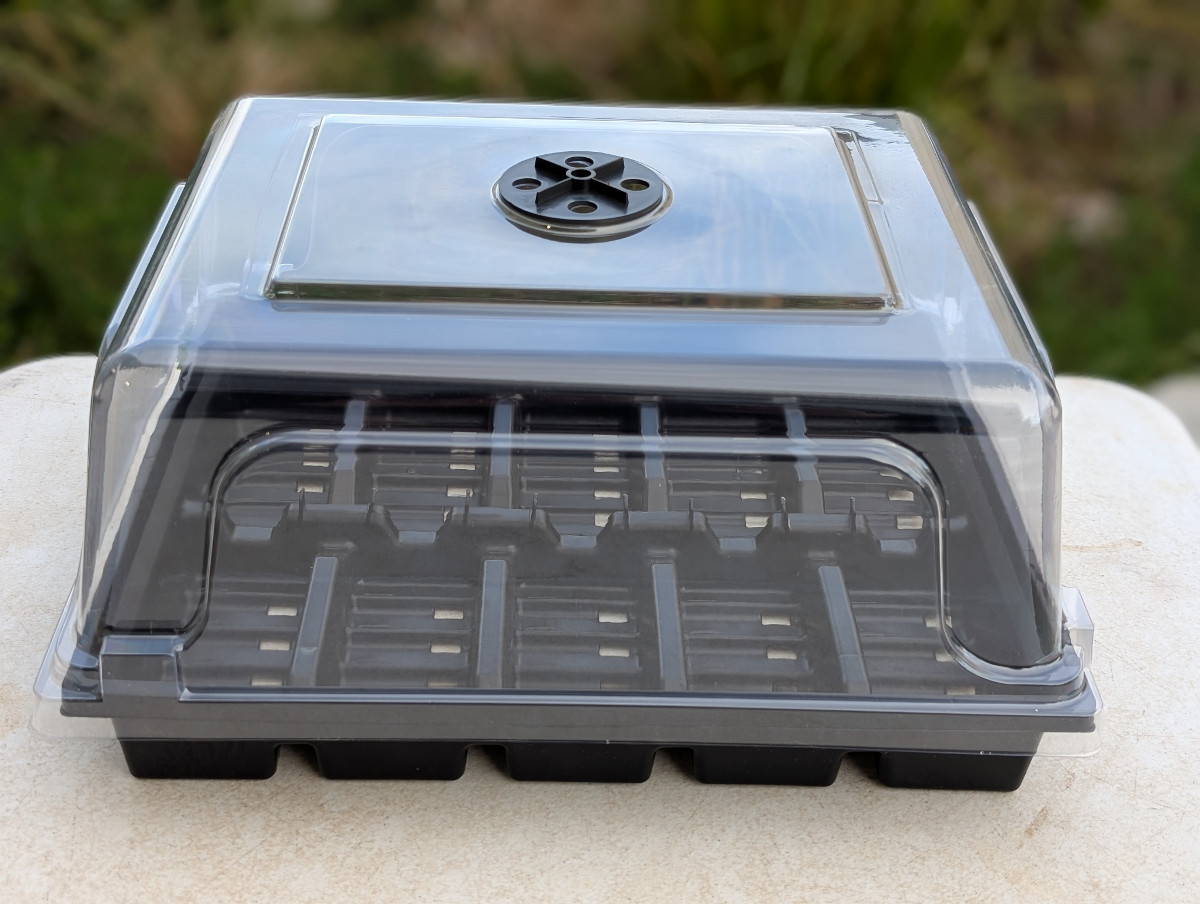
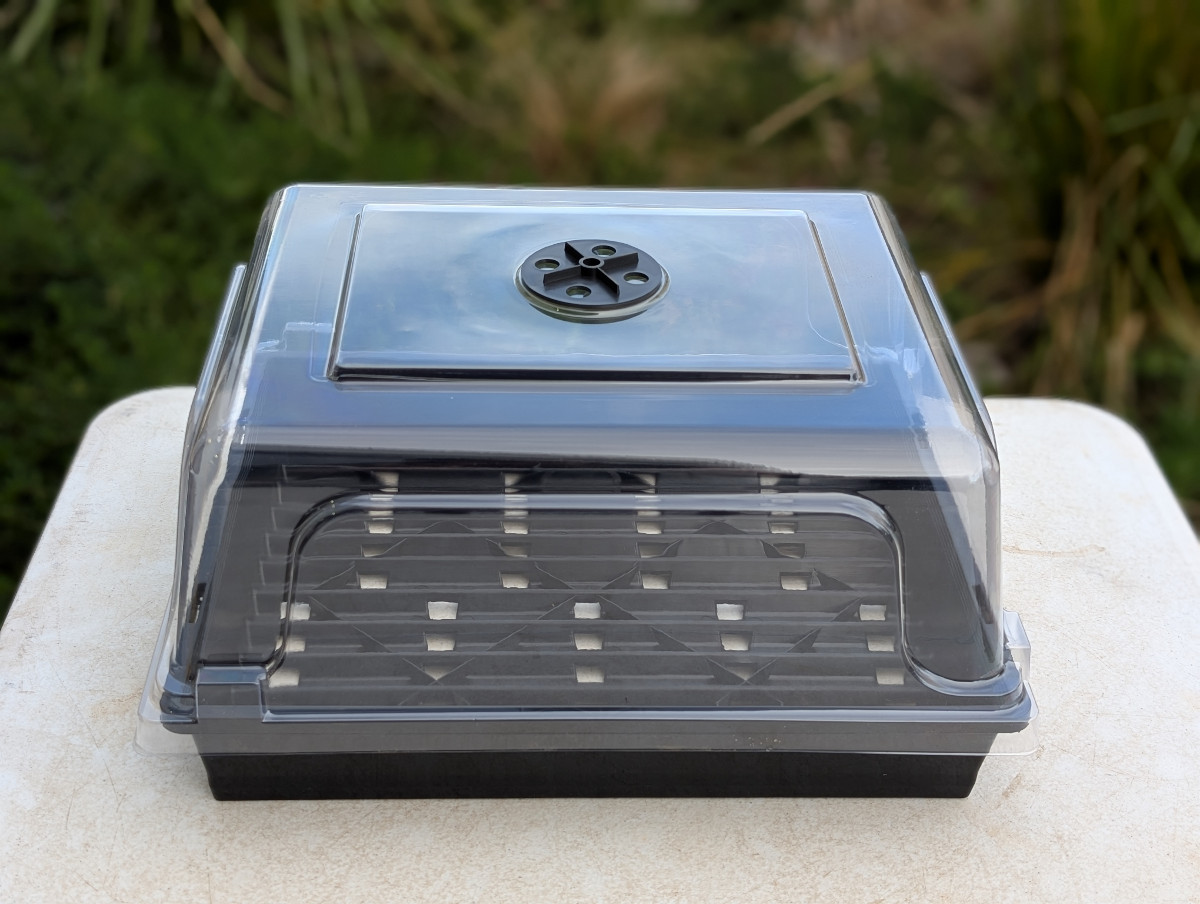
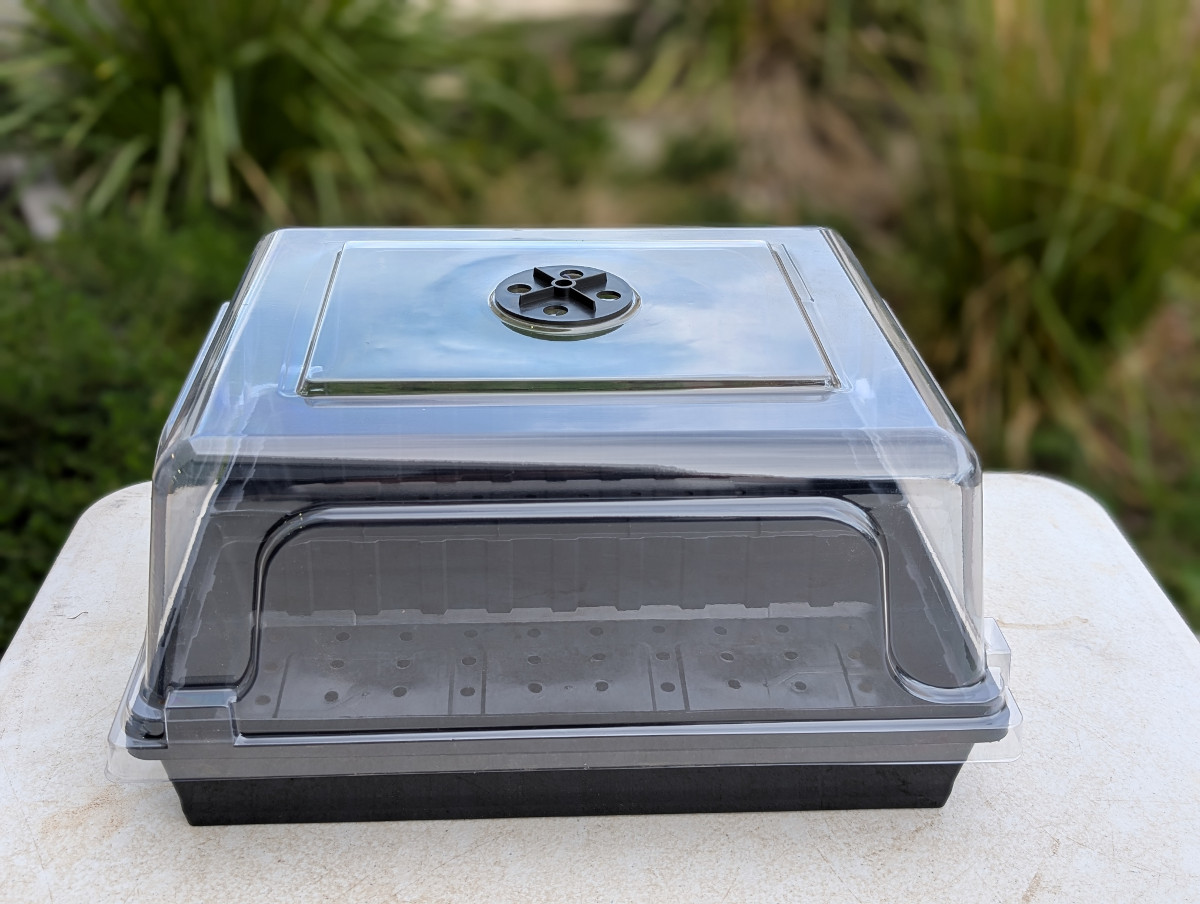
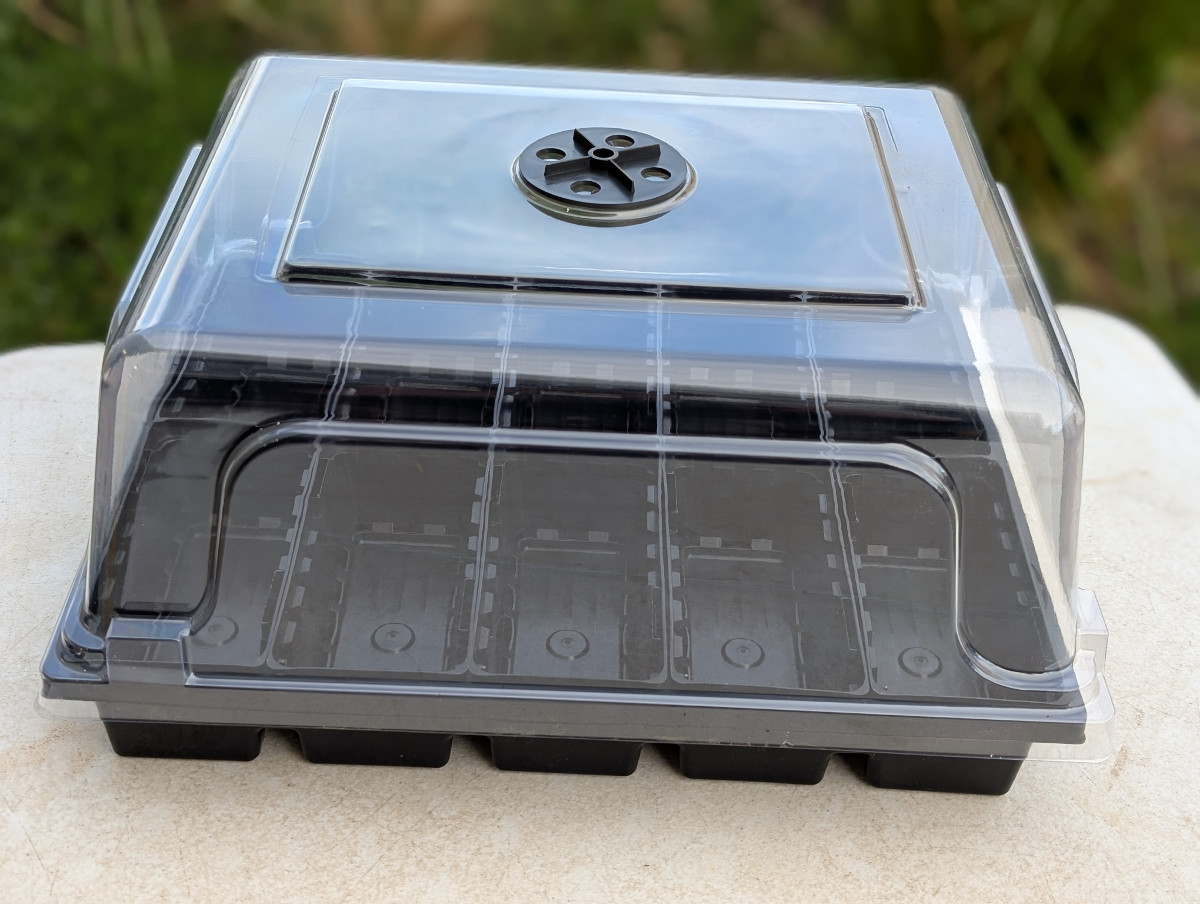
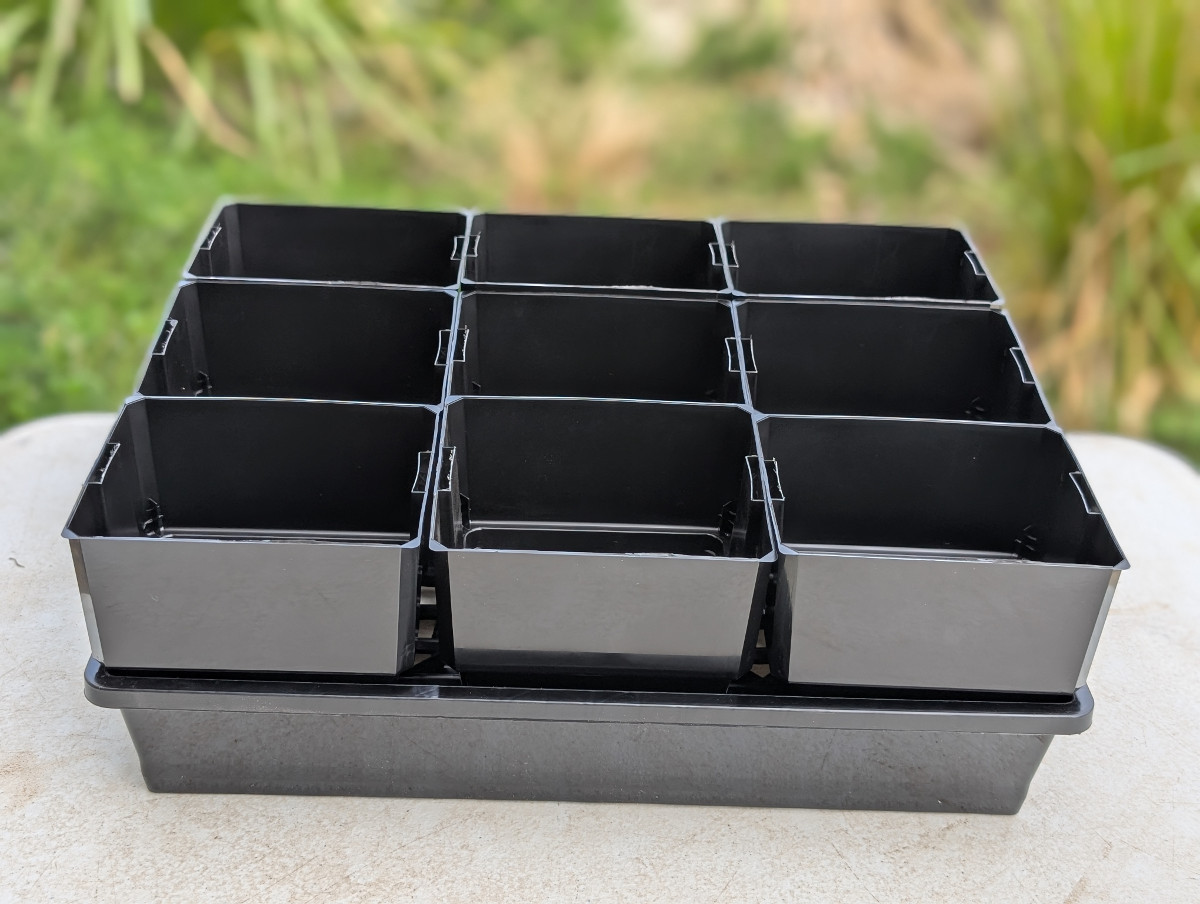
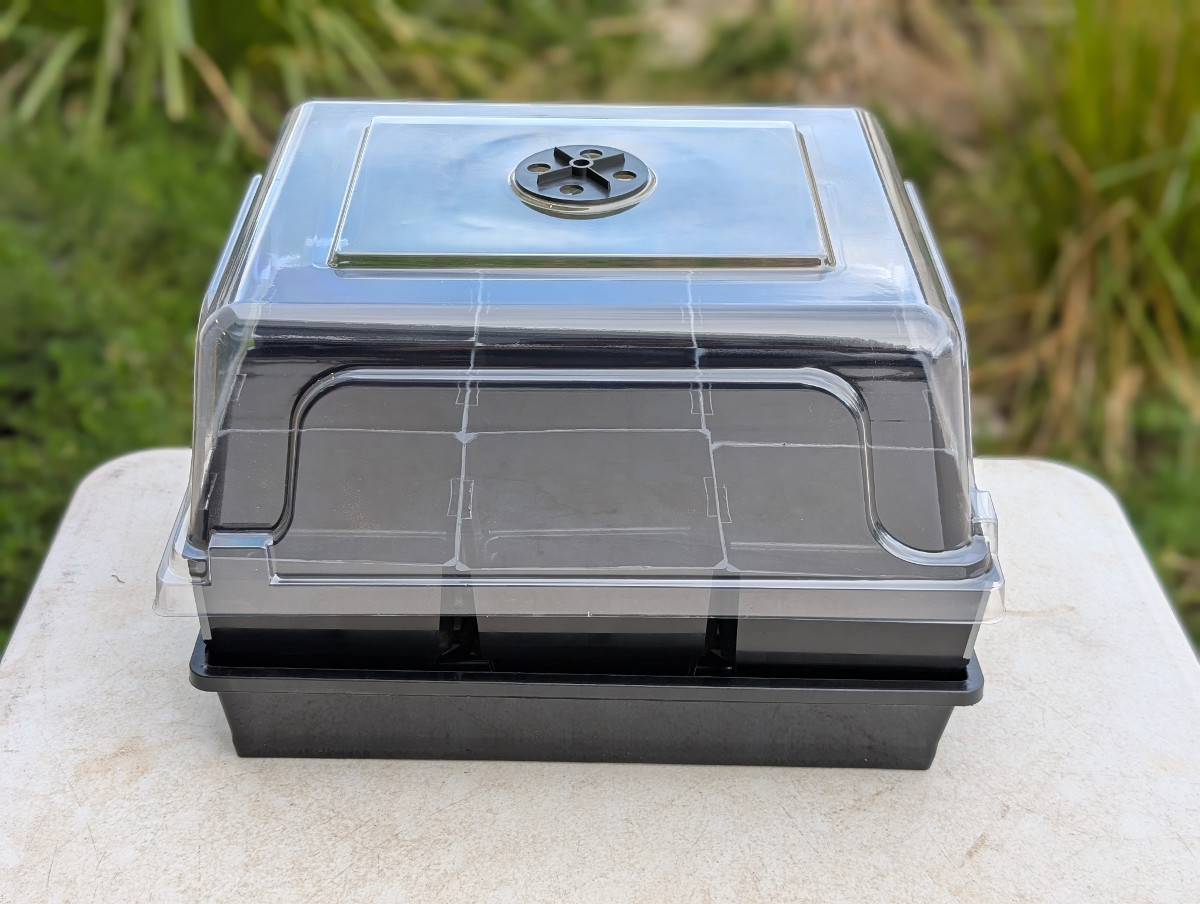
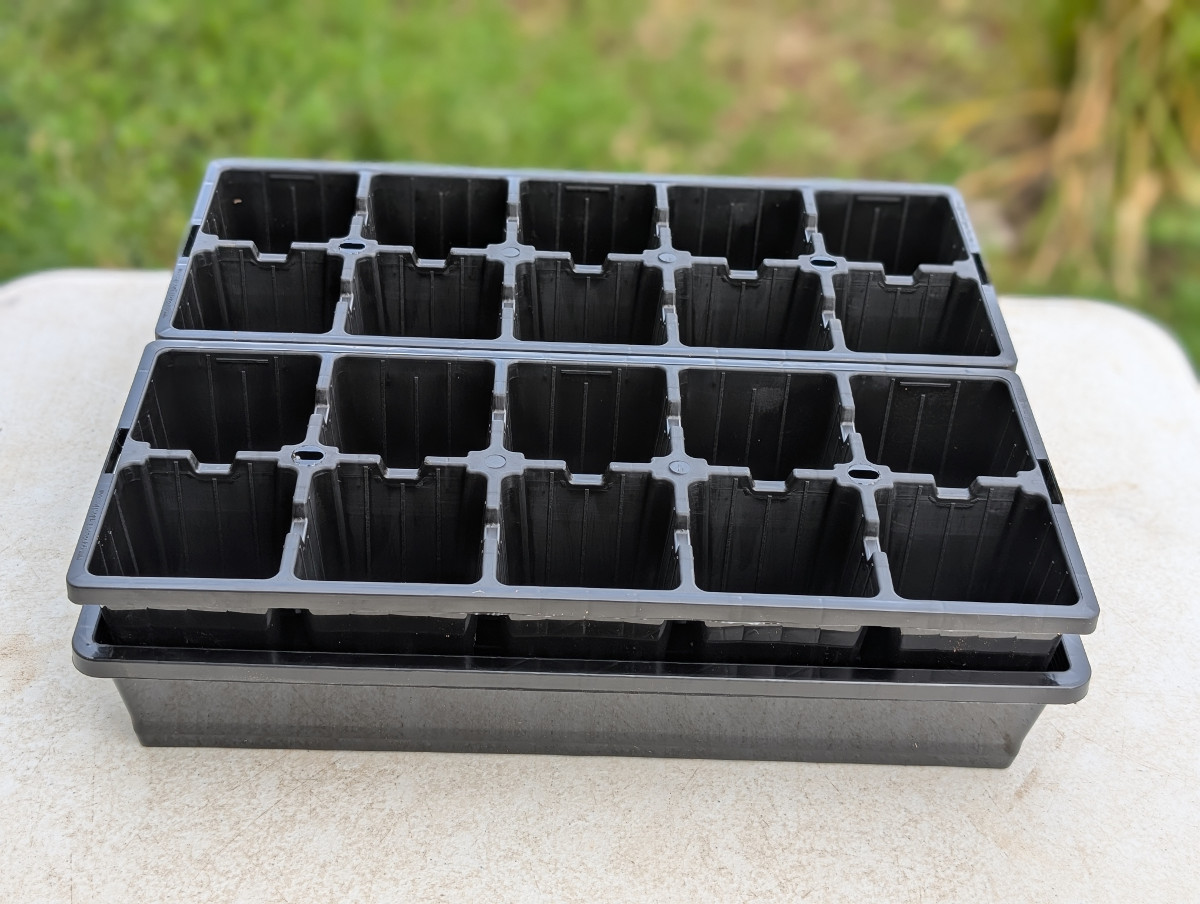
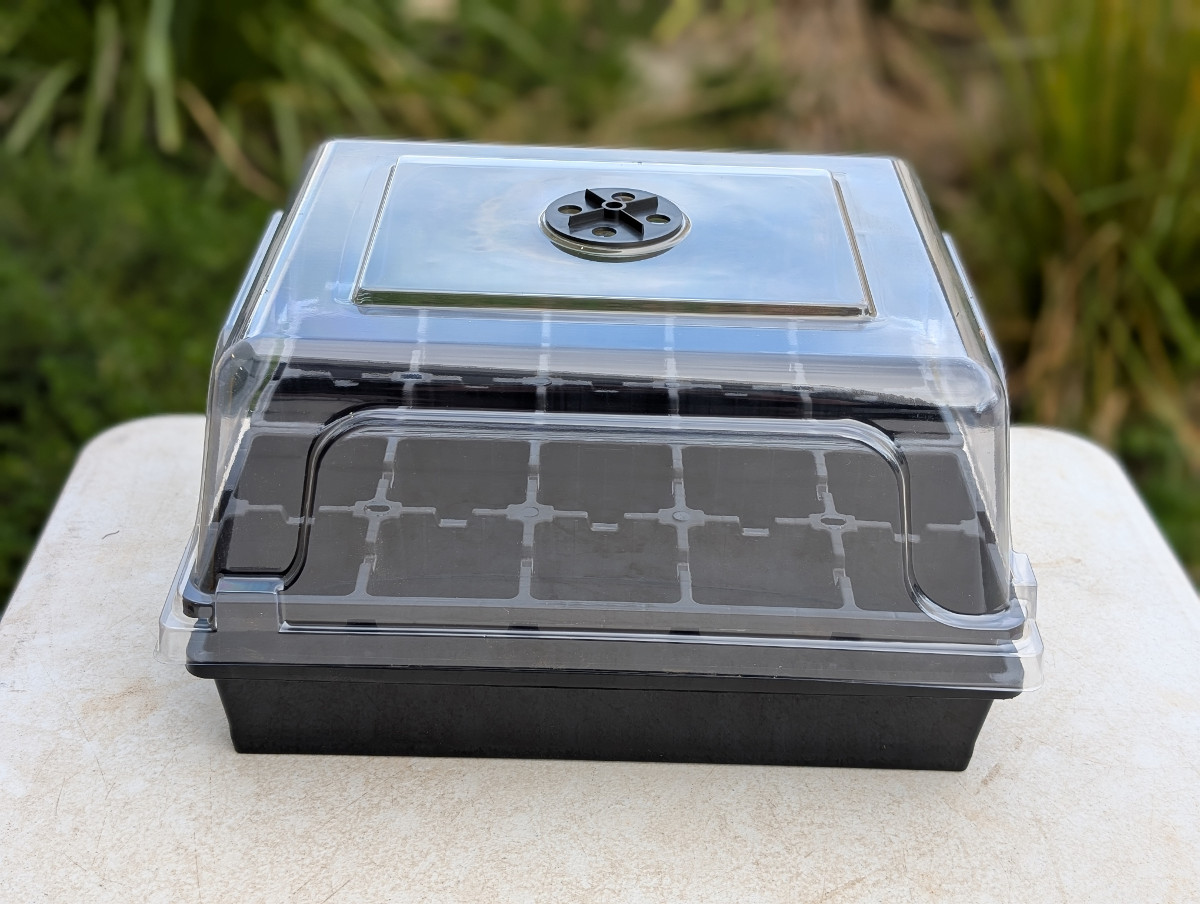
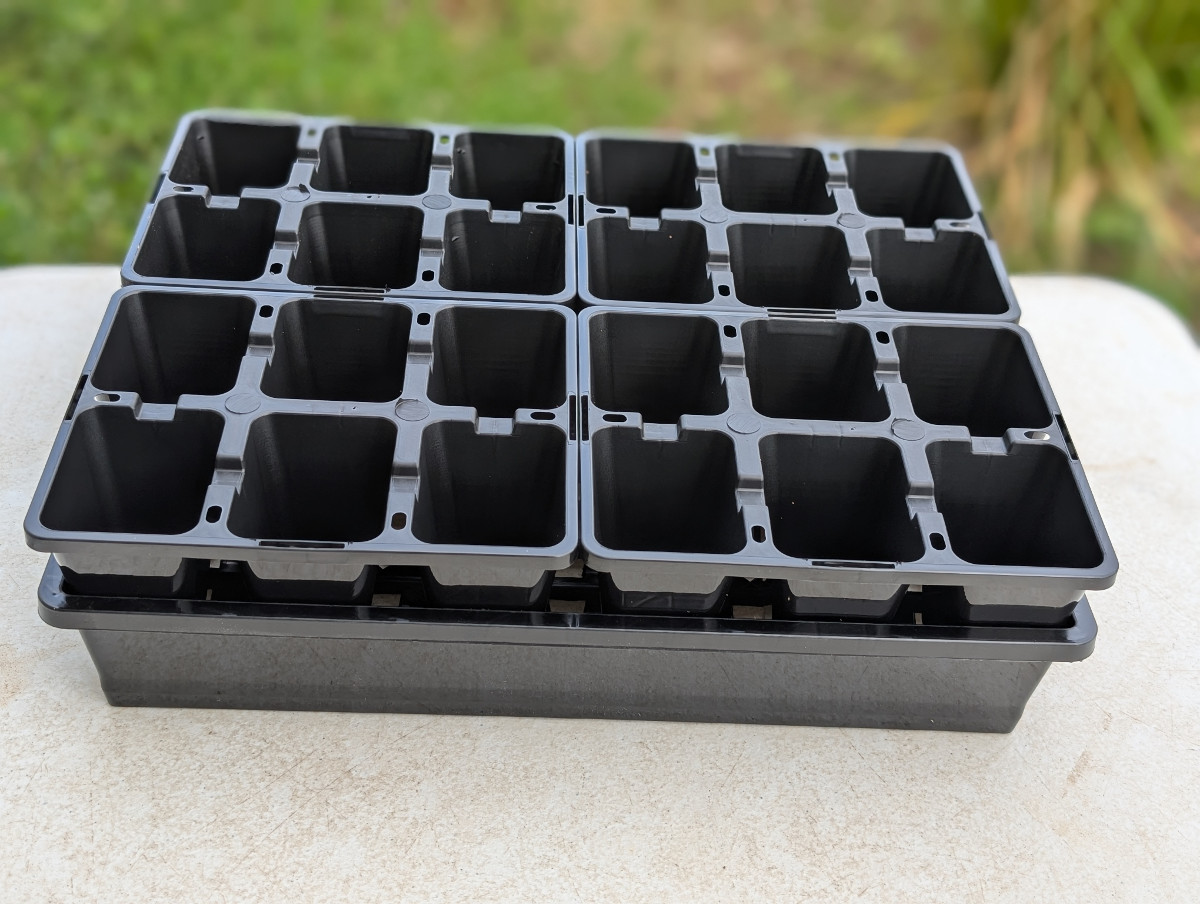
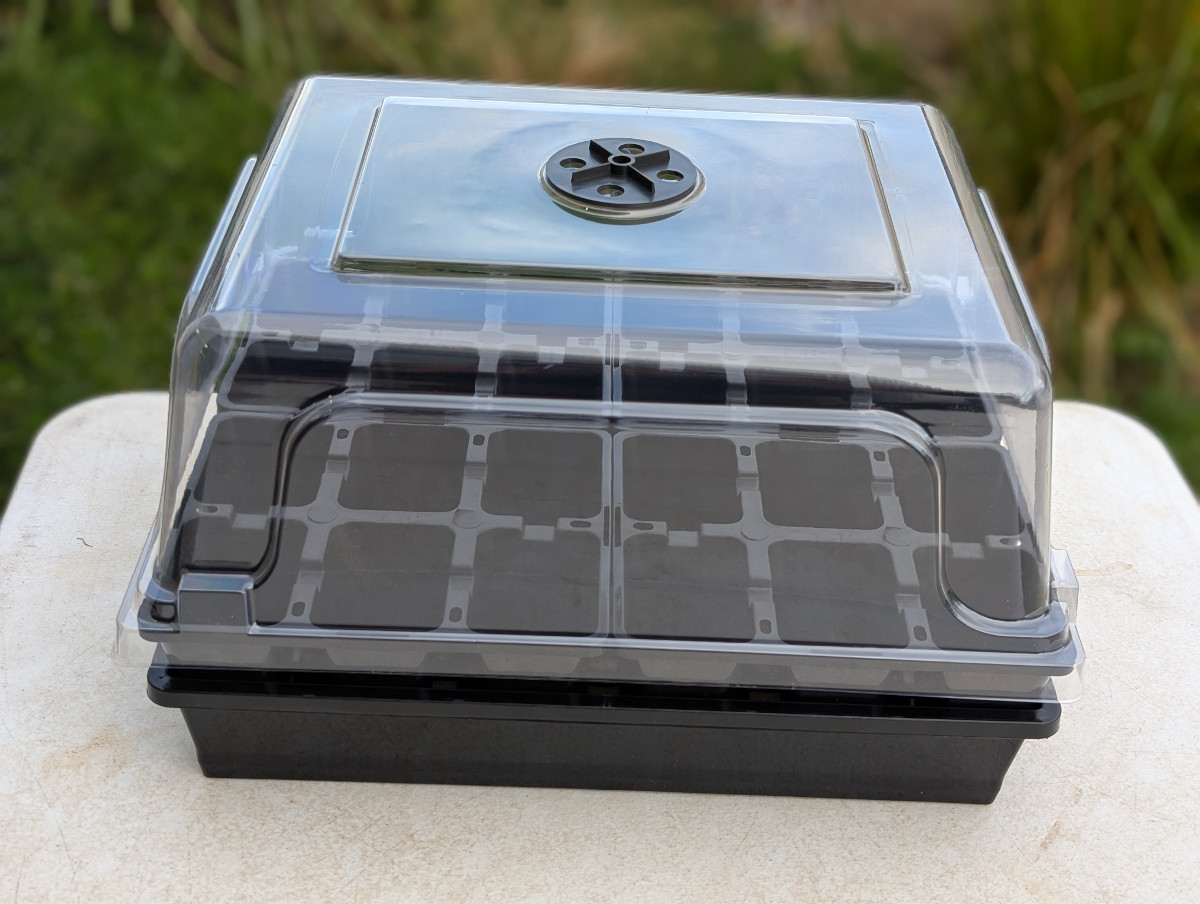
Our Greenhouse Lid is designed for maximum compatibility with a wide range of common Australian trays and pots. Take a look at the compatible products below to see how you can create your own mini-greenhouse!
Trays
The trays listed below are compatiable with our Greenhouse Lid:
***
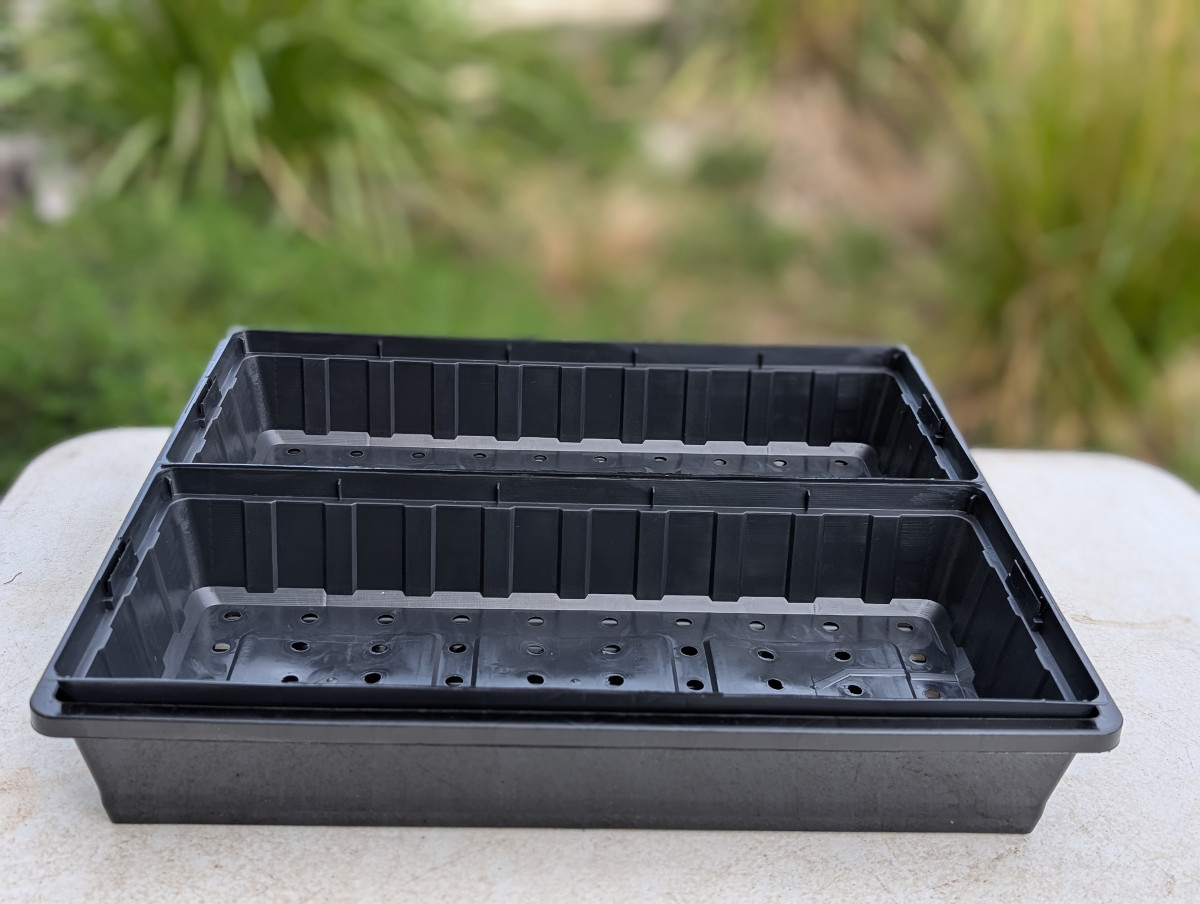
Product: Drip Tray Solid Bottom
Product code: TRHG
Quantity to fit Greenhouse lid: 1
.jpg)
.jpg)
Product: 10 Cavity Punnet Tray
Product code: TRS10X00
Quantity to fit Greenhouse lid: 1

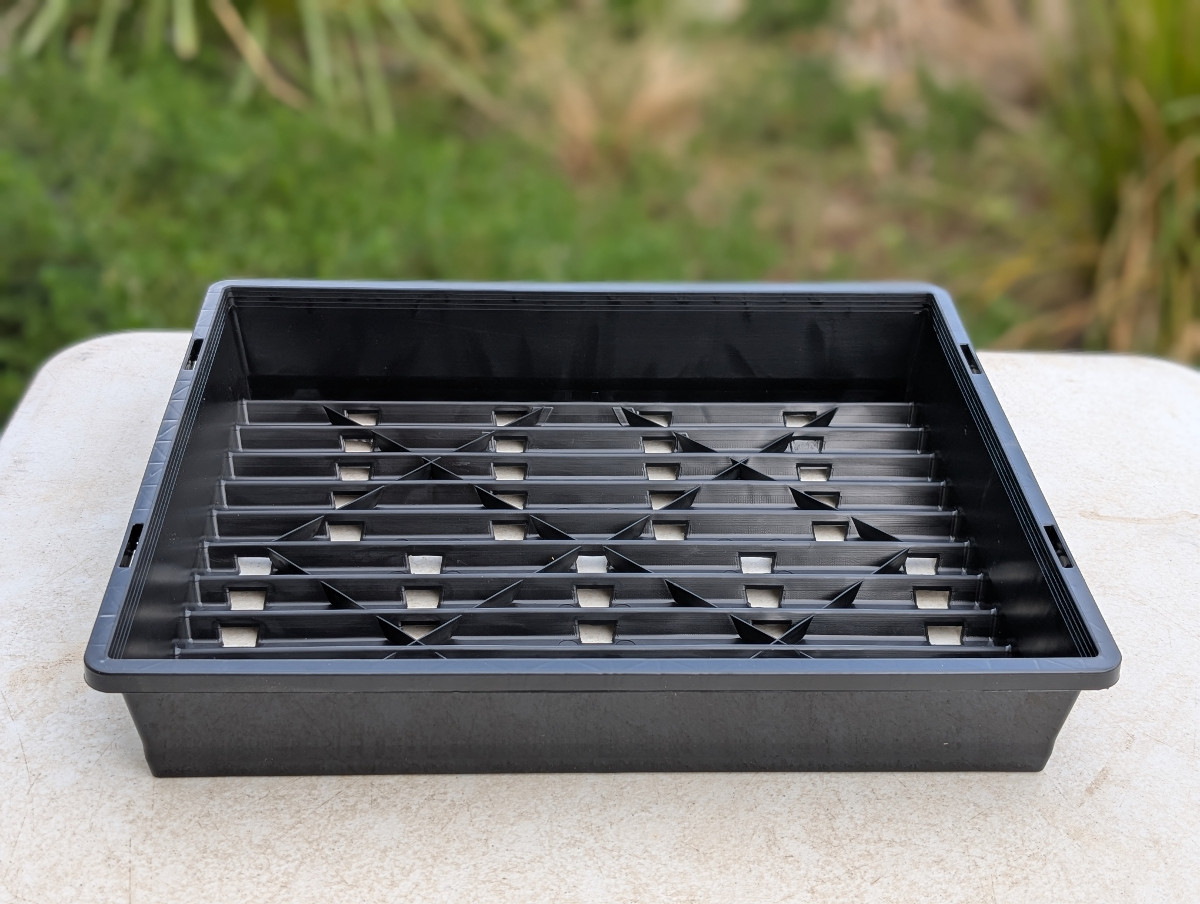
Product: Seedling Tray- Ridged Bottom
Product code: TRS349X
Quantity to fit Greenhouse lid: 1
Product: 12 Cavity Punnet Tray
Product code: TRS12X00
Quantity to fit Greenhouse lid: 1
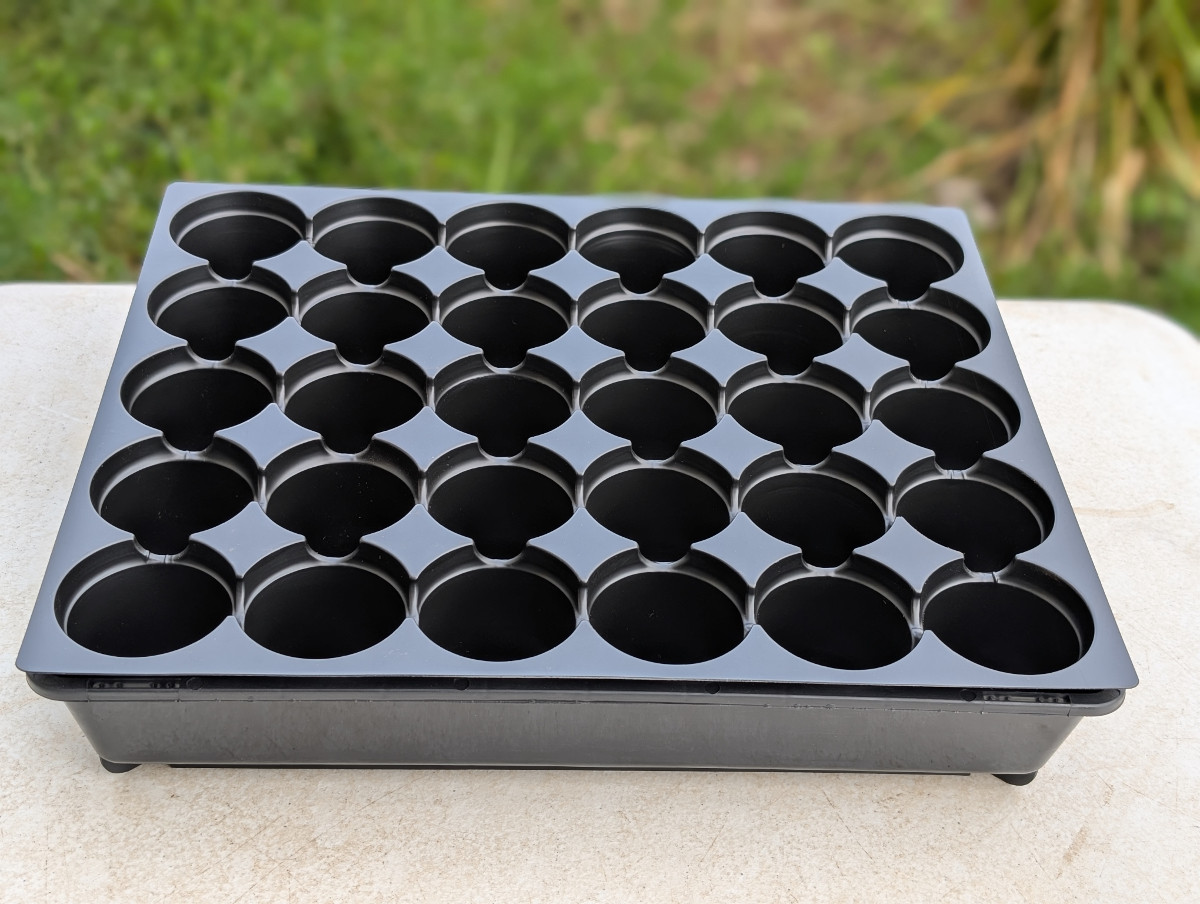
Product: 30 Cell Propagation Tray
Product code: K30R
Quantity to fit Greenhouse lid: 1
(product is pictured below in combination with a drip tray which is the standard combination)

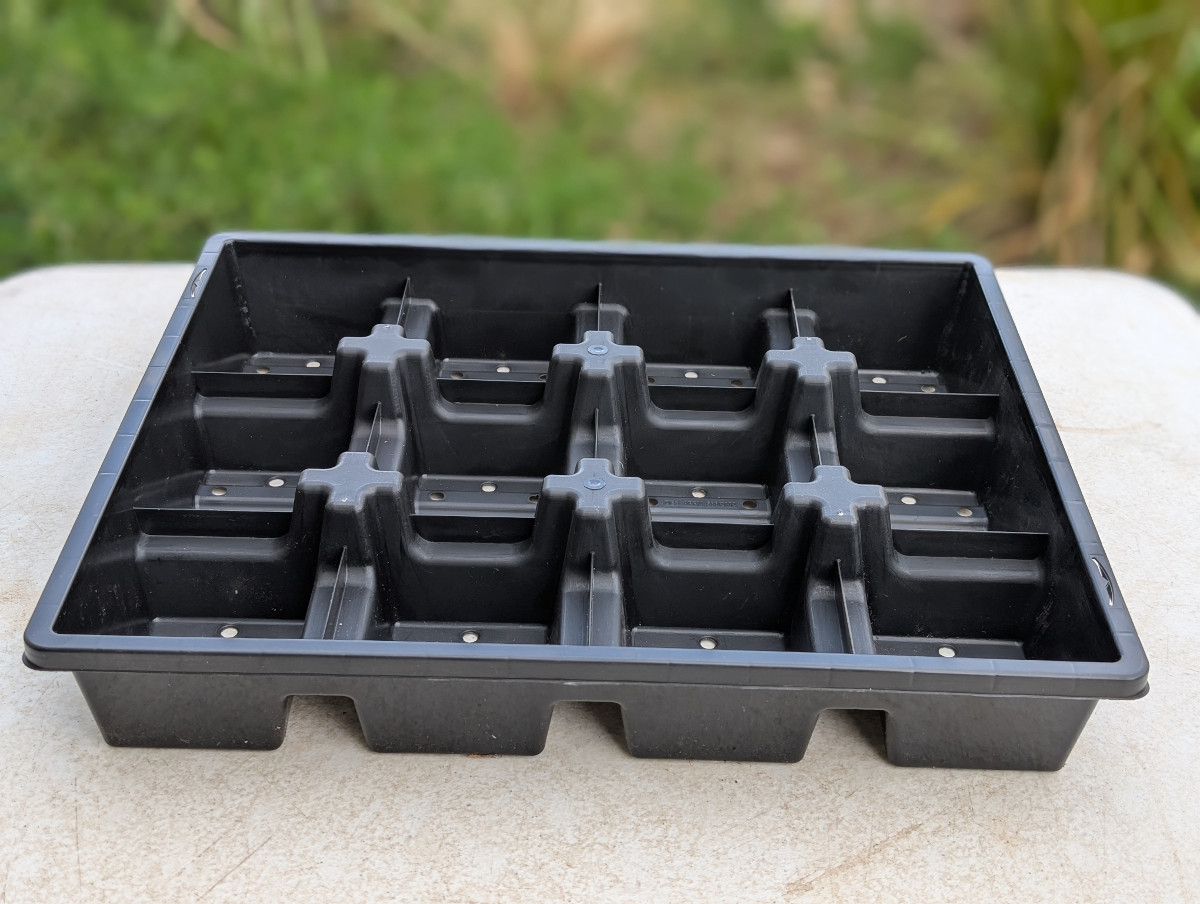
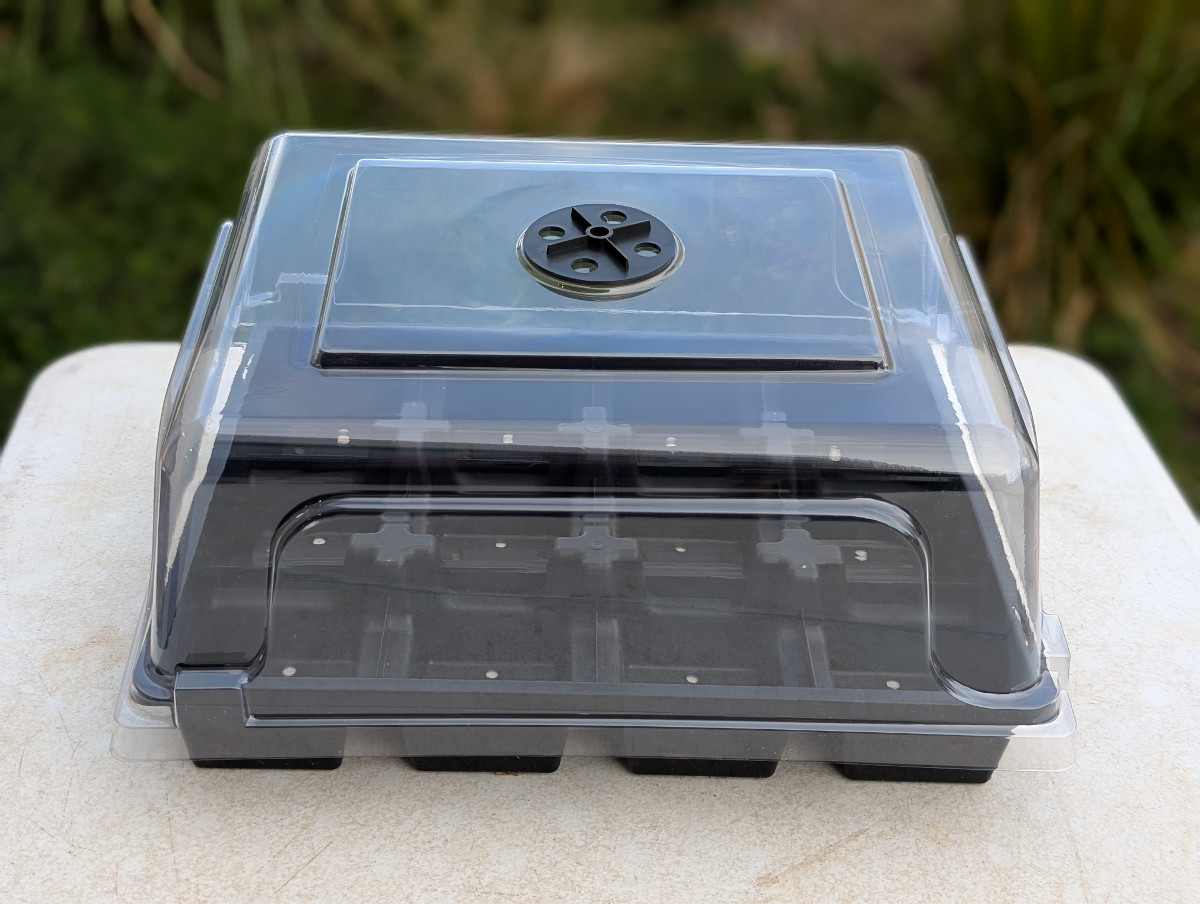
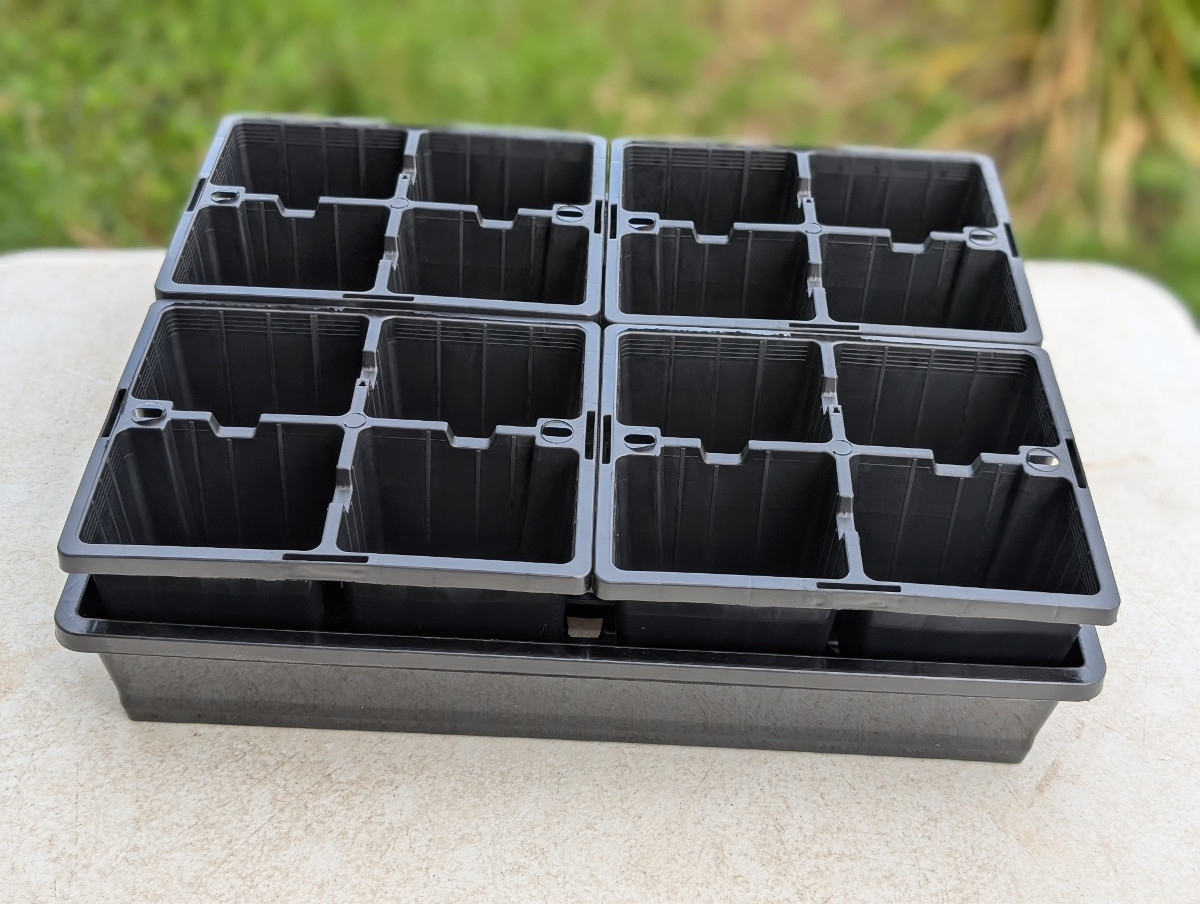
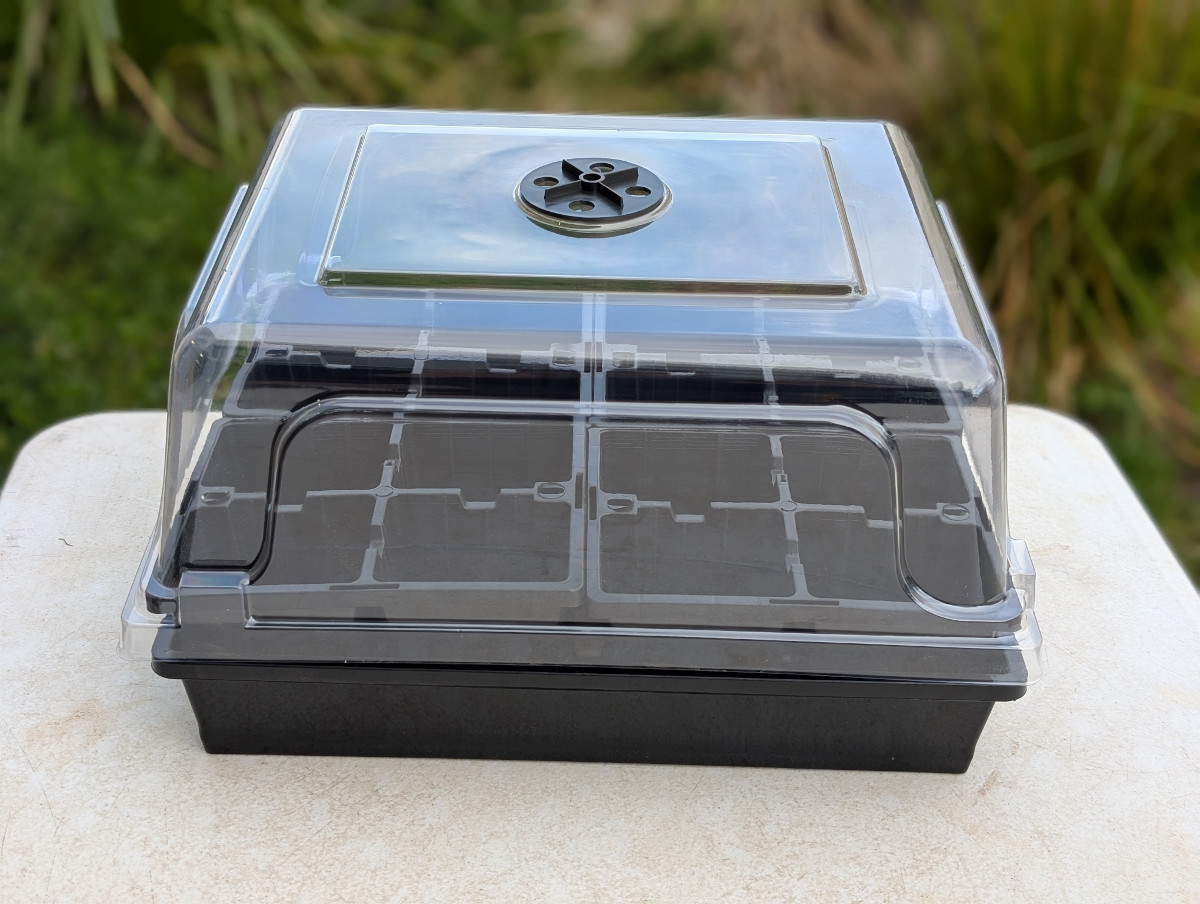
Product: Half Tray Super Punnet
Product code: PUNSP00
Quantity to fit Greenhouse lid: 1
(product is pictured below in combination with a drip tray which is the standard combination)
Containers
The containers listed below are compatiable with our Greenhouse Lid:
***
Product: Water Saver Punnet
Product code: PUNMWSS
Quantity to fit Greenhouse lid: 10
(product is pictured below in combination with a drip tray which is the standard combination)
.jpg)
Product: Squat Punnet Pot- Small
Product code: PP100SQ00
Quantity to fit Greenhouse lid: 12
(product is pictured below in combination with a drip tray which is the standard combination)
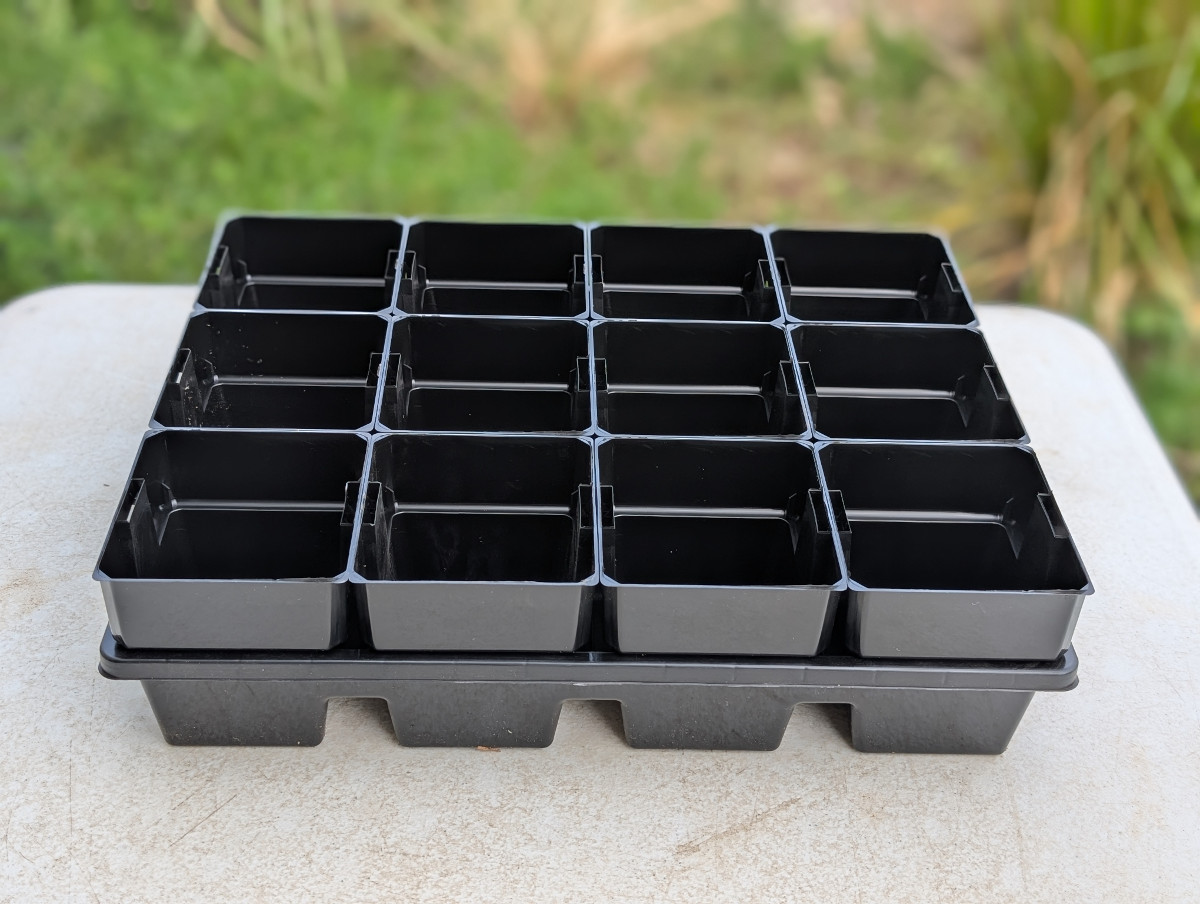
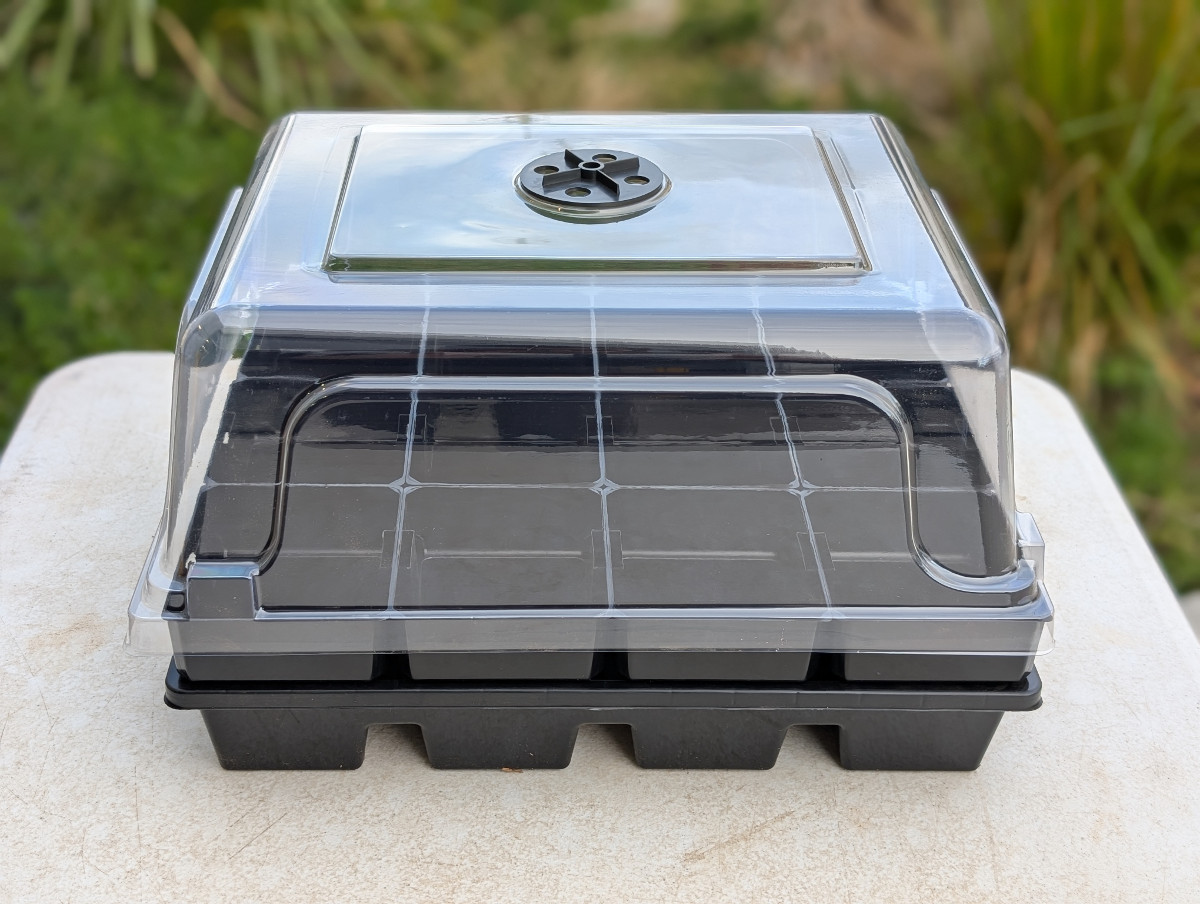
Product: Squat Punnet Pot- Large
Product code: PP116SX00
Quantity to fit Greenhouse lid: 9
(product is pictured below in combination with a drip tray which is the standard combination)
Product: 10 Cell Punnet
Product code: PUN10PACK
Quantity to fit Greenhouse lid: 2
(product is pictured below in combination with a drip tray which is the standard combination)
Product: 4 Cell Punnet
Product code: PP116SX00
Quantity to fit Greenhouse lid: 4
(product is pictured below in combination with a drip tray which is the standard combination)
Product: 6 Cell Punnet
Product code: PUN6PACK00
Quantity to fit Greenhouse lid: 4
(product is pictured below in combination with a drip tray which is the standard combination)
Congratulations to our winner, Mcora Farming from Victoria! We loved the layout of your garden and were particularly charmed by you tractor and rusty beds!
Mcora Farming (VIC)
This months winner!
.jpg)
Mcora Farming said: We live with 6 people and needing more food options, 7 large custom steel beds 8mts long x 1 mtr wide, 1 bed on the ground for garlic/corn and then to top it off with an old rustic tractor with a seeder drill on the back, converted with herbs at the back of it. The veggie garden is surrounded by 40 fruit trees.
.jpg)
.jpg)
Mcora Farming said: An old tractor with the seeder has herbs growing all year round! Great feature to the garden
.jpg)
Mcora Farming said: These sunflowers were just amazing so tall and beautiful
.jpg)
Lucinda (NSW)
.jpg)
Mcora Farming said: Hi. My garden is my own quirky style. I have my zygocactus growing in my covered area & with a raised bed which at the moment I have full of silverbeet (which I love to eat ). It originally was for strawberries the raised bed. But at the moment it’s the silverbeet patch instead.
.jpg)
Mcora Farming said: Love this small area. I put some pots in to cheer up an otherwise boring small area. I’ve a nsw Christmas bush. A woolly bush. An azalea & a pot of polyanthus with some tête-à-tête daffodil bulbs ready for the warmer months & just few other flowery ones as well.
.jpg)
Mcora Farming said: I had this corner in my garden that was just asking for a feature. So I decided on to put beside my residing Venus statue a water feature. It’s a plastic half barrel pot with a solar powered water fountain floating in it. The birds love it & it brings more joy to my garden.
.jpg)
Jenni (QLD)
.jpg)
.jpg)
Jenni said: Wet soggy winter in the tropics. I like it, l add to the garden, my lemongrass, pawpaws, Thai basil, frangipanis with the beautiful hippie's but don't forget the dwarf beans. Adding colour with homemade structures.
.jpg)
.jpg)
Jenni said: Revamping the hanging baskets.
.jpg)
Jenni said: Adding colour to my garden.
.jpg)
Margi (NSW)
.jpg)
Margi said:
My winter vegetable patch is looking healthy with caulifower and broccolli that I grew from The Seed Collection seeds. I can protect the plants from the white moth as soon as it appears (often with the August westerlies) by zipping up the netted tunnels.
In my cool greenhouse (high tunnel shape) I am getting ready to dig in the next two gardens now full of an autumn/winter green manure crop. I will soon chop it into the garden beds and mix with mushroom compost, then leave it to mulch over winter ready for summer crops (mainly lettuce, tomatoes, capsicum and eggplants as well as cucumber).
.jpg)
Jo (QLD)
.jpg)
Jo said: Winter in North Queensland. Lots of corn.
.jpg)
Jo said: Zuchinnis, Beets, Tomato & Silverbeet
.jpg)
Jo said: Garlic in November.
Lucilla (TAS)
.jpg)
Lucilla said: Turning leaves into confetti in my winter garden. Nothing like a crisp morning and a bit of leaf-mowing fun!
.jpg)
Lucilla said: A little bee, a big reminder that even in my winter garden, life is still buzzing.
.jpg)
Lucilla said: Green and gold leaves and quiet paths — my winter garden is a gentle reminder that change can be beautiful.
Mr Aussie Dad (NSW)
.jpg)
Mr Aussie Dad said: My winter garden with summer veggies! With supermarket veggie prices sky high, I've turned our spare shower into a summer garden using cheap reflective solar blankets, a 150w LED grow light and 80w greenhouse heater. I call this my "Shower Farm".
.jpg)
.jpg)
.jpg)
Mr Aussie Dad said: Suyo Long cucumbers and Calmart and Moscovich tomatoes in 20L buckets are growing like crazy. Yum!
.jpg)
Mr Aussie Dad said: An old, well-worn electric toothbrush is my busy pollinator every morning before I head to work.
.jpg)
Westbreen Primary garden go getters. (VIC)
.jpg)
Westbreen Primary garden go getters. said: The primary school vegetable garden, I look after with our students slowly starting to grow our winter crops.
Compost made from our classroom fruit waste adds wonderful nutrients you our garden where the students see it transformed from scraps to compost to garden to picking and eating the vegetables we grow.
.jpg)
Westbreen Primary garden go getters. said: Our asparagus bed flanked by 2 blueberry bushes and a lavender. Fingers crossed we can start harvesting asparagus in Spring. By bringing in pollinators with the help of our new flower pots, hopefully it will help us grow bigger more plentiful crops.
.jpg)
Westbreen Primary garden go getters. said: After a very successful first time growing loofah. We picked 15! The unseasonal warm weather has confused the plant and we have more growing! Best tip is make sure your trellis is very sturdy.
Dom Peters (QLD)
.jpg)
Dom said: My take on Eco brutalism. Mixing grasses, fern and moss with flowing Silver Dichondra, Cousin It and Scarlet Boganvillea. Cineraria, Red Flash Lotus to accentuate the levels
.jpg)
Dom said: Scarlet Boganvillea in front of Native Purple fountain grass.
.jpg)
Dom said: Making use of the shade to grow moss
Mrs Gardner (NSW)
.jpg)
Mrs Gardner said: Sleepy winter flower beds generously mulched with autumn leaves, nestled between pretty, wattle wood chip paths. Even after a light frost, the baby pincushions and everlasting daisies are still happy, slowly growing, awaiting the warmth of spring!
.jpg)
Mrs Gardner said:
‘Paper Daisy- Pink and White
Everlasting’
Rhodanthe chlorocephala
This Australian native daisy seems to be quite happy growing in my (temperate) winter flower garden!
.jpg)
Mrs Gardner said: Young Red Acre cabbage plants in a bed of autumn leaves. The pests aren’t a problem in this cooler weather, and they should be nice and sweet when I turn them into delicious purple sauerkraut!
Jenny (SA)
.jpg)
Jenny said: 'Up the garden path', a feel of waiting for Spring! Espaliered fruit trees along the fenceline are waiting to fruit, late-season sunflowers are inching along, garlic is growing patiently and in the background, golden asparagus fronds will be pruned to give way to bare earth soon. Capsicums can't be seen in the back garden bed but are overwintering and continue to ripen.
.jpg)
Jenny said: My favourite Snapdragons in bloom in the garden bed next to the sandpit, with carnations to each side and Cosmos self-seeding. Spring wildflowers and sweet peas pending on the trellis.
.jpg)
Jenny said: Under the insect netting: kohl rabi beginning to swell, Mache is thriving in the 20% UV filtering; its nutty flavour is coming through and I can eat it without having to worry about 'grubbing' for caterpillars or moths first.
Kool Garden (VIC)
.jpg)
Kool Garden said: Growing from seed.
The two Avocado plants started off as an experiment to develop roots. They were left in water for much longer than they should have before being planted into soil outside. This is their second winter outside, and most of their growth has happened during the last 6 months. With minimal care and a lot of neglect they've manages to survive. It just goes to show the tenacious nature of nature.
May (WA)
.jpg)
May said: I'm new to this gardening as a newbie housewife as well.
I wanna show you our humble raise garden.
With wild rockets, mustard leaves, and more leaves.
We got help from our little friends eating the weeds I've plucked and let them have some slaters.
.jpg)
.jpg)
May said: I love how are garden has grown into a luscious greens.
.jpg)
Congratulations to this months winner Renae K in SA; we loved seeing Hughie, Pip and Indy all handing out together in the garden!
Poppy Gnomes (QLD)
.jpg)
Poppy Gnomes says: This is Rani! A very beautiful girl, who LOVES to dig holes throughout the lawn and steal all the strawberries (see second picture where she was caught red-handed). She also loves sunbathing outside with all the flowers and having a good sniff around the veggie patch.
.jpg)
.jpg)
Bronwen (VIC)
.jpg)
Genevieve says: This is Pipin Cat, and she loves to join me outside in the garden. Her favourite hobbies include playing in dirt, eating dead twigs off my plants, chasing leaves and taking a snooze in my pot plants, regardless of any plant growing within. She enjoys snoozing in pots so much that I have brought a pot containing failed ranunculus from last season inside for her to snooze in. I’m sure they failed because it was her favourite snooze spot last year.
.jpg)
.jpg)
Tammy Gloster (VIC)
.jpg)
Tammy Gloster says: Wanda helping with the pruning
Meg (VIC)
.jpg)
Meg says: My reliable little friends are always there…under a lettuce leaf, visiting the zinnias or popping out of a zucchini flower.
.jpg)
.jpg)
Sally K (VIC)
.jpg)
Sally K says: Gracie enjoying the morning sun amidst the kangaroo paw.
She doesn't mind getting her own paws dirty helping mumma in the garden either!
Romeo (VIC)
.jpg)
Romeo says: My goats Faunus & Amalthea (destroyers of blackberry); ducks Jup & Tess (snail and slug patrol), and dog Epona (digger of holes).
Pamster (VIC)
.jpg)
Pamster says: Doug is my Parson Terrier, there is no show without punch. We are starting from scratch on our new block so lots of earth works going on. This particular drain is for one of our water tanks that will Water the veggie patch and chooks. It was a shame I couldn’t send the video of this work, Doug was convinced there was something in the pipes he was hilarious with his head up the pipe, biting and shaking it.
Cookie (the kookaburra) comes everyday for a visit. My garden is only just being created so there is lots of work going on creating new beds, poly
Tunnel drainage etc. Cookie is fearless he comes in close and watches my every move. He is great company.
.jpg)
Renae K (SA)
This months winner.
.jpg)
Renae K says: Hughie, my little poddy lamb was a great companion in the gardens. Initially he was freely roaming around as I planted seedlings. But then the seedlings started disappearing! Both Pip and Indy kept a close eye on him, but couldn’t stop his grazing behaviour coming through.
.jpg)
.jpg)
Mountains harvest (NSW)
.jpg)
Mountains harvest: These are our helpers in our garden. Jean, Jet and Milly in first photo. Milly and Lulu in the second and Dot in the third photo. They are extremely helpful. Us and the neighbours that are looking in our garden, love them helping in the garden. Scratching the soil and leaving blobs of good fertilizer. We love them, they are a good bunch.
.jpg)
.jpg)
Dinah C (NSW)
.jpg)
Dinah C says: These are some of the regular visitors who help us with pest control or soil aeration!
.jpg)
.JPG)
Naomi Green (SA)
.jpg)
Naomi Green says: My beautiful ladies (Buttercup, Marigold, Rose, Tulip, Bluebell and Snowdrop) are always out helping me in the veggie patch. Most the time they are helpful helping aerate the compost heap, picking up the bugs and weeds and sometimes they are a little less helpful stealing my raspberries and tomatoes and eating odd seedlings but I love them and they are worth the missing raspberries.
.jpg)
Sian (QLD)
.jpg)
Sian says: The Foreman, busy at work
Reid Homestead Dream (NSW)
.jpg)
Reid Homestead Dream says: Max spends a lot of time making sure birds, leaves, and cars passing by do claim the backyard and all the plants. It’s only far he is represented.
Two acres and us (NSW)
.jpg)
Two acres and us says: Can you spot the dog?!
Crazy Daisy loves autumn leaves.
Denise (SA)
.JPG)
Denise says: Cooper my Burmese gardening friend testing my patience in my imatiens pot.
Rel (VIC)
.jpg)
Rel says: Luna is great at deadheading the flowers and loves to help dig the vege patch ready for winter planting.
A nap, using her tiger toy for a pillow, is needed after a big morning in the garden. Mum then sneaks back out to repair the damage and get some gardening done!
.jpg)
.jpg)
Simone Baker (TAS)
.jpg)
Simone Baker says: These little girls follow me everywhere in my garden, they love to have bantam dust baths close by where I’m working sharing their dust with me and even wanting to help dig up the dirt for me too, sometimes they are a bit to helpful and need a little shoo away.
Michaela (WA)
.jpg)
Michaela says: Our lovely Buff Silky Rooster Eagle - doing his thing in the garden and White Fluffy about to scratch in the fallen leaves and mulch in our orchard.
.jpg)
Zen (QLD)
.png)
Zen says: Young Masters Hook and Licorice are not only great company in the garden but also very helpful. They assist me with bug control, fertilizing and one of their favorite hobbies - turning mulch (often out of the garden beds, but they are young and still learning the finer points of gardening)
.png)
Tessa (VIC)
.jpg)
Tessa says: Millie, my golden cocker spaniel pup, loves 'helping' in the garden. Digging, weeding, sniffing and keeping me company are ways we enjoy our time in the garden.
.JPG)
.jpg)
Macca (NSW)
.jpg)
Macca says: The best gardening companion that a gardener could have.
Celia Collins (VIC)
.jpg)
Celia Collins says: This boobook owl has been roosting in our Japanese Maple nearly every day for the past 2 months. When we walk under the tree he never flies off but just looks at us quizzically to see what we are up to, every night he takes off, presumably to hunt but is usually back in the same spot the next morning. Of course I am saying 'he' but could very well be 'she'!
Gaily Snaily (NSW)
.jpg)
Gaily Snaily says: Rainbow Lorikeet in the red eucalyptus tree, making alot of noise, letting his presence be known.
Love them in the garden & always in pairs, they are naughtty & nice
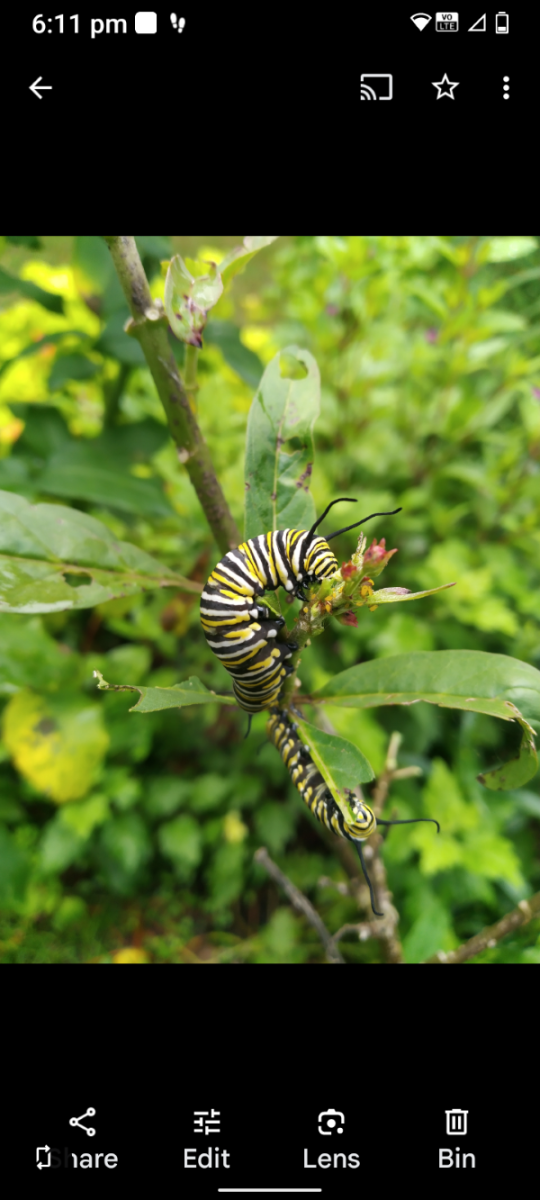
Monarch Butterfly caterpillars 2 on the milk weed. Love having the beautiful cocoons hatching in the garden on other plants never on the same plant they feed from. Butterflies are graceful & busy all the time, love, love them
Thank you for choosing my garden
.jpg)
Fungus'eating ladybird. Helpful insect, adults feed on black mould & other fungi.
Good friend in the garden.
Kez (SA)
Kez says: Pussy cat is Queen Mimi the first . Ike and Tina the lizards ( they argue a lot haha ) and spider boy !! The first one rolls around everywhere and smells the flowers and the other three eat pests . All are welcome
Darren (WA)
.jpg)
Darren says: Missy's favourite thing about our garden is finding the spaces in between - the little dog-sized patches where plants don't grow, or where she's cleared a place for herself. Is there anything better than curling up in the winter sun? We love that she can enjoy these spaces, it makes our garden truly feel part of our home.
Maggie on the other hand is a digger and chewer. Her white fur gives away exactly what she's been up to, and those ears don't quite fit neatly in a pot. You could say she loves the garden more than the garden loves her.
.jpg)
.jpg)
Kristy-Ann (QLD)
.jpg)
Kristy-Ann says: Pleased to see the pest control patrol is on the job. This young butcherbird is demolishing the grasshoppers that eat my plants. He and his buddies, who get black and white uniforms when fully trained (magpies, magpie lark and butcherbirds) are very effective at controlling pests in my garden.
.JPG)
We also have the rainbow lorikeets who like to dine at the birdie bistro and splurge or on nectar cocktails in the surrounding trees, they bring the party to the garden.
And when it's warm, good old Harry can be counted on to be lounging about somewhere. I can him a racing stripe skink because of this awesome line green stripes, but I think he's actually a comb-earred skink. There's been several generations of Harry and Harriet popping their heads out to say hi, whenever it's nice and warm.
.JPG)
Scissorhands (NSW)
.jpg)
Scissorhands says: Zurich the corgi would come for a cuddle but he prefers the comfort of indoor where he can keep an eye on his food.
On the other hand, his bff Q the sheltie is the garden supervisor who likes to micromanage his pawrents. He is often found rolling on the grass and enjoying the ever-changing scent of the seasons.
Dianne (NSW)
.JPG)
Dianne says: 1. Introducing my favourite Garden Buddies! This is a full-grown Dwarf Eastern Green Tree Frog! There must be hundreds of them in various gardens that I planted over the last 7yrs. This one is sitting in a Day Lily, with which they seem to love & have a symbiotic relationship, helping pollinated the flowers &, in turn, get rewarded by catching the pest s that eat the flowers. If you are familiar with Day Lilies, you can see these frogs are tiny! Females can reach a maximum size of 25–30 mm, while males may only reach 20 mm when fully grown!
.JPG)
2. This is 'Tom' who assists (sometimes) being a Garden Helper with 'Mia' but usually can be seen keeping various decorative cane baskets about the place warm & ready for cut flowers I may take inside or just chillin' out conserving his energy being a garden ornament! He also was a Rescue Kitty at the same time of 'Mia', but he had was so thin & dehydrated I didn't think he'd pull through. He's also now 12yrs old.
.JPG)
3. This is 'Mia' surveying all she can see from a high fence post at my new address out of town. 'Mia' is a rescue kitty & was bought to me by the local Ranger as a tiny kitten when he found her in a gutter. I had just lost my old 17yr old cat from an age-related illness, that was the exact same colour!
'Mia' assists me in the garden with constant smooches, distracting me so I don't see her favourite weeds & reminding me it might be time for my cuppa & bikkies for her!
She's been my garden assistant now for 12yrs! You might say 'From Gutter Waif to Gardening Guru'!
Tamara (QLD)
.jpg)
Tamara says: After our dog of 13 years passed away, being in the garden was hard. I missed her faithful companionship as she followed me about. We weren't ready to have another dog, but one day I decided to welcome two gorgeous little bantam chickens to share our world. They are Elsie and Esme and they are everything I could have hoped for. They are the greatest of friends and I love watching them do their chicken thing and cluck softly about. They love a treat and a cuddle, and while they don't replace our beautiful old dog, they do make us smile once more.
.jpg)
.jpg)
Aimee (WA)
.JPG)
Aimee says: These are out pet geese, who reside in a yard of their own beside my vege patch. They also have access to our oak/truffle paddocks, but have their pond and get fed in their own yard. The excess trimmings, cuttings, and outgrown plants etc tend to end up in a pile in their yard to get burnt, by the end of Autumn the pile is huge.
The photos here were taken after the initial burn, when I had put a heap on the pile that was too green to burn....the geese were most interested and spent the next week investigating it and eating what they could - even from the top of the pile!
.JPG)
They are very cheeky - I only managed to harvest about a third of my tomato crop this year because they kept breaking in to the vege patch, till I finally worked out how they were escaping.
Every time I go in there to weed, water etc they line up in a row and watch, waiting for any pecked fruit or greens for a treat.
Marmaduke - the grey goose, thinks he is in charge of the yard - he is always first in line for any vege scraps, but the rest of the white flock aren't shy in fossicking for their share!
.JPG)
Joanne (NSW)
.jpg)
Joanne says: Helpful and bright, and all things nice in mine and my daughter’s gardens.
.jpg)
.jpg)
Dorothy (VIC)
.JPG)
Dorothy says: Kaiser was his name, A very well loved family member. He didn't just dig his bones in the ground he made crateres for them.He was always with me while l was gardening.Passed away 2019 aged 10, still sadly missed..
.JPG)
.JPG)
Tangerlyn (VIC)
.jpg)
Tangerlyn says: After filling my Garden with Salvias of all varieties and colours finally l have created a home for my favourite birds in my Vermont garden, the Spine Bill.
Penny (VIC)
.jpg)
Penny says: Meet our resident ringtail possum "Dale" (the kids named him, not me!)He loves to hang out in our garden, mostly during the late arvo into early evening, and is very friendly. We've made a nestbox for him in one of our larger trees, which he's found comfy and helps him feel protected. Thankfully, Dale leaves the edibles I've planted alone - preferring to eat the callistemon flowers and new growth, as well as eucalypts further down the street. He is a wonderful little gentle friend to have share our area.
.jpg)
Cathryn (VIC)
.jpg)
Cathryn says: Bear and Gina are the guardians of all they survey. Astrid has just begun her idyllic life in the chicken Hilton
.jpg)
.jpg)
Purple Nat (VIC)
.jpg)
Purple Nat says: My little Sydney, she’s my constant companion in the garden.
.jpg)
.jpg)
Cottage garden (NSW)
.jpg)
Cottage garden says: Butters the cat enjoying the tea room, kylo the dog romping on the garden path, bunny staying out of the garden
.jpg)
.jpg)
Lauren C (NSW)
.jpg)
Lauren C says: Mr Hammy, Sabrina, Arabella and Pepper love to hang out in this pot and sunbathe. Sometimes there’s more chickens than soil!
.jpg)
.jpg)
Nature-haven (QLD)
.JPG)
Nature-haven says: Hi
These are some of my garden friends.
When we moved to our home the yard was just grass with no birdlife or insects to find. We've planted masses of flowers, grasses and native plants and now we have so many garden friends such as birds, lizards, insects, frogs and even some Tree Snakes. Here are some of our friends that visit.
A pair of Pale Headed Rosellas visit our garden daily to feast on seeds they find among our many plants and flowers.
.JPG)
A Lesser Wanderer butterfly also loves visiting our garden to find nectar in the many flowers we have.
My last garden friend is one of our resident Little Wattlebirds. A family of three visit our garden each day to splash about in any of our seven birdbaths. They splash around so much that we have to refill the baths everyday. They just seem to love our garden and its Grevilleas and baths. They are a joy to watch.
Thanks.
.JPG)
Jojo (QLD)
.jpg)
Jojo says: Raven and Misty. Raven came to us from a friend as a day-old chick. In her first few hours, our friend rescued her from being trapped inside a hard, sticky egg-membrane. Even with utmost care, some of Raven’s tiny new feathers were stuck into the membrane, so she was a little less-feathered than the others, and the smallest. But she survived the first night, and then thrived. Since then, she has been the most curious, most friendly, most persistent, smartest, and the best layer we have. She is a very naughty chook who gets into everything, but we forgive her! Our dog Misty loved watching the chickens grow up, but Raven fearlessly used to peck at Misty’s hair to see if it was edible! Dear gentle Misty put up with a lot! Now Misty knows Raven isn’t supposed to get into the garden unless we say so, and is keeping a close eye. Misty is a little timid of Raven – now she’s not a chick anymore, but will give her a gentle nudge along if needed. But Raven especially loves the mustard greens here, and will try, and try again!
.jpg)
.jpg)
Newly Budding Green Thumb (WA)
.jpg)
Newly Budding Green Thumb says: This is Gooseberry, the porch cat. He showed up several weeks ago and has been helping supervise while we do our spring planting. His only request is that we take frequent breaks to give him pets and attention. He loves to roll around in the grass next to my raised planters.
.jpg)
.jpg)
Jen (NSW)
.jpg)
Jen says:
There’s a little group of ladybugs in my garden I’ve come to think of as The Dotsquad. They spread out across the plants, especially around the roses and kale, where aphids like to sneak in. The ladybugs aren’t flashy about it, just going about their work, keeping the garden in balance without much fuss.
.JPG)
They’re not perfect, of course. Sometimes they disappear for a bit, and I’ll catch them napping in flower petals or tucked into shady corners. But I like that about them. They do what they need to, in their own time, and the garden is healthier for it.
It’s become a small habit now, checking that branch in the morning to see if they’re still there, tucked in like a little community. It’s a quiet kind of joy.
.JPG)
Preventing Pests and Diseases
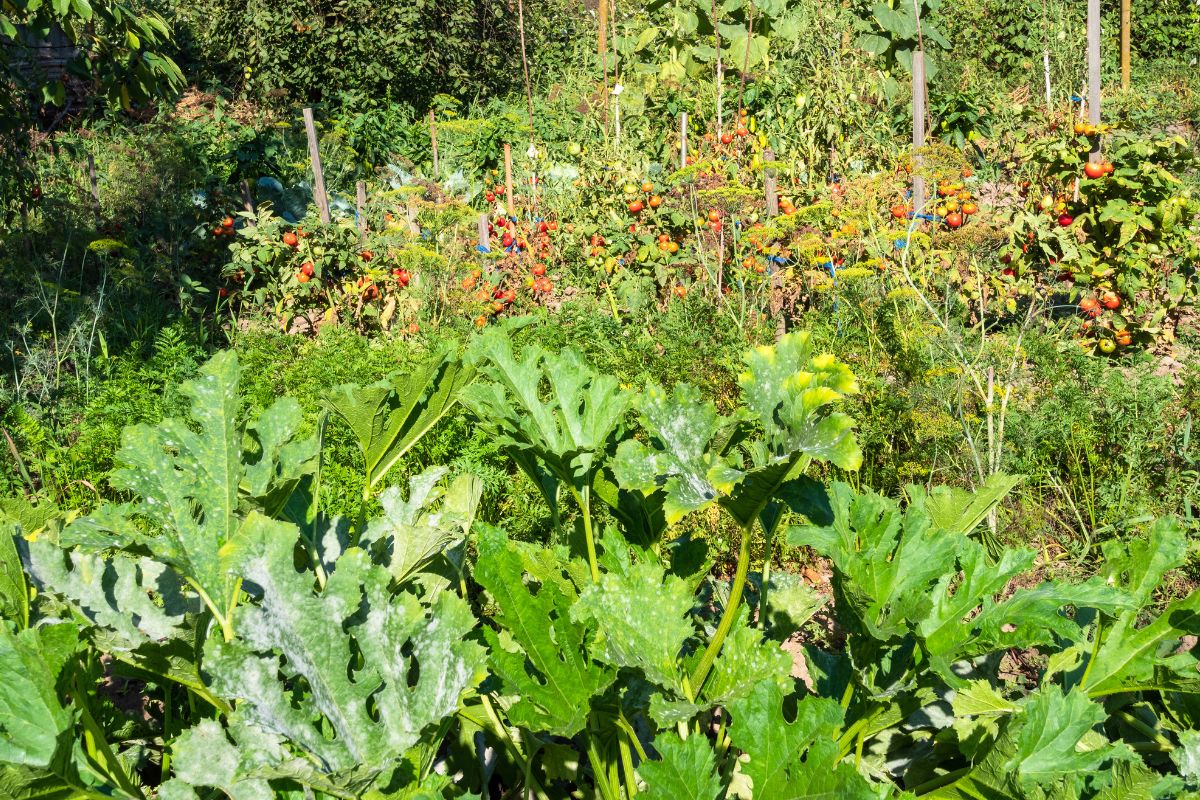
One of the most compelling reasons to remove declining plants is to actively prevent the spread of pests and diseases. Plants that are nearing the end of their natural life often experience stress, which can weaken their defences and make them more susceptible to various issues. These weakened plants can then become attractive breeding grounds and readily available food sources for unwanted pests. For instance, a tomato plant that has finished its productive phase, characterised by yellowing leaves and a decline in fruit production, might attract aphids, whiteflies, or other common garden pests. These pests can then easily migrate to healthier plants in the vicinity, causing further damage and potentially impacting the overall health of the garden.
Similarly, plants that are in decline are often more vulnerable to fungal diseases. For instance, powdery mildew, a common fungal disease, especially during periods of high humidity, can readily colonise stressed plants. This disease, recognisable by its white, dusty coating on the leaves, can rapidly spread to other susceptible plants, including cucumbers, zucchini, and pumpkins. Promptly removing the affected plant helps to contain the problem and protect other healthy crops from infection.
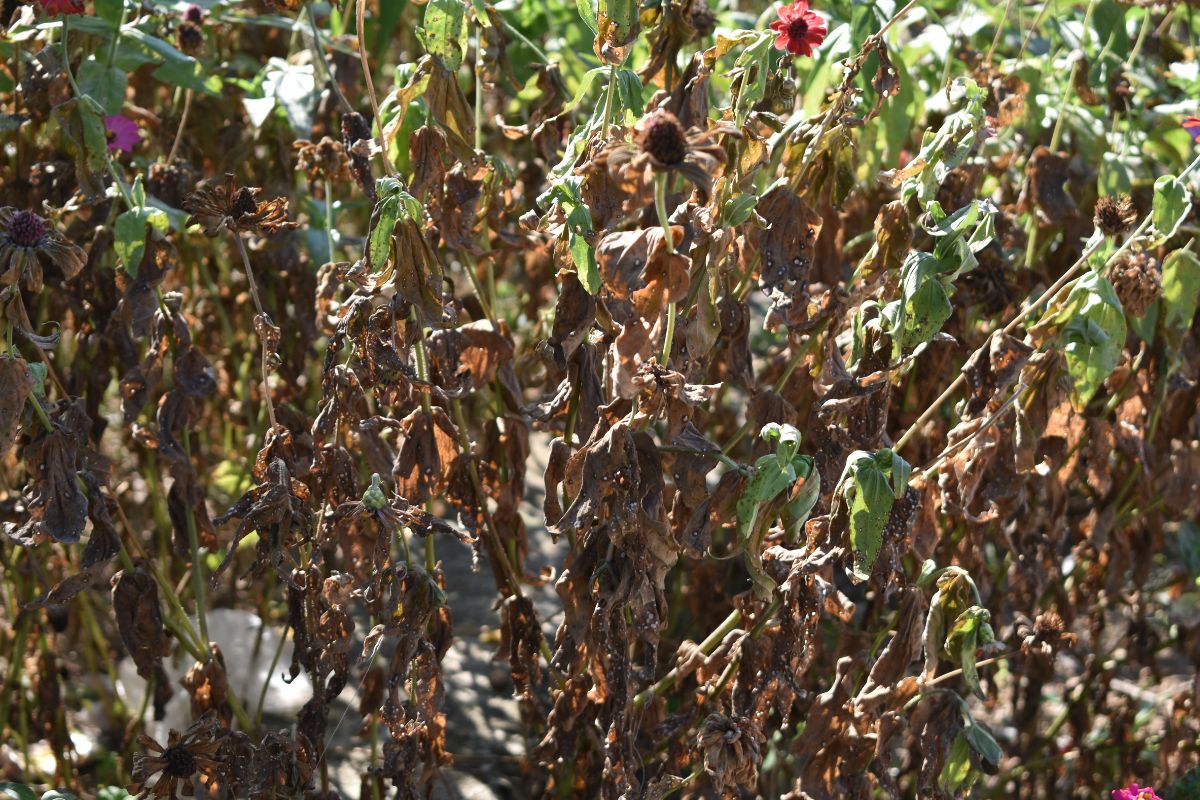
Enhancing Visual Appeal
Beyond the crucial aspect of plant health, removing spent plants offers a tangible improvement to the visual appeal of a garden. A garden that is filled with plants exhibiting yellowing foliage, a straggly appearance, or signs of decay can detract significantly from the overall beauty of the outdoor space. The removal of these tired elements can instantly rejuvenate the look of garden beds, creating a more visually pleasing environment. Consider annual flowers that have passed their peak; while they may have once provided a burst of vibrant colour, they often become leggy and produce only a few sparse blooms as they near the end of their life cycle.
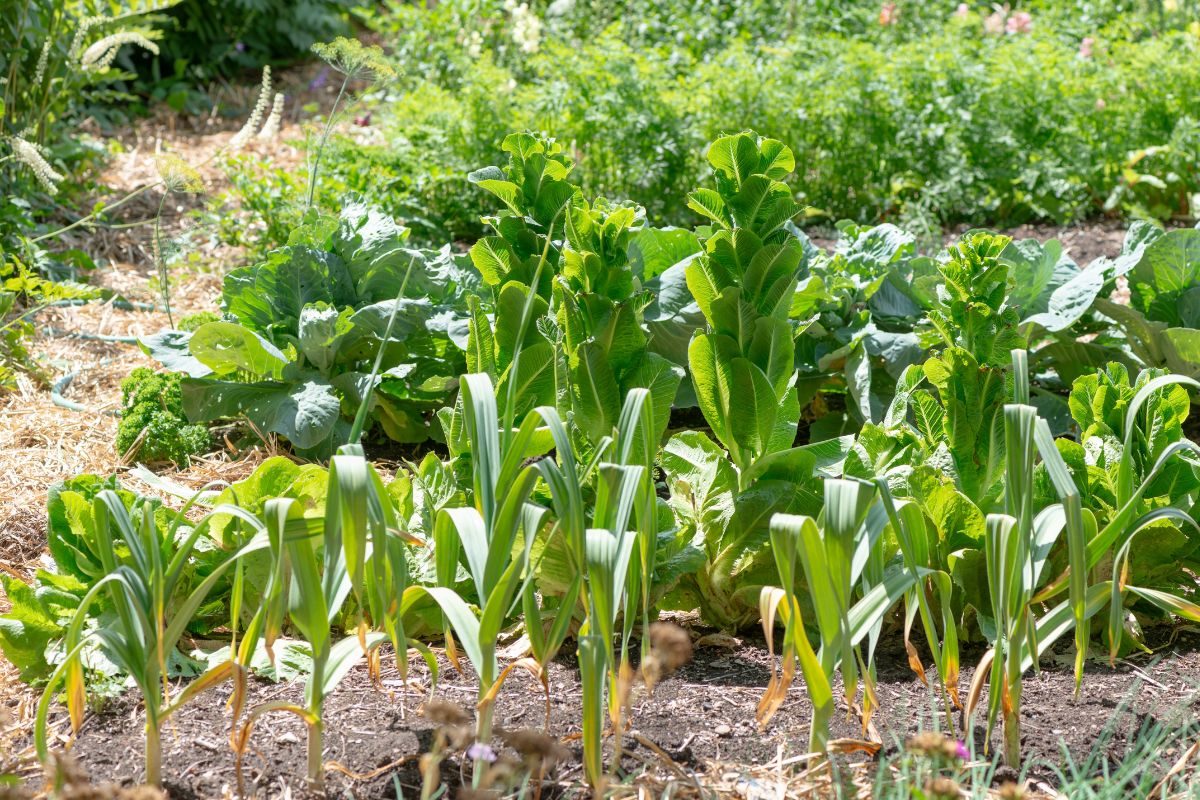
Maximising Garden Productivity by Making Room for New Plants
Removing plants that are past their best is also crucial for making room for new, more productive plants. Every garden has limited space and allowing tired or unproductive plants to remain prevents you from growing new crops. For example, once a vegetable plant like a tomato or cucumber has finished producing its harvest or is succumbing to disease like mildew, it continues to occupy valuable space and resources. By removing these spent plants, you create opportunities to sow new seeds or plant seedlings that are in their prime, ensuring a continuous cycle of growth and harvest throughout the gardening year. This practice allows you to maximise the productivity of your garden and enjoy a greater variety of plants.
Improving Airflow and Sunlight
Dense, dying, or unproductive foliage can also impede crucial airflow and block sunlight from reaching healthy plants growing beneath. Restricted airflow can lead to increased humidity around plants, creating an environment conducive to the development of fungal diseases. By removing old, overcrowded plants, gardeners can significantly improve both air circulation and the amount of light that reaches the remaining healthy plants, fostering a more favourable environment for them to thrive.
Preventing Self-Seeding
Managing plant propagation is another important consideration in maintaining a well-kept garden. While the self-seeding of certain annual flowers can be a welcome occurrence, other plants that are past their prime may release seeds that the gardener does not necessarily want spreading throughout the garden. Removing these plants before they reach full seed maturity can help gardeners retain control over what grows in their garden beds and prevent the emergence of unwanted seedlings in unexpected locations. This proactive approach to managing self-seeding contributes to a more organised and intentional garden design.
Enhancing Soil Health
The act of removing a plant that has reached the end of its productive life presents an excellent opportunity to enhance the soil for future plantings. After removing the old plant, consider incorporating compost or well-rotted manure into the soil. This practice helps to replenish essential nutrients that may have been depleted by the previous plant, improving the overall fertility and structure of the soil for subsequent growth. Furthermore, if the removed plant exhibited signs of disease, it is generally advisable to avoid planting the same type of plant in the same location for a certain period. This precaution helps to reduce the risk of soil-borne diseases persisting and affecting new plants. Implementing crop rotation practices can also further minimise the potential for disease buildup in the soil over time.
Common Examples
Consider these common scenarios in a garden to further illustrate the benefits of removing spent plants:
- The Tired Tomato Plant: After several months of producing delicious tomatoes, the plant may begin to look exhausted, with yellowing leaves and minimal fruit production. At this stage, it has likely reached the end of its natural life cycle and is best removed to make room for a new round of planting.
- The Mildew-Covered Cucumber: As previously mentioned, powdery mildew is a frequent issue on cucumber plants. Removing the affected plant promptly is essential to prevent the fungal disease from spreading to other plants in the garden.
- The Straggly Annual Flower: That petunia or zinnia that once provided a vibrant splash of colour may now appear tired and produce very few flowers. Pulling it out will create space for planting fresh, vibrant annuals for the next season, ensuring a continuous display of blooms.
- Bolted Vegetables: Vegetables such as lettuce and spinach tend to "bolt," sending up a flower stalk, in warmer weather conditions. Once this occurs, the leaves become bitter and less palatable. It is best to remove these bolted plants to make space for new sowings of more desirable crops.
While it may evoke a touch of melancholy to bid farewell to a plant that has been cared for, it is important to recognise that removing plants past their prime is an indispensable element of the natural gardening cycle. It is an act of responsible garden management that contributes significantly to preventing pest and disease outbreaks, enhancing the aesthetic appeal of the garden, maximising productivity by freeing up space, and ensuring the ongoing health of your garden. Gardeners should not hesitate to respectfully remove tired plants, making way for new life and the promise of vibrant growth in their patch.
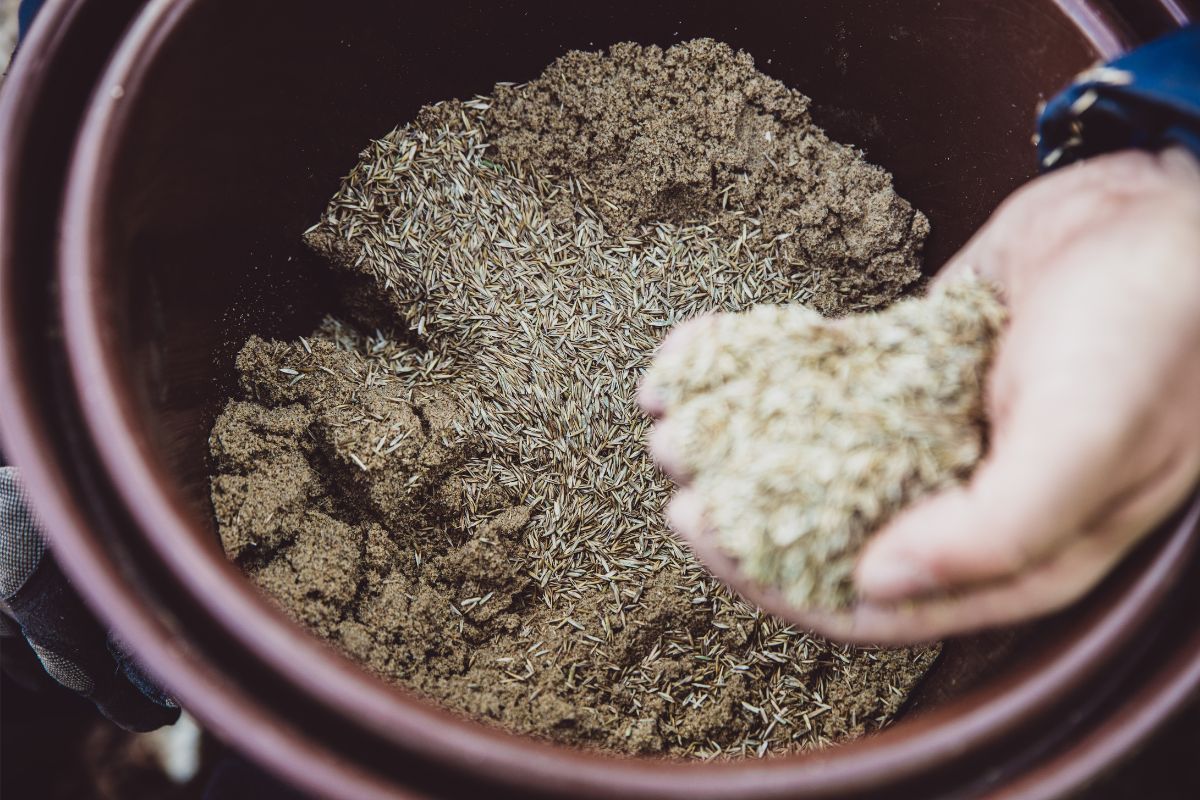
Fortunately, there's a simple, effective, and inexpensive solution: mixing your seeds with sand before sowing. This technique uses sand as a bulking agent, making seeds easier to handle and distribute evenly, whether you're dealing with minuscule seeds or covering broad areas.
This article will explain why sand mixing works so well, guide you on choosing the right sand (and what to avoid), suggest mixing ratios, and provide practical steps for using this method effectively.
Why Mix Seeds with Sand?
Mixing seeds with sand increases the volume you're working with, making a small quantity of seed easier to handle and distribute evenly across the soil. This simple principle offers significant benefits in two common scenarios.
Handling Tiny Seeds
Seeds like poppies, foxgloves, petunias, lobelia, oregano, thyme and mint can be incredibly small. This presents several challenges:
- Handling Difficulty: They are hard to pick up and easily lost.
- Over-sowing: It's easy to sow them too thickly, leading to crowded seedlings competing for resources.
- Waste and Thinning: Overcrowding wastes seed and requires careful thinning, which can damage the remaining seedlings' roots.
Mixing these tiny seeds with sand makes the mixture easier to grasp and sprinkle thinly. The sand separates the seeds, promoting better spacing from the start. Lighter coloured sand also provides a visual guide against darker soil, helping you see where you've sown.
Even Coverage for Large Areas (Broadcasting)
Achieving even seed distribution when establishing a wildflower meadow, sowing a lawn, or planting larger crops can be difficult. Hand scattering or using spreaders often results in uneven patches.
Mixing seed with sand adds bulk and weight, regulating flow from spreaders and making hand broadcasting more controlled and uniform. Dividing the mix in half and applying it in perpendicular passes (e.g., North-South, then East-West) further improves evenness.
The sand's visibility helps track coverage, and its weight helps seeds settle onto the soil, resisting wind drift and improving crucial seed-to-soil contact for germination.
Choosing Your Sand Wisely (and What to Avoid)
The goal is to use a sand that provides bulk and separation for easier sowing, without creating problems like compaction right around the seed.
Recommended Types:
- Horticultural Sand: Specifically processed for garden use, it's gritty, washed, graded, and often lime-free (pH neutral), making it a safe choice. Find it at garden centres and nurseries.
- Builder's Sand (Coarse): A common, economical option from hardware stores and building suppliers. Ensure it's coarse (sometimes called concrete sand), not the fine sand used for bricklaying mortar. Coarse builder's sand can contain silica dust, so consider wearing a mask if handling large dry quantities.
- Coarse Sand / Grit: These terms refer to sand with larger, angular particles. The angular shape helps prevent the particles from packing too tightly immediately around the seed. Available at building suppliers or landscape yards.
Whichever sand type you choose it's import to make sure it's washed and free from fine silt, clay, salts, weed seeds or other contaminants. Horticultural and concrete sand are usually washed so are usually the best choice.
Sand to AVOID:
Play Sand / Sandbox Sand / Fine Sand: Do not use this for mixing with seeds. The particles are very small and often rounded. When wet, they pack together tightly, creating a dense, airless environment right around the seed that hinders germination and root growth – the opposite of what's needed.
Alternatives to Sand
If suitable coarse sand isn't available, other fine, inert, or organic materials can serve as carriers:
- Vermiculite: Lightweight, holds moisture and air well, good for tiny seeds.
- Perlite: Primarily adds aeration.
- Fine, Sieved Compost or Seed Raising Mix: Can add nutrients, but must be fine, free-flowing, and weed-free. Both are best used dry.
The principle remains the same: add bulk for easier, more even distribution without negatively impacting germination.
Getting the Mix Right: Sand-to-Seed Ratios
There's no single perfect ratio; it depends on seed size, area size, sowing method, and personal preference. Feel free to experiment!
As a starting point, for handling tiny seeds, a ratio of 1 part seed to 4-10 parts sand (by volume) is recommeded. Some gardeners use a simple pinch of seed to a tablespoon of sand for small quantities. This dilution makes handling easier and promotes better spacing.
For broadcasting over large areas, a higher proportion of sand is typically used to add sufficient bulk for even spreading. Ratios anywhere from 1 part seed to 5 parts sand, up to 1:20, are common. The key is to add enough carrier material to allow for controlled distribution by hand or spreader.
A higher sand ratio (e.g., 1:20) results in a more diluted mix, making it easier to achieve sparse sowing. A lower ratio (e.g., 1:2) gives a more concentrated mix. Adjust to suit your specific needs.
Simple Steps for Mixing and Sowing
- Prepare Your Soil: Ensure the area is weed-free. Loosen the soil and rake to a fine, level tilth. Remove large debris. Lightly pre-watering helps seeds stick.
- Ensure Sand is (Mostly) Dry: Dry or slightly damp sand flows best, especially for spreaders. Slightly damp sand can help seeds adhere for hand broadcasting but avoid wet, clumping sand.
- Mix Seed and Sand Thoroughly:
- Small quantities: Use a clean jar, bowl, or simply add the sand to the seed packet. An old spice shaker works well as an applicator.
- Larger quantities: Use a clean bucket, tub, or wheelbarrow. Mix well by hand (use gloves if desired) or with a trowel. For very large areas, mix with a shovel on a clean tarp.
- Scatter the Mixture Evenly:
- Hand Broadcasting: Use a consistent, sweeping motion. Walk systematically. Use the perpendicular pass method for large areas. Practice with just sand if unsure.
- Using a Shaker: Gently shake over drills or seed trays.
- Pinch and Sprinkle: For very small sowings simply pinching and sprinkling seeds is also an effective method.
- Using a Mechanical Spreader: Calibrate first according to instructions, starting with the smallest setting and testing on a tarp. Walk at a steady pace.
- Cover Lightly & Ensure Seed-to-Soil Contact: Crucial for moisture uptake.
- Gently rake soil over seeds. Aim for a covering depth similar to the seed's diameter – tiny seeds need very little or no cover. Pressing them firmly onto the soil might suffice.
- Alternatively, sift a fine layer of compost, seed mix, or more sand over the area.
- Gently firm the soil using a rake, or your hands.
- Water Gently: Use a fine spray immediately after sowing. A watering can with a fine rose or a hose on a mist setting is ideal. Keep the area consistently moist until seedlings establish.
***
Mixing seeds with sand is a simple, low-cost way to overcome the challenges of handling tiny seeds and broadcasting evenly over large areas. Sand acts as a carrier, improving distribution and spacing, which reduces thinning, saves seed, and leads to healthier plants. It’s a straightforward technique that can significantly improve your sowing success and might just become a regular part of your gardening routine.
.jpg)
And now, we're excited to announce the winner of the $100 store credit: Elina Skliarenko from Victoria!
Elina's winning entry, "Bug Snug" really impressed us. Her idea of building a simple shelter using natural materials like bark, pinecones, and sticks to attract helpful bugs is a fantastic way to support a healthy garden ecosystem. Congratulations, Elina!
Read on below to see all the other great tips and tricks that were submitted – you might just find your next brilliant gardening idea!
***
Genevieve Locke (WA)
.jpg)
Genevieve says: Sewing seeds in toilet roll tubes. This is a great way to sew seedlings that don't like their roots to disturbed eg Zinnia and Sweet Peas and also stops your seedlings disappearing when you plant out due to critters in the soil eg cut worm which bites the seedling off at the base. Make 4 even slits half an inch at one end then fold over like the lid of a box. Once seeds have sprouted you can open the bottom or just leave if roots are coming through. Plant the tubes leaving them half a inch above the soil. The rolls will breakdown. I keep mine in recycled meat trays packed in fairly tight so they stand up and water from the bottom. Keep watch for drying out in hot weather as the cardboard draws the moisture
.jpg)
.jpg)
Genevieve says: Saving seed from your favourite zinnias so they come out with same flower from previous year.
Place organza bags (buy from $2 shop or similar)over the bud before it opens. Zinnias can self pollinate. This method stops bees from pollinating the flower and changing its colour. Once the flower has dried up and changed to a crunchy brown pull the flower apart. I use a pair of long tweezers. The seeds should be hard . If you hold the seed between thumb and forefinger and press the seed should be stiff and not bend. I have had some amazing success and some disappointments where some did not pollinate but about 85%.
The lime and pink zinnia flower came from a bee pollinated zinnia 2yrs ago and this is the first one this yr from this method of saving seed. I got about 50 seeds from this plant
Rocket (VIC)
.jpg)
Genevieve says: I line a tray with plastic then place punnets in the tray and fill with water. This keeps your seedlings moist even in very hot weather for several days and saves watering time and frequently checking moisture.
Linda (TAS)
.png)
Linda says: Possum Scarer; From a couple of garbage bags, rags, fishing line and 3 sticks I made a Tassie Devil that can be pushed into the grass in my back yard or clamped to the rails on my front deck. It moves in the wind from side to side and scares the possums away
Mickey Vee (WA)
.jpg)
.jpg)
.jpg)
Mickey says:
A cracking idea!
An Egg-cellent Way to Keep Snails at Bay!
Looking for a cheap and eco-friendly way to protect your plants from snails? Save your eggshells!
Here’s how:
Pop the empty eggshells into your air fryer for 3 minutes to dry them out.
Once cool, crush them using a mortar and pestle into a fine, gritty texture.
Sprinkle the crushed shells around the base of your seedlings and garden plants.
The sharp edges deter snails and slugs without the need for harmful chemicals - plus, eggshells add calcium to your soil over time.
Great for your garden and the environment!
Tanya Afams (SA)
.jpg)
Tanya says: Rainwater tank keyhole garden.
.jpg)
Tanya says: Instead of having a crane lift out our old tanks, I drew up this design. 2 keyhole gardens from one tank. Top two rings are the main frame with a small piece cut for entry and flipped to become the middle. The bottom ring becomes the side walls of the key. Huge success on our clay soil. Now have a more friable soil in the tanks.
.jpg)
.jpg)
Tanya says: Very happy with these time saving raised seedling boxes I designed. Drew out the plan, put the frame together and hubby banged them up. I put them on an old welded frame so just at waist height.
Punnets and seedling pots dry out so fast. With the deeper soil in the boxes, allows soil to remain moist longer. I drilled holes in the wood to accommodate the arch protective netting tunnel so seedlings get a great start.
Paris (NSW)
.jpg)
Paris says: This is my budget seed raising set up, which sits on the verandah. I use old egg cartons and shells to plant the seedlings in
.jpg)
Paris says: When they’re ready I can place the egg or cut the square containing the sprout off and add to the bed where I want without risk of damaging the delicate roots. My ‘Greenhouse’ is a broken overturned clear storage bucket on a piece of corflute.
.jpg)
Paris says: I also have a small indoor version using only egg shells sitting in a clear egg storage container with a lid that I got for about $5 from Bunnings.
Sara (NSW)
.jpg)
Sara says: Make the birds in your garden your friends. I always leave a tasty treat or two uncovered for my Birdy friends to enjoy. They repay me 100 fold by catching endless caterpillars, grasshoppers and other pests. They never touch the harvest. The most effective hunters in my garden are the noisy miners and the butcher birds. We have families living and breeding in our yard. I could watch them all day long.
Angie Trewhella (WA)
.jpg)
Sara says: Beer in a shallow dish is the best slug trap there is! They prefer getting sloshed to eating my produce and the birds seem to enjoy a marinated treat!
Plant Addict (VIC)
.jpg)
Plant Addict says: Old shower caps make fabulous covers to stop drips in hanging baskets that don’t have plastic liners. If the elastic is too blown then a couple of stainless steel pegs work wonders. The colourful caps look great too!
Cas Jsa (QLD)
.jpg)
Cas says: Rat and Cat Deterrent, sometimes even possums. This tip has saved my corn and other vegies and fruits. Get a small container, either plastic or a small bottle with a tin lid. Punch a few holes in the lid. Fill the container half full of Citronella and put the lid back on. Sit the container in the middle of your garden or on top of the soil in a pot. Rats, mice, cats, and possums HATE the smell and will leave your crops alone. You can see here I've just planted pole beans and I have a tiny plastic container in the middle of the garden that is half full of citronella.
Elina Skliarenko (VIC)
This months winner!
.png)
Elina says:
"Bug Snug" – Creating a Cozy Haven for Beneficial Insects
To maintain a natural balance in the garden, it’s important to attract not only pollinators but also predatory insects that help control pests. That’s why I create "Bug Snug"—a cozy refuge where insects can live, breed, and overwinter.
A Bug Snug is not just a pile of twigs; it’s a true natural shelter where every creature can find its perfect hiding spot. It contains everything they need—bark with tiny crevices, pinecones, sticks, small logs with cracks where beetles love to hide, and even straw for extra comfort.
How to Make a Bug Snug
Creating a cozy corner for insects is easier than you think:
Build the frame. Take three (or more) long sticks—bamboo, hazel, or even eucalyptus will work. I used bamboo sticks and tied them together at the top to form a sturdy tipi. This serves as the foundation for the entire structure.
Secure it in the ground. Push the bottom ends of the sticks into the soil so the structure stands firm and steady.
Add natural filling. I carefully collect and arrange pieces of wood, dry leaves, wood chips, pinecones, straw, bark, and small branches to create a warm and safe home for insects and other garden creatures.
Welcome new residents. Now, I love watching as ladybugs, beetles, spiders, and even small lizards make their home in these cozy hideouts. The Bug Snug comes to life, filled with rustling sounds, tiny movements, and the vibrant pulse of nature itself.
A Bug Snug is not just a charming addition to the garden; it’s a vital part of the ecosystem. By creating these shelters, we support nature, reduce organic waste, and promote healthy soil.
.jpg)
Elina says:
Green Manure – Nature’s Way to Enrich the Soil
To keep my soil fertile and full of life, I actively use green manure—plants grown specifically to improve soil structure, enrich it with organic matter, and suppress weeds.
How I Do It:
After harvesting, I sow fast-growing green manure plants such as mustard, phacelia, clover, or lupine in my garden beds.
When they grow tall, I don’t remove them completely; instead, I cut them down and leave them as mulch on the surface or gently incorporate them into the soil to break down and enrich it.
Mustard helps cleanse the soil of pathogens, phacelia improves soil structure, and clover fixes nitrogen, making it available for future crops.
In autumn, I plant winter green manure crops such as rye or vetch, which protect the soil from erosion and, in early spring, become a rich natural fertilizer.
Thanks to green manure, my soil remains loose, fertile, and full of life, allowing me to grow abundant harvests without chemical fertilizers.
.jpg)
Elina says: Nurturing the Soil Microbiome – Healthy Soil Without Chemicals
The secret to a thriving garden is not just good soil—it’s the invisible life within it: bacteria, fungi, and other microorganisms. Instead of simply feeding my plants, I focus on developing a healthy soil microbiome.
What I Do:
• I regularly use microbial inoculants like Popul8 and GOGO Juice, which contain beneficial bacteria and fungi that enhance soil structure.
• I apply Trichoderma and Bacillus subtilis, which suppress harmful pathogens and help plant roots absorb nutrients more efficiently.
• I cover the soil with mulch (straw, grass clippings, wood chips) to create the perfect environment for beneficial microbes to thrive.
• I avoid tilling the soil, preserving the natural relationships between fungi and plant roots.
With this approach, my plants become more resistant to diseases and drought, while my soil grows richer, healthier, and more fertile every year.
Heidi (VIC)
.jpg)
.jpg)
Heidi says: Full cycle - recycle - pea cycle
Growing sweet peas and eating peas such as sugar snap and snow peas are rewarding crops. After their final harvest I pull out the spent plants and store them in a tub over summer where they dry out. Then in autumn, when I have planted the collected seed and other winter veggies, I use my organic homemade pea straw mulch to keep the soil warm.
Moonie (NSW)
.jpg)
Moonie says: Grow snail and slug vulnerable flower seedlings in a pot then move pot into the flower border.
.jpg)
Moonie says: Protect snail and slug vulnerable seedlings in a cloche made from old plastic bottles. Compare size of unprotected versus protected bok choy.
.jpg)
Moonie says: Lazy seed-raising method for time-poor gardeners using coriander (which enjoys simple direct sowing). Clear and prepare a bed, scatter seed, muss into soil with hands. Let nature do the rest.
Zane B (WA)
.jpg)
Zane says: When planting several varieties of seeds in pots, it is so easy to forget which pots have which seeds. But I found an easy way to tell. I line up a row of pots of one variety and make a marker flag for the start of that row, and I don't have to buy anything special to do it. Whenever I cook skewers of meat on the barbie, I save the used skewers after dinner and rinse them off. Then, when it is seed planting time, I take one of the skewers, cut off the top of a seed packet from the Seed Collection with the name on it, tape it to the skewer, and voila! I little flag to identify what's planted. Here you can see the one I've made for the Broccoli - Green Sprouting Calabrese seeds.
Jen (NSW)
.png)
Jen says: If birds keep stealing your strawberries before you can pick them, try placing a few small red-painted rocks around the plants before the berries ripen. Birds will peck at the rocks, thinking they're real fruit, then lose interest when nothing happens. It’s a simple way to protect your harvest without using nets or scare tactics.
]]>Thank you to everyone who took the time to share their hard work and the fruits (and vegetables, and herbs, and flowers!) of their labour. We've been so impressed by the variety and dedication on display, and we hope you enjoy browsing through this collection of wonderful harvests as much as we have. Get ready to feel inspired and perhaps even a little hungry!
Stay tuned for more exciting competitions and opportunities to share your gardening journey with our community! Happy gardening!
***
The Seed Bomber (VIC)
.jpg)
The Seed Bomber says: A pot full of heartsease with their canine guardian in the background. While he does do a good job chasing away birds that dig up our pots, he has also developed a taste for young pansy leaves and flowers!
.jpg)
The Seed Bomber says: Sweet basil grew in abundance this year.
.jpg)
The Seed Bomber says: Tomatoes were not nearly as plentiful but we got a few kilos of the cherry variety.
Syberia (NSW)
.jpg)
Syberia says: Accidental sweet potatoes, thought we had harvested them all but apparently not.
.jpg)
Syberia says: A massive harvest of a volunteer tomato plant that grew in my sidewall. I had a very happy 7 year old whom devoured all of them in 3 days
.jpg)
Syberia says: Small harvest after going away. We were very happy with our Small abundance. The chillies are Scotch bonnet and Jalapenos.
Toni Porter (TAS)
.jpg)
Toni says: My dining table full of beautiful colour- Tomatoes in various stages of ripening (I pick them as soon as they get a hint of colour and they ripen beautifully inside, to avoid pests), Zinnias which I grew for the first time this year, and Tasmanian Pepperberry, drying in a bowl - I use the leaves and berries for cooking tea
.jpg)
Toni says: Cafe au Lait Dahlias and Jude the Obscure Roses looking beautiful together. I get many flushes these over many weeks. My very favourite Rose and Dahlia compliment each other so well!
Anke Anna (NSW)
.jpg)
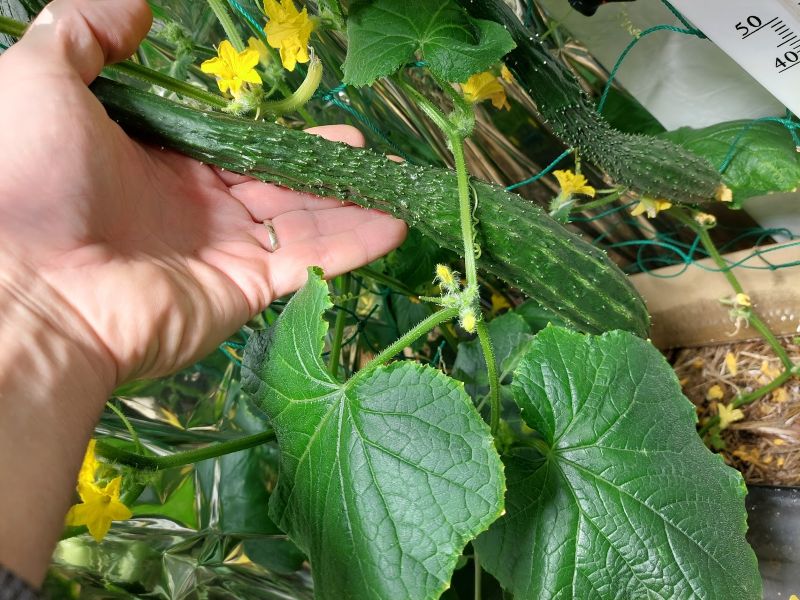
Anke says: Cucumbers taking over my washing line
.jpg)
Anke says: Scarlet Runner Beans with first bean harvest
.jpg)
Anke says: Tamarillos, still growing
Elina Skliarenko (VIC)
.jpg)
Elina says: Summer painted the garden beds, weaving bright colors and fragrances together.
In my palms, warm from the sun, rest the first apples—most cherished, crisp, and juicy. Their scent awakens childhood memories, of grandmother’s apple orchards where each fruit was a sweet secret hidden among the green leaves.
The cucumbers, rough and crunchy, still hold the coolness of the morning dew. They are like tiny forest hedgehogs, curled up among the tangled vines. The eggplant, smooth and mysteriously dark, hides beneath the foliage—a drop of night in this radiant, sunlit world. Tomatoes have soaked up the summer’s sweetness, and strawberries gleam like scattered rubies, luring with their sugary promise.
And among this abundance—flowers. As if they have gathered all the shades of summer: sunlit yellow, fiery red, deep crimson. Their petals tremble in the gentle breeze, weaving the garden’s fragrance into the morning air.
I gathered all this richness into one bouquet—summer cradled in my hands. Not just a harvest, but a symphony of nature, where every fruit and every flower is a note in the great melody of life. This morning will stay with me—the scent of fresh apples, the cool touch of cucumbers, and the silky whisper of flower petals.
.jpg)
Elina says: The plums have ripened in the garden. They hang in heavy clusters on the branches, warm from the sun, their deep purple skin hiding juicy, golden flesh within. A single touch, and it feels as if they are ready to tumble right into your hands.
Their taste is like childhood—like carefree summer days, like a gentle breeze in the shade of the trees. There is something magical about them, as if each plum carries a little piece of the sun’s golden smile.
.jpg)
Elina says: I stepped into the garden barefoot, letting the cool grass gently embrace my feet. The night’s dew had yet to dry, and the morning sun was just beginning to spill its golden light, awakening the garden. The air was filled with the scent of fresh greenery, blooming herbs, and damp earth—pure, alive, infused with the breath of summer.
I didn’t take a basket. Instead, I simply gathered the hem of my shirt and filled it with the morning’s harvest—just as I used to in childhood. A young zucchini, bumpy cucumbers still cool and rough to the touch, a sun-kissed pattypan squash, tomatoes the color of deep amber… All of it—fruits of care, warm days, raindrops, and the gentle touch of nature.
Tamara (QLD)
.jpg)
Tamara says: After a tough day at work, I found so much joy just wandering around the garden collecting these beautiful little blooms. It was a gentle reminder of how healing nature can be.... zinnia, cosmos and dahlia...
.jpg)
Tamara says: The colour!!
Ry duncan (NSW)
.jpg)
Ry says: Over 3kg of cucumbers! With more still on the two plants!
.jpg)
Cass (QLD)
.jpg)
Cass says: Little Miss Avery helping to harvest our bumper crop of Dutch cream potatoes in our plot at the community gardens. They were so tasty roasted, mashed and added to soup.
.jpg)
Cass says: Carrots grown in a raised bed at home. Ready for washing and cooking. - destined for the soup pot. I experimented with three different varieties of carrots and chantenay was a clear winner!
.jpg)
Cass says: Had a pretty good crop of button squash this season. Not sure how they ended up stripy, I was only expecting yellow ones - cross pollination maybe? They are very pretty looking and taste fabulous in stir fries.
Reid Homestead Dream (NSW/ACT)
.jpg)
Reid says: Tomatomania! I have Cherry, Siberian, Tri star, Burnley sure crop and of cause Roma.
.jpg)
Reid says: The joy and satisfaction of plating up food you grew from seed is next level living. Early White Spanish onions, Nicola potatoes (very high yield), Every Season carrots and, Waltham butternut pumpkin. Mmmmm
.jpg)
Reid says: Just after a wander around the garden. Still bringing in tomatoes ( Cherry, Tri Star, Burnley, Siberian and, Roma) along with Utah celery, Sweet basil and, Triple Curled parsley. So much joy.
Kiara (TAS)
.jpg)
Kiara says: In this photo you're seeing a harvest from our little backyard garden. I'm a mum of two girls, aged 6 and 9 years old. We love spending time in the garden together, and my girls have helped to plant and harvest much of this produce. Here we have some Detroit beetroot, silverbeet, sprouting broccoli, kale, pineapple sage and others. My favourite part of gardening is watching my daughter's enjoy the harvest. They will go outside and, pick and eat tomatoes, lettuce, herbs straight from the garden.
Gloria M (QLD)
.jpg)
Gloria says: Flowers that delight me.
.jpg)
Gloria says: Beautiful hibiscus
.jpg)
Gloria says: Jade in all its glory
Leah Fitzmaurice (WA)
.jpg)
Leah says: Returning from an 18 day trip is always a nervous time for a gardener! Is anything still alive?
My gardens welcome home gift basket shown here.
.jpg)
Leah says: Our favourite game is hunting for "baby" pumpkins and getting excited as they turn into "big daddy" pumpkins. (Yes I know, it's a squash - but to my 3 year old everything is pumpkin!)
.jpg)
Leah says: What does 100 chillies look like? Shame the toddler can't handle spice, darn.
Nina (NSW)
This months winner!
.jpg)
Nina says: An early morning pick for my bouquet…some peachy zinnias, a few varieties of celosia and a pop of white and purple gomphrenas!
My first season growing flowers with intention, decided to start with these ‘easy to grow’ varieties, they all had fantastic germination and grew so well! Will definitely be adding more to my collection next season!
.jpg)
Nina says: A dried flower wreath made from a mix of statice, strawflowers, yarrow, globe amaranth and my absolute favourite, flamingo feather celosia!
I started growing flowers in earnest in 2024, with a lean toward varieties that are gorgeous both fresh and dried.
Dried flowers, like statice, are so nostalgic for me.
.jpg)
Nina says: Peach ‘Zinderella’ Zinnia
Caustin (WA)
.jpg)
Caustin says: I grow enough veggies for my partner and myself and plenty to take along to our local Saturday morning food swap. This is just some of the produce I snapped early one morning so I could put it on our local Facebook page to remind people that it was on.
I love my veggie garden…. I chat to the plants every morning while harvesting them.
.jpg)
Caustin says: I have had great success growing lovely capsicums. This one was a beauty. My plants overwintered and started producing early. What a bonus!
.jpg)
Caustin says: I put shade cloth over the veggie garden each summer. It really helps them deal with the heat. It cost a few hundred dollars to set up but is really worth it.
Pippy (SA)
.jpg)
Pippy says: I planted two small banana plants in my suburban Adelaide backyard. I wanted the leaves to steam foods in and never thought we would every see the fruit.They have gone bananas. We now have two large hands of bananas and they are delicious. We have used the leaves for steaming, the bananas in smoothies,cakes and snacking on, also the inner stem of the plant in our stir fries and curries. What a diverse plant. We love it.
AMO (NSW)
.JPG)
AMO says: These pumpkins are the result of burying kitchen scraps into my raised garden bed instead of composting as I usually do.
Experimenting & Second Chance Successes (SA)
.jpg)
Experimenting & Second Chance Successes says: Autumn harvest with the last of the cherry tomatoes (Cosmic purple), yellow and red Californian Wonder Capsicums, Long Yellow Mild Banana Peppers, Serrano Chillies, Caysan Chillies, Manganji Chillies, Hot Long Red Banana Peppers, Californian Red Onions and Burgandy Okra which is still going strong. I experimented with some new varieties of tomatoes and chillies this year and found the Cosmic Purple tomatoes super sweet and very prolific with tall vines and hanging bunches of 8-10 tomatoes each….amazing in salads. Found the Manganji Chillies beautiful and sweet, shallow fried in olive oil with balsamic, garlic and cracked pepper dressing. I’m stuffing the Long Yellow Mild Banana Peppers tonight Italian style with fresh breadcrumbs, anchovies, capers, garlic and Parmesan Cheese…yum. The Okra I will use in a traditional Cypriot vegetarian dish, sautéed in a rich onion fresh tomato sauce with slices eggplant and potatoes….goes well with a freshly baked crusty sourdough. Thanks for the opportunity to share!
.jpg)
Experimenting & Second Chance Successes says: This image is titled ‘second chance tomatoes’! The single tomato plant on the right is a Costoluto Fiorentino that was the ‘runt’ of my late batch of seedlings and the only one that survived a bad case of red spider mite. The tomato plants towards the back are my ‘second chance’ tomato plants, attacked by red spider mite while I was overseas but resurrected for a potential late harvest. I removed the top half of the leaves of the plants that were heavily infested, leaving the tomatoes to ripen. I treated the plants with regular foliar sprays of water ( mites hate it) and dusting of diatomaceous earth. When the last of the top tomatoes ripened, I harvested them and cut the top half of the plant away. This stimulated new growth and once established I removed all of the old leaves. All of the foliage visible in the photo is new and there are also lots of new flowers and tomatoes setting. Fingers crossed my second chance tomatoes might give me an even later crop well into the end of Autumn.
Mrs Cayir (NSW)
.jpg)
Mrs Cayir says: This is the recent Kent pumpkin harvest among my Rosemary and rainlillies. My husband doesnt eat pumpkin but it grows so well that I use it for my confidence boosting haha. The same day we had this harvest a woman on a local facebook page found the courage to ask if anyone had any extra food she might be able to have and we were able to grab a good sized bag of bean, cherry toms and a couple of these pumpkins. We LOVED having these things just surplus and sitting in the garden when we found someone needing them. Looking forward to adding a whole lot more this cool season.
.jpg)
Mrs Cayir says: Our pumpkins being very photogenic amongst the rainlillies
.jpg)
Mrs Cayir says: The care package. Sorry, I forgot the eggs, we had plenty of chicken eggs (last week, this week is moulting season lol) to offer her too.
Jennifer Carnovale (VIC)
.jpg)
Jennifer says: This is the first time I've being successful at growing capsicums and there are lots of them!
.JPG)
Jennifer says: These piles of tomatoes and other veges are one of many harvests since 1st Jan. Cucumbers, tomatoes (Grosse lisse, cocktail variety, big tom), strawberries. I also have silverbeet, spring onions and lettuce in the same garden (pic #3).
.jpg)
Jennifer says: This is my larger vege garden and my pride and joy. I have harvested 57.25kg of tomatoes just in Jan and Feb this year!
Kate Vickery (VIC)
.jpg)
Kate says: Considering this for my bridal bouquet later in the year
Angie Trewhella (VIC)
.jpg)
Angie says: Night harvest of jalapenos for pickling into candied jalapenos!
.jpg)
Angie says: An abundance of chillies to be strung up and dried!
.jpg)
Angie says: Eggplants to be preserved in herbs and oil!
MJ (NSW)
.jpg)
MJ says: My first harvest, experimenting to see what grows best.NSW South Coast
.jpg)
MJ says: cucumbers and basil pesto for dinner tonight
.jpg)
MJ says: Keith the Kookaburra keeping an eye on things
Cin in the ‘dale (NSW)
.jpg)
Cin in the ‘dale says: When you notice the difference between homegrown and supermarket produce! Garden proud.
.jpg)
Cin in the ‘dale says: When you move from a big city to the regional nsw, live in a cool climate but you nail a few veg and also own chickens for the first time!
.jpg)
Cin in the ‘dale says: When you have never grown garlic before and there is that moment when you harvest a few big healthy beauties and do an awkward dance! Also added bonus of keeping the vamps away when drying out for consumption. Garden proud.
Max Giucastro (VIC)
.jpg)
Max says: This is this year's bumper crop of white onions that I planted in 2024 from seeds I bought from the seed collection. I have enough onions to get me through to the next planting season.
.jpg)
Max says: Spring onions also were plentyful from my plantings. I don't believe in using chemical sprays in my garden. If I have pests that are out of control, I will only use home made vegetable oil sprays. Most of the advice I get for my gardening is actually on the seed collection website site, it is full of articles on how to's.
.jpg)
Max says: Here are my kangaroo island purple garĺics which I also sourced from the seed collection. For many years I tried time, after time, to plant supermarket garlics that had sprouted in my pantry so I figured they would grow.
However every time I was disappointed with small or rotten useless garlics.
This time in 2024 when garlic planting season arrived, I thought I should try proper seed garlic instead of supermarket garlic. The proof well as you can see is in the photo of this year's bumper crop of my backyard organicly grown garlics.
Thanks to the seed collection information on the website, and the garlics that I purchased from them I will do the same this March.
Megan Macalpine (VIC)
.jpg)
Megan says: We were delighted with this recent winning entry in the Berwick Show. The French pumpkin was the highlight, together with South African gem squash, a variety of capsicums, brinjal and potatoes
.jpg)
Megan says: The display of fresh herbs was also a winner. Six different kinds, namely Sorrel, Mint, Lemon Verbena, Bay Leaves, Oregano and Curry Plant. We enjoy being able to collect a large variety of herbs from our garden for our own use. They perfume the garden and add taste and texture to food. There are so many good things about a veggie garden or a herb patch!
.jpg)
Megan says: Whilst the Jerusalem Artichokes (bought from you!) didn’t win a prize, we were so happy with the success of growing them for the first time.
Tien (VIC)
.jpg)
Tien says: There is nothing that brightens the day, and WFH desk, than a freshly cut bunch of flowers! My harvest includes sedums, lemon myrtle (smells amazing!), roses, zinnias (seeds from the Seed Collection) and dahlias (Cafe Au Lait, Salmon Joy, pink cactus Superior, white pom pom Little Angel and Atlantic Jewels). I have a small garden in Melbourne suburbia. Being able to grow flowers among the vegetables, herbs and fruit trees is immensely rewarding. Being able to share it with other like minded green thumbs makes it even better! Enjoy!
Turrumbi hobby farm (NSW)
.jpg)
Turrumbi hobby farm says: Blue Butterfly pea flowers, pineapple, guava, grapes, passion fruits, banana, Tamarillo, kiwis, pepino, quail eggs.
.jpg)
Turrumbi hobby farm says: Autumn harvest Butterfly blue pea flowers, Wampee fruit, cucumbers, dragon fruit, pineapple, passion fruit, Zucchini, grapes.
Grace (NSW)
.jpg)
Grace says: I planted these Autumn Bliss raspberry canes in July 2024, 10 days after I had given birth to our daughter Sophie and have named them “Sophieberries”. 7 months on baby Sophie has finally been able to enjoy the first harvest of these special plants!
.jpg)
Grace says: This small and humble harvest is a reminder that each season will end and make way for a new season. After giving birth to our beautiful baby girl in July 2024 I was really struggling with post natal anxiety and rarely left the house. But spending 5 minutes then 10 minutes and now hours in the garden with my little one has been the saving grace I needed. I cannot imagine a world without gardening!
.jpg)
Grace says: After months of expectation, my 3 glutinous corn plants yielded 1.5 cobs of corn. However these are a variety uncommon in Australia and remind my mum of her home in South Korea. Small as they may be, the smile on my mum’s face made it all worth it.
Nadia (NSW)
.jpg)
Nadia says: A marvellous season for the marketmore cucumber in the wicking bed. 16 plants produced close to 200 cucumbers. At one point I was picking 8-10 every 3 days. I made heaps of excellent bread and butter pickles with it. It was the perfect variety!
I also had about 10kg of delicious Tommy toe, tigerella and polish tomatoes. Excellent for eating and the polish are great for tomato chutney.
.jpg)
Nadia says: My marketmore cucumber pickles were perfect. And polish tomatoes suit chutney making!
.jpg)
Nadia says: My wicking beds in action. It became a beautiful lush forrest of vegies!
Linda (QLD)
.jpg)
Linda says: I just love growing Pumpkins, they are so easy! So many different ones ~ Jap, Aussie Blue and there was even a little butternut which was eaten quickly! Delicious!
.jpg)
Linda says: Our baby Butternut and another Jap! Off to be roasted!
.jpg)
Linda says: My first attempt at growing Capsicums, cute little fella!
Knomor Park (VIC)
.jpg)
Knomor Park says: A truck load of produce and pretty flowers!
.jpg)
Knomor Park says: The truckload has made its journey inbound to the kitchen! Ruby red chard, eggplant, capsicum, a variety of tomatoes, rocket, basil, barlotti beans, zucchini, carrots, cucumber!
.jpg)
Knomor Park says: What doesn't get eaten immediately gets preserved for a later day! Cannot wait to enjoy crab apple jelly on toast, or on a cracker with a slice of Camembert. Bread and butter pickles will be served with steak in winter. Sandwiches with lashings of zucchini pickles, ham and cheese will be enjoyed any day in school lunchboxes!
Living-mudflower (NSW)
.jpg)
Living-mudflower says: Nothing compares to the tastes of fresh sweet corn on the cob dripping with butter and salt. This variety tastes sweet, it is higher in antioxidants than yellow corn, and holds a lot of sentimental value. I bred this purple and white sweet corn when my daughter was born because I thought a little girl would be more likely to eat her vegetables if they were pretty. I also wanted a family heirloom to pass on. Creating this unique sweet corn has meant my kids have grown up eating vegetables that are as beautiful and delicious as they are healthy.
.jpg)
Living-mudflower says: I like parsley, it is so simple to grow and highly nutritious, unfortunately most varieties are too small to be very useful. I put some effort into sourcing as many different varieties I could, and crossing them, and culling, and crossing again, and developed this. The result is a giant parsley that makes other 'giant' varieties look small. We use this as a leaf vegetable, use the petioles like celery, and the roots are delicious when roasted. It is just as easy to grow this giant variety as it is to grow small unimproved varieties. The benefit of this is it is something we created ourselves.
.jpg)
Living-mudflower says: We have a few apple trees, these are from Pink Lady. Placing stencils on red apples while they develop means the area under the stencil does not turn red, and words or pictures can be stenciled onto them. This takes time and dedication, but is worth the effort. My kids love eating apples that have been stenciled like this, and they are a big hit at pre-school where they help to encourage other kids to be excited about eating ad growing fruit.
QueenPenelopespatch (VIC)
.jpg)
QueenPenelopespatch says: Autumn garden grocery harvest gives you a bit of everything. We have cucumbers, tomatoes, zucchini, eggplants, beans, chilies, capsicum & springonions. The fun in this mystery harvest is now planning the cooking for the week from this lot.
.jpg)
QueenPenelopespatch says: I love chillies and am a chilli nerd. We grow chillies to preserve & use during the year. We freeze these but seperate them into three categories, mild or omlette chillies, everyday chillies (spicier ones) and Proceed with caution (the ones that will set you on fire) chillies.
Varieties include Turkish snakes, shishito, bulgarian carrot, long cayanne, black muleto, purple cayenne, serrano, caysen, Jalepeno etc. We have more chilli varieties in production too.
.jpg)
QueenPenelopespatch says: The beauty of this harvest is that everything was pollinated by the bees. The Honey melon was the sweetest I have tasted. We have a Cinderella pumpkin, long melon, zucchini, peppers & chilli. Added some Dahlias for the coffee table.
Peta Rogers (TAS)
.jpg)
Peta Rogers says: The pure taste of summer, sunshine trapped in tasty tomatoes! Down here in Tassie it’s a talking point, “when do you plant your tomatoes and when did you get your first one to eat?” Such fierce competition! My love heart of tomatoes are Black Icicle, Jaune Flamme, Tommy Toe, Yellow Pear, Honeybee and Black Cherry.
.jpg)
Peta Rogers says: Supermodel of the flower world. My Giant Russian Sunflowers grew to 2.9 metres tall this year and survived the strong winds. So proud!
.jpg)
Peta Rogers says: One of my Giant Russian Sunflowers. Guaranteed to put a smile on anyone’s face
Daisy Attenborough (TAS)
.jpg)
Daisy says: An abundance of produce from the garden! Spray-free (thanks to the wrens, frogs, spiders and skinks for picking off most of the bad bugs this year), all the plants are heirloom/organic, giving us incredibly tasty, nutrient-dense produce. There's a vaseful of edibles, including dahlia, salvia and fuchsia flowers, traditional herbs, and Tas natives such as Warrigal Greens, kunzea, and river mint. We experimented with fermented dill pickles, made sauerkraut from late red cabbage, cooked Japanese quick pickled cucumbers, created capers from nasturtium seeds, and made calendula salve and lavender body balm from the flowers in the garden. The basket of fruit and vegetables were lip-smackingly delicious!
.jpg)
Daisy says: Collecting seeds. Some of the seeds will be kept in readiness for sowing next spring, some will be used as seasoning in the kitchen, and the sunflower that was grown to encourage bees and other insects into the vegetable garden will now serve as a feasting platter for our free-ranging hens. The seeds: organic coriander, dill, heirloom lettuce, organic celery, silverbeet from an ancient plant in the garden, and some Tasmanian purple garlic which has been an excellent pest deterrent in all the vegetable garden beds this year.
Maria loves flowers (VIC)
.jpg)
Maria says: A bunch of dried Russian Statice, which I grew for the first time this year. Such a great and unique plant. Flowers forever, great as a cut flower and holds its colour well when dried. Seed from Seed Collection.
.jpg)
Maria says: Rose lime Zinnias, Blue Victory salvia, Burgandy Beau pincushion flowers, Lucky lips snapdragons and cinereria silver dust for foliage. All the flowers are growing in my cottage style front garden. I get lots of comments from passer-bys especially about the Zinnias. All grown from Seed collection seed
Cydde (VIC)
.jpg)
Cydde says: Toms, trombocino and cayenne chillis
.jpg)
Cydde says: Trombocino and hybrid Rugosa/Napoli punkin, curing with the cat in the sun!
.jpg)
Cydde says: In spite of our driest year and summer on record, small windows of respite from extreme heat allowed the tomatoes to come on, with the help of the native garden and blue banded bees
Michelle (NSW)
.jpg)
Michelle says: Love "harvesting" flowers for Christmas
.jpg)
Michelle says: The red and green capsicums just warms my heart
.jpg)
Michelle says: Found a new love for heirloom tomatoes
Cat Mueller (ACT)
.jpg)
Cat Mueller says: This year was the first opportunity I’ve had to grow a garden in the ground. I have learnt a lot! I’ve learnt that although a cottage-style garden or ‘chaos garden’ is my vibe, giving beans a designated spot next year will ensure an easy harvest. It will avoid me having to crouch and reach through a maze of cosmos, sunflowers and zinnias to grab that tasty bean, which is metres away from another tasty bean.
I’ve learnt that the rosella couple that resides in my garden loves getting to my cosmos blooms and seeds before I do, especially the pink ones! Holographic bird tape seems to have helped - and gets bonus points for bringing a party vibe to the garden. I’ve had endless flowers brightening up my kitchen windowsill, bringing joy to my housemate and me.
I haven’t bought veggies for months. The Aldi cashiers must think I now survive on a diet of cheese, yoghurt and curry paste. I’ve been making Thai red-inspired curry with my zucchinis, lime leaves, chillis, purple beans, Thai basil, and chunks of tomato for sweetness! I’ve been snacking on delicious bocconcini and basil paired with an entire rainbow of tomatoes.
.jpg)
Cat Mueller says: I’m excited to try my first adorable golden nugget pumpkin and overjoyed that my finger lime has fruited for the first time now that it has celebrated its fourth birthday. I’ve been enjoying making pesto out of all my tough brassicas, carrot tops, radish greens etc. with lots of sorrel to really give it a kick! I put the juice and zest of a whole lemon and use sunflower seeds for crunch. Delish.
The in-ground beds have levelled up my flower game, enabling me to shower everyone I know with bouquets. My favourite seasonal colour scheme right now is a mix of orange (‘Bright Lights’) cosmos, beautiful feathery burgundy amaranth and bright pink zinnias, paired with a cheery explosion of yellow Jerusalem artichoke flowers. I’ve also had a great time mixing in more unconventional things into arrangements. Garlic chive flower clusters are adorable. Fennel fronds are beautiful floaty greenery to pair with amaranth and white cosmos. I also love the sculptural fennel seed umbels that look like little umbrellas flipped by the wind.
I’m going to plant Russian Statice seeds now that its autumn to take over for the amaranth as the theatrical element to my bouquets - with its drape, height and movement.
.jpg)
Cat Mueller says: Throughout summer I’ve been using edible flowers like calendulas to decorate cakes, salads and rice paper rolls. I’ve been drying some of the petals on baking paper to use as sprinkles when they aren’t in flower. I grew a huge variety of calendula this year. My favourite was from the ‘Pacific Beauty Mix’ - a gorgeous large pale yellow flower, floppier than your standard calendula. I am excited to see what varieties self-seed next year.
Puncstorta (WA)
.jpg)
Puncstorta says: I moved house and I've built a new garden bed and fell up with new soil, which turned out to be very very alkaline, so hardly anything grew in it. Butter pumpkin and zucchini suffered from powdery mildew even if I made the pumpkin run up to the sky. Tomatoes were eaten by a rodent every single night. Spinach was growing well until little worms started eating them up. I harvested a few eggplants and to my surprise 4 watermelons. They just grew and grew and grew. The biggest weighed 19.9kg. This winter my job will be to add lots of manure to the soil to prepare it for next year's growing season.
Sudha (QLD)
.jpg)
Sudha says: I have grown these organically without any fertilisers or pesticides. You are looking at cooking banana or plantain banana, eggplants, bitter gourd, curry leaves, gourd, pumpkin and other snake beans, okra, ivy gourd. Snake beans are just getting started.
.jpg)
Sudha says: More of the same crop.
.jpg)
Sudha says: More of the same crop with chillies added.
]]>Congratulation to Jacqueline Felsinger from Tasmania who was the winner of the $100 store credit. We loved seeing how you are adapting to your challenging but beautiful environment!
Look our for more competitions soon!
***
Kate (NSW)
.jpg)
Kate says: Afternoon sun through the garden wild. Here you can see the results of me experimenting overtime by letting plants self seed. In this photo you can see amaranth, sorrel, tomatoes, taro, fennel, leeks, dandelions, Vietnamese mint, borage, marigolds, chia, grevillea, dahlias and in the foreground the loropetalum and Mallee bird bath which is a favourite feature and frequented by many wrens, sparrows, parrots, blackbirds, skinks and bees.
Kate says: My biggest helper and biggest fan of being in the garden, my rescue dog is predominantly responsible for spreading the plants seeds everywhere because he loves helping by pruning dried woody stems of plants off with his teeth and pushing things around as I work in the garden. Here you can see him taking a break in the strawberry patch with some big sunchokes in the background
Kate says: I planted a single unknown variety of oregano a couple of seasons ago and it surprised me very much this spring by producing all these lilac flowers over a meter tall which I have never seen before!! I don't particularly like cooking with oregano but I like aromatic plants and having these flowers come up in contrast to the blue borage flowers behind them was very magical. The garden wild always surprises me. Sometimes when you let nature do its own thing, magic happens.
Duncan (NSW)
Duncan says: Native bush garden. Years of weed removal, planting and maintenance.o
Duncan says: A prostrate form of Melaleuca hypericifolia. The flower spikes appeared in spring and summer followed by the fruit which are woody, capsules with the sepals remaining as teeth around the rim.
.jpg)
Duncan says: Using Commelina cyanea to stabilise the bank. The native Senna acclinis you can see in the background is an endangered plant, it is important people working in restoration to be able to distinguish between the two species.
Lucy (NSW)
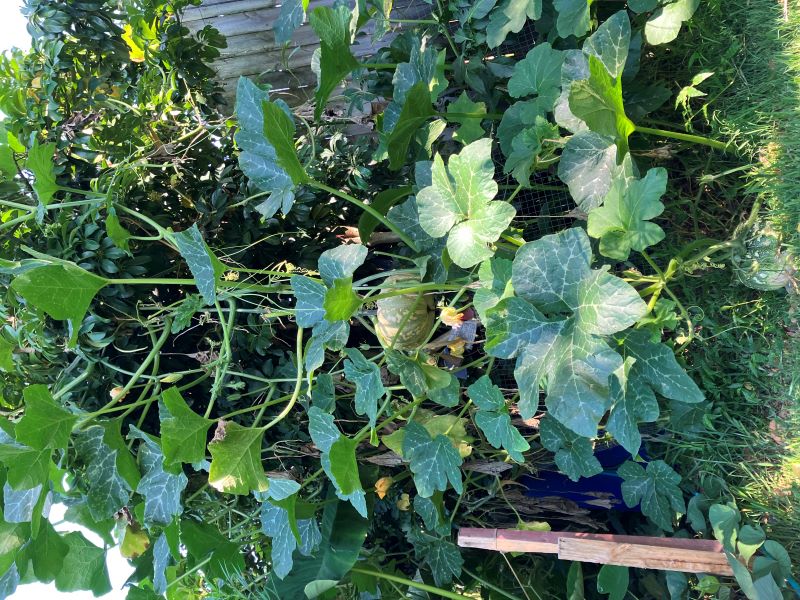
Lucy Says: I grew some Kent pumpkins up the umbrella tree on the back fence to save some space. I wasn’t sure if they’d get enough sun under the tree but they made it to the top and are now cascading back down with the odd pumpkin here and there. There are some louffas hidden in the curtain of vines somewhere too.
.jpg)
Lucy Says: I absolutely love the insects that my garden patches have brought. I don’t like to remove anything, I like watching the ecosystem work with its aphids and lady beetles and hoverflies and wasps and assassin bugs and spider mites and mite destroyers- it’s all so fascinating to watch. But I especially love the blue banded bees that seem so keen on all the blue flowers. They visit these red chicory flowers every morning.
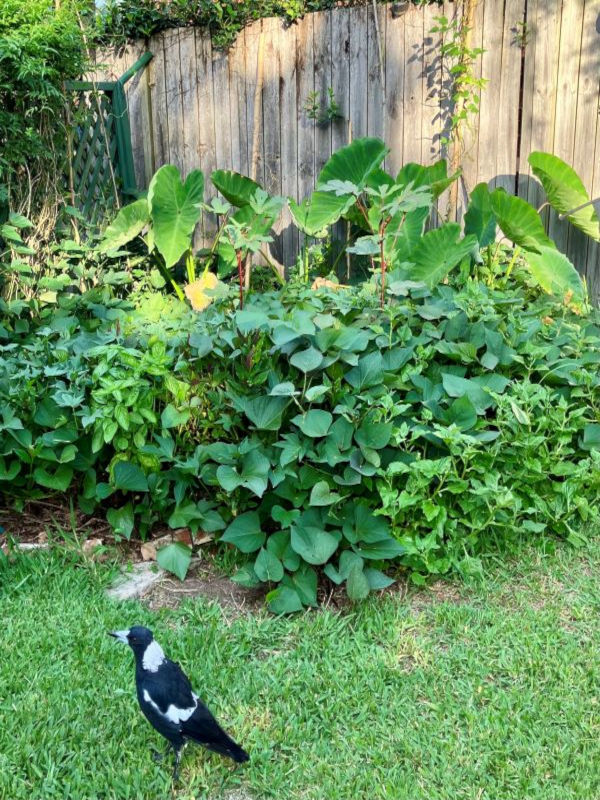
Lucy Says: My partner calls my gardening style ‘messy’. Everything piled in together. Herbs and spinach at the front, okra in the middle, taro at the back and beans on the fence, with sweet potato and tetragonia as a bit of an out of hand ground cover.
Julie Robinson (WA)
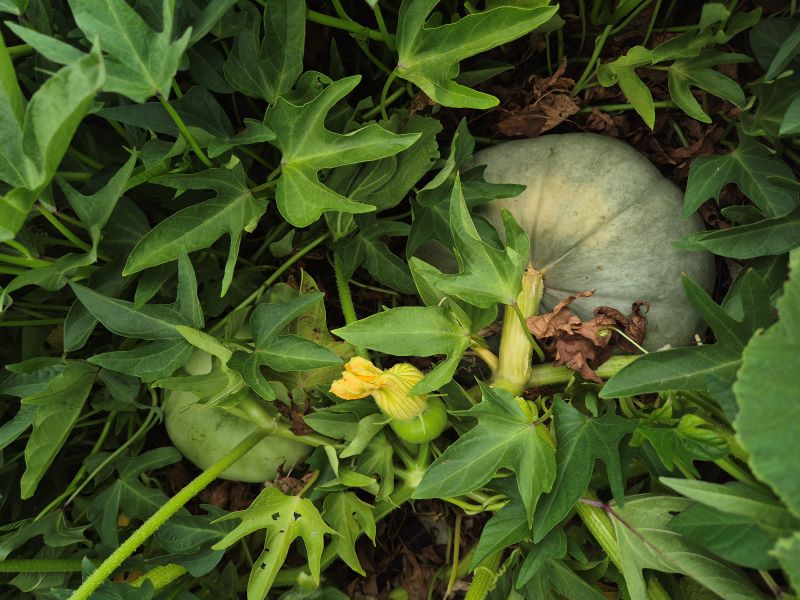
Julie Robinson Says: Volunteer pumpkins from my compost! The two self-sown pumpkins are loving our summer heat. I love finding large surprise pumpkins hidden away among the pumpkin and sweet potato leaves.
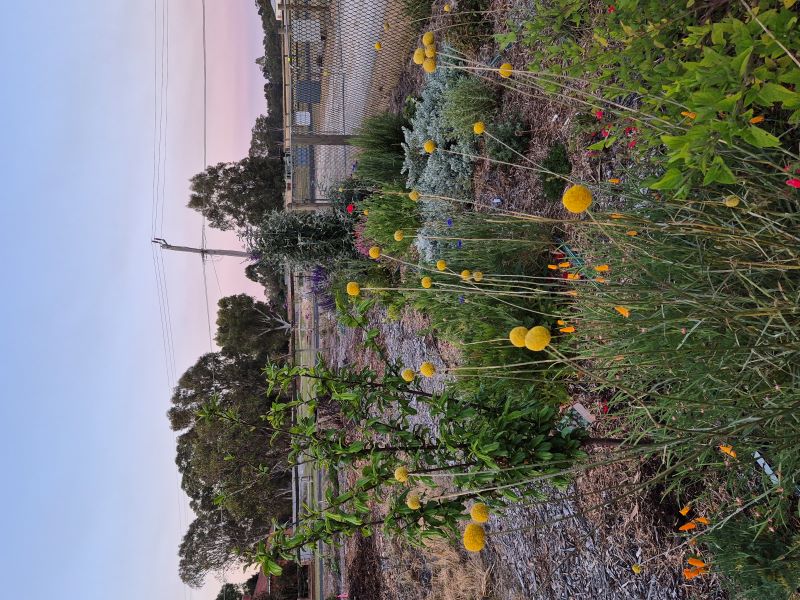
Julie Robinson Says: This photo shows one of the garden beds in spring time. This garden bed runs roughly north to south. I love the happy mix in this bed including natives such as Billy Buttons and an Eremophila ground cover, a cherry plum (time will tell if I ever get any fruit due to our heat), salvias and poppies. There's also rosemary, lavender and a Buddleia. So much work has gone into this garden being just me, my trusty wheelbarrow and time. Perth has really sandy soils so I constantly bring in compost and nutrient rich soil. I've also placed a huge pile of mulch that was taller than me to form temporary paths. Eventually I would like to have limestone paths around all the garden beds and a limestone base in the central courtyard.
.jpg)
Julie Robinson Says: This is a relatively new garden project, started in September 2023. All work so far has been done by me with my trusty wheelbarrow. I've started with garden beds that wrap around the outer edge of this garden area. Future works include a central courtyard which will have another semi-circle garden bed wrapping around it so it's hidden from all sides except the opening to the north. The style is of a wild, permaculture garden with fruit trees, vegetables and many flowering plants for beauty and to welcome all the pollinators. I'm particularly excited every time I find native blue-banded bees in the garden. The garden already has 16 trees in it with more to come. Perth has extreme summers and plants suffer during this time if not shaded, so I'm eager for canopy cover over this area.
Onlyplants.get.dirty.roots (QLD)
.jpg)
Onlyplants.get.dirty.roots Says: My reclaimed plant trolley, it works perfectly for taking seedlings in amd out of the rain or sun quickly
.jpg)
Onlyplants.get.dirty.roots Says: My beautiful seed grown zinnias that somehow have survived the last 2000mm of rain we have gotten over the last month
.jpg)
Onlyplants.get.dirty.roots Says: My pathway that i created by myself with no experience! The path will soon take me the whole way around my garden and will have solar lights along the sides with zinnia, diannthus and a varigated ground cover that im unsure of its name. Cant wait untill its complete!
Jacqueline Felsinger (TAS)
This months winner!
.jpg)
Jacqueline Felsinger Says: This is my greenhouse, built by my talented husband! Growing in a greenhouse is imperative here, given our cold and windy climate. I grew tomatoes, cucumbers, chili, capsicum, eggplant, and herbs in pots and even giving watermelon a go! I found that not many bees were pollinating in the greenhouse, so I thought I would try planting calendulas as well, and they worked a treat in attracting bees and other pollinators! For the trellises, we used fencing wire which was left over from the fencing around our veggie patch, which also works perfectly.
.jpg)
Jacqueline Felsinger Says: This little patch was my 'trial patch'! I wanted to utilise the space better, so I planted pumpkins on 4 pumpkin tower trellises in each corner. I also planted sweetcorn down the centre, baby beets (mostly harvested) and dwarf beans. As you can see, I've also planted sunflowers and bee attracting flowers to attract pollinators for my pumpkins. Just need more sunshine to ripen up the pumpkins, and thinking next season to plant pumpkins more suited to cool weather.
Amending the soil in this patch was quite a challenge as we have clay soil, but as mentioned, I am slowly amending my soil with various organic materials and know that this is a process which will take some time. But all part of the fun!
.jpg)
Jacqueline Felsinger: We live in a remote area on the southern tip of beautiful King Island, Tasmania, and are in the process of building our own home. Our goal is to live a self-sufficient lifestyle, and growing our own organic produce is a huge part of this. I started my vegetable garden around April 2024 and for the first time in my life, am experiencing how amazing it is to grow and eat your own produce!
The cold and windy weather here can be quite challenging at times, but I am learning how to adapt my gardening to the particular climate of my area. Another challenge is that we have clay soil, and so have slowly been amending my soil with various organic materials and aged cow manure, which we get from local paddocks and load up in our trailer. One of the key features of our garden is our dog Moses who keeps the possums away! I've discovered that the gardening journey is filled with lots of 'trials & errors', but this is where I feel I have learned the most, and will continue to learn.
So here is my garden so far...my beautiful, tranquil space filled with so much joy as I see my vegetables begin to flourish from the simple planting of a little seed!
Kartren (VIC)
.jpg)
Kartren Says: The first time I've been able to grow Rudbeckia and zinnias, I'm very proud!
.jpg)
Kartren Says: I love my enclosed vegetable garden, which is needed to keep the possums from eating my seedlings
.jpg)
Kartren Says: Aerial view of my vegetable garden
Esther Griggs (TAS)
.jpg)
Esther Griggs Says: The Seed Collection fueling my summer garden dreams!
.jpg)
Esther Griggs Says: Seedlings germinating from direct planting for the first time!
.jpg)
Esther Griggs Says: Looking out from my veggie garden out to my bush block that is now starting to really thrive as a flower garden with lawns and yards for our family. 4 years ago, this was literally all bush!
Penny (VIC)
.jpg)
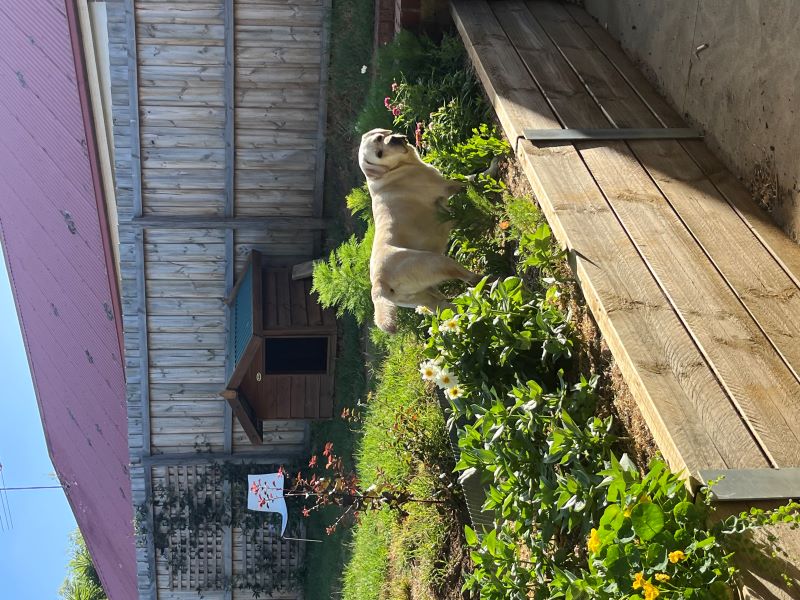
Penny Says: This has been my first year ever trying to grow flowers from seeds, and although this little garden bed had very clay heavy soil I’ve had great luck with direct sowing zinnias, nasturtium, cosmos, California poppies, paper daisies and a few cornflowers, as well as planting dahlia tubers. As a complete beginner I wasn’t so focused on style or overall form, just wanted a bright and colourful mix that would attract bees and be something fun for my dog Clementine to sniff and explore (which as you can see she has been enjoying). It’s honestly just been nice as a beginner to be able to try out a few different types of plants and varieties without needing to spend 100s of dollars on seedlings!

.jpg)
Penny Says: My absolute favourite part of the garden are the different shades of everlasting daisies that have come from sowing multiple seed varieties. I was really unfamiliar with natives and so did not expect much, but these plants have been blooming for weeks and just keep springing up with different gorgeous shades of pink, red, and white. Apart from their beautiful colour I also love how much the bees tend to gravitate towards and enjoy these flowers too!
.jpg)
Penny Says: I’ve been so happy with how my zinnias have grown, as they were my first experiment with raising seeds in trays indoors and then transplanting the seedlings into the garden, and they have probably been the most abundant of all of the flowers. I have found a lot of useful tips through your articles but specifically used « Hardening Off Seedlings: The Key to Successful Transplanting » to successfully transplant these to the garden and keep them healthy and strong.
Gina (NSW)
.jpg)
Gina Says: We purchased this house in Sapphire Beach just out of Coffs 6 months ago. Where the pavers and water feature are was a rotted pine wooden deck exposed to the elements. We bought 2nd hand pavers and saw this design on Pinterest. It’s so nice sitting out under the alfresco in the afternoon with a drink enjoying it after all the hard work.
Further down the yard, I have 4 planter boxes with a lot of vege seeds I purchased from you. We have spinach, corn, bunching onions, several varieties of tomatoes, cucamelon, spaghetti squash, and lots of herbs to name a few. I just love seeing the seeds grow into plants then we get to eat them.
This is only part of our garden we have built from a weeded mess and we love it.
.jpg)
Gina Says: This photo shows the veggies in the planter box’s which were covered in weeds and so much mint now we have a beautiful veggie garden. It took a lot to turn all the soil and loosen it up as the planters are 2m long, and one had to be turned around completely. A lot of shoveling. That was a slow process but now it’s beautiful. We planted a lady finger banana which was only 1 metre high when we purchased it now behind the planters, you can see how fast it is growing. It has to be 3m tall now. I also have fruit trees such as cumquat, orange, lemon, lime, fig, and olive.
We have a pond with just water plants. There are can canna Lilly, elephant ears, purple picklerush and a pretty yellow marshwart to name a few, and a solar frog water feature. This was originally a goldfish pond with no fish in it just very green water so we turned it into a pond garden.
Lastly, a bird bath circled with lavender plants which originally was an outdoor camp style BBQ, it was pretty ugly.
I’ve tried to plant flowers that attract bees. I again bought seeds from you alyssum, petunias, marigold and sunflowers.
It’s amazing what you can do in a suburban garden.
.jpg)
Gina Says: This is a favourite. Imagine, the entire area of the paving was a rotted pine deck with a wooden wall along the back. So the best thing to do was rip it up and replace it with something else. Originally we were going to put a goldfish pond in the middle but hit rock which meant too much digging. There were 16 cemented logs which were used for the decking. We tried removing it manually but nearly killed us so we got a jackhammer, job was done in an hour.
We bought 2nd hand pavers and the water feature from Bunnings. We were lucky we had a powerpoint close by. Saw a design on Pinterest and off we went.
Some of the plants in there included herbs such as rosemary, oregano, and thyme.
There is also crepe myrtle, bird of paradise, alpine strawberries, lavender, buxus, and china doll which I propagated from cuttings that I will train to grow on a single stalk and make a ball design so it doesn’t get too bushy. The same will be done with the crepe myrtle.
It’s just a peaceful place to sit under the alfresco with a drink listening to the sound of the fountain.
KristelRuby (VIC)
.jpg)
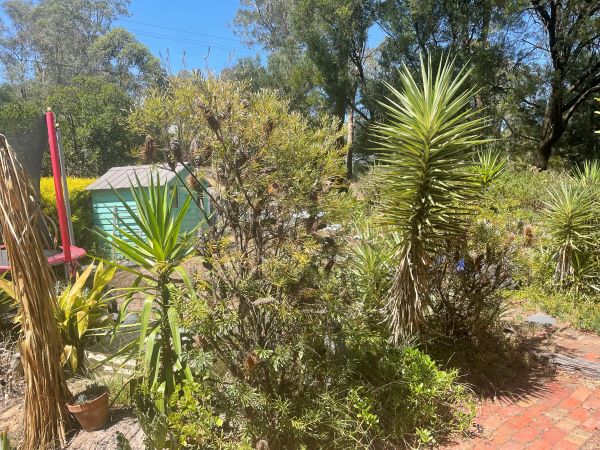
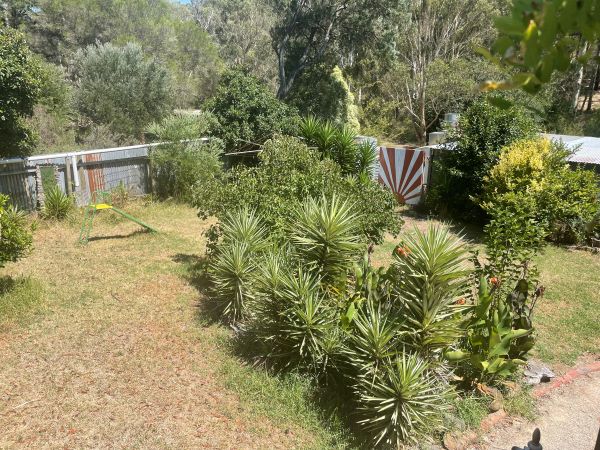

KristelRuby: This is my garden my daughter and I are starting to get it going we wish to grow all our fruits and veggies here and create a safe peaceful world for us to nurture ourselves and our space
.jpg)
KristelRuby: My daughter loves watching and discovering all of the beautiful creatures!
.jpg)
KristelRuby: Our sculptures are growing as we learn new skills
Betty (VIC)
.jpg)
.jpg)
.jpg)
Betty Says: This is my veg patch. Some seeds I have bought from seed collection. My cucumbers have produced lots of flowers and fruit despite the hot weather. My Kang Kong and the sweet potato vines are abundant and great tasting too.
.jpg)
Betty Says: Kang Kong
.jpg)
Betty Says: Sweet potato vines
Glenbar Garden (VIC)
.jpg)
.jpg)
.jpg)
.jpg)
Glenbar Garden Says: We have a large country garden in Sth Gippsland, Victoria. It’s a mixture of perennials, annuals, large borders and trees. My husband and I do most of it ourselves for 45 years. I’m very keen on growing from seed and love zinnias and cosmos.
.jpg)
Glenbar Garden Says: Zinnias grown from seed
.jpg)
Glenbar Garden Says: New garden not quite one year old grown from cuttings and seeds
Home (WA)
.jpg)
Home Says: It's a work in progress. It is yet to become full blown sanctuary where birds visit and coffee is consumed. But it's home
.jpg)
Home Says: First season of Nashi Pears. So exciting.
.jpg)
Home Says: Shade protection for all the dwarf fruit trees. Best thing ever so far. My trees have survived. And are holding fruit
Sylvia D (NSW)
.jpg)
.jpg)
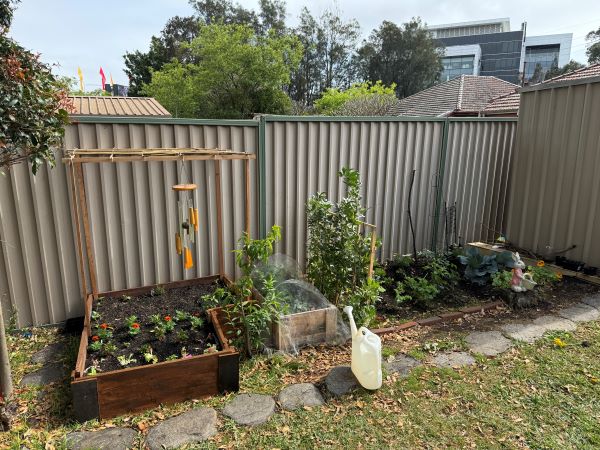
Sylvia D Says: My little backyard garden area with 2 homemade raised garden beds and 1 in the ground area.
I have successfully grown so many crops from the seeds I bought here. It has brought me so much joy over the last year. :)
.jpg)
Sylvia D Says: It has to be this raised garden bed I built by myself. I built this for my climbing vegetables and have successfully grown some beans and peas :)
.jpg)
Sylvia D Says: This is my most recent harvest of this white summer squash!! I’m so impressed and amazed by how cute and delicious this squash is. Seeds were bought from you guys! So so grateful. :)
Izzys garden (NSW)
.jpg)
.jpg)
Izzys garden Says: In this photo is our container garden on our balcony, we love our little Blueberries plant and strawberries which give our 4-year-old wake up in the morning to check if there’s any fruit to be picked.
We love to sit any of the day and looking our pots conner full of colour and in winter our Orchid flowers beautifully and smell divine. Thank you hopefully you guys can enjoy our garden too
.jpg)
.jpg)
.jpg)
Izzys garden Says: This is our Blueberries we grow in pots, our friends told us that our blueberries won’t last in the pots. But after trial and error, we have them grow great in our pots because we changed the potting mix to a gardenia’s potting mix and have been fruitful. We been have having them for 3 years now
MindfulVeg (VIC)
.jpg)
MindfulVeg Says: I love your seeds! 100% germination rate every time!! My garden is my absolute happy place. When I’m not giving back to my community or earning a quid you will find me sowing, growing or harvesting something. When my husband asks.. are you ok? (Because I’m not).. then I haven’t been in to the garden to clear my head. Thank you for your great products and great information
Raised organic garden beds (NSW)
.jpg)
Raised organic garden beds says: This is my raised vegetable garden. When we moved in this was a weird shaped piece of unproductive lawn. Each year it produces countless kilograms of organic vegetables, herbs, berries, as well as a few flowers. Having raised beds is easier on my back, and having several beds makes crop rotation simple. It can get rather messy from time to time, especially when I allow things to set seed, but it is intended to be a productive garden rather than ornamental.
.jpg)
Raised organic garden beds says: I love growing buckwheat. It goes from seed to flower in next to no time, it suffers no pests or diseases, and it attracts and feeds many beneficial insects. This can be allowed to drop seed, or dug under as green manure, or cut and fed to the chickens. Buckwheat is such a useful plant, it has a place in every garden.
.jpg)
Raised organic garden beds says: These are some of the delicious tomatoes I picked from my garden. Each year my kids help me grow tomatoes form seed, they help me pick (and eat) the tomatoes, and they help me save seeds for the following years. Many of these tomato varieties are heirlooms, some are varieties that we have bred and stabilised ourselves - meaning we are creating our own family heirloom varieties! If there is one way to get kids to eat their veggies, it is involve them and breed something they think tastes great.
Kezza (SA)
.jpg)
.jpg)
.jpg)
Kezza says: Where to start . These are early photos as I set up my 1 fruit orchard. 2 veg and flowers bed in formal garden . 3 roses ready to plant out. Will also have a tropical corner with water feature. Oh so much I want to do !! …..
.jpg)
Kezza says: My small food forest is coming along nicely. Best way to meet neighbours with free tomatoes for all !!
.jpg)
Kezza says: Very proud of my fruit trees . Can’t wait to show my great nephews/nieces how food is grown.
Eilish (VIC)
.png)
Eilish says: This pumpkin from my garden is very heavy.
Eva_growing (QLD)
.jpg)
Eva_growing says: Norman (the cat) and our balcony jungle! 20+ fruit tree seedlings, dragonfruit, herbs and greens for me, my partners amorphophallus collection, and our quail pen!
.jpg)
Eva_growing says: It’s a tight squeeze but we make it work. We’ve netted the balcony to keep the possums out and the cats in. This doubles as a place to trellis tomatoes and dragonfruit, and grow the malbar spinach for shade and quail food.
.jpg)
Eva_growing says: It’s nice to watch it change over the seasons and become progressively more wild and jam packed. The cats have enjoyed getting more shady hiding spots.
Two Scarecrows (TAS)
.jpg)
Two Scarecrows says: Our Vegetable garden at Weetah Tasmania is a busy place where each year we grow enough food for several households. It is our privilege to share the produce with local friends but also with our hard-working and much loved Community House in Deloraine where anyone who needs extra food support can collect the surplus we delivery there each week. As Quakers we are committed to Earthcare stewardship and we always say that caring for the Earth begins in the garden.
Our garden design is sectional and is rotating each season. We always include a "Wildflower Meadow" along the borders for bees and beneficial insects, also habitat for birds. We keep two birdbaths nearby and also sand for dust baths. One day we saw more than a dozen Goldfinches all stop in for a dust bath at the same time!
.jpg)
Two Scarecrows says: Our Giant Sunflowers are a hit with the bumblebees and birds. We also save and dry the heads each year for snacks. As our garden is directly along our rural road, the school bus goes past each day so the children can see the sunflowers in bloom.
.jpg)
Two Scarecrows says: It's most important to have a "wild" flower section near the vegetable garden. It brings beneficial insects and bees and offers cover for the birds who help "police" the less welcome insect visitors to our space. We always include lavender hedges amongst the wildflower section both for this plants durability but as a forage source for the bees. We use the lavender flowers dried in hand-sewn sachets in our closets and clothes drawers. OF course there is always enough extra lavender to give away!
Tamara (QLD)
.jpg)
.jpg)
.jpg)
Tamara says: My beautiful vegie and pollinator patch - a magical space that nourishes our family in mind, body and soul as well as all the birds and bees and bugs that call our garden home... My favourite flowers - zinnia, cosmos and dahlia, all grown from The Seed Collection seeds...
.jpg)
Tamara says: I always add lots of flowers to attract beneficial insects, help pollinate our vegies, and to simply look utterly delightful. My favourites are gaura, zinnia, dahlia, cosmos, roses, nasturtium, sweet william and pansy. It has taken a couple of growing seasons, but we now have a system that takes care of itself! I have very few pests or disease and it is all done naturally. Nature at her most beautiful.
.jpg)
.jpg)
Tamara says: I use old pieces of reo to help support my climbing vegies and flowers, to maximise our space and productivity.
I have four bird baths around the garden to help my beautiful feathered friends. Since we moved here almost 15 years ago, we have planted out the garden in a way that has encouraged over 50 different birds to visit or call our garden home and I'm so very humbled by that.
Elle Brice (NSW)
.jpg)
Elle Brice says: A mixed veg garden that includes sunflowers, zucchini and corn from theseedcollection
Elle Brice says: Double Dazzler in all its glory
Elle Brice says: I managed to harvest one cob of corn before the corn plants were infested with aphids, bugs it’s almost perfect! I had to remove the rest of the corn plants and start again.
Alex’s Secret Garden (VIC)
.jpg)
Alex says: My secret garden! I live in an apartment but very lucky to have a private garden on the ground floor. I started this garden from scratch 2 years ago to include a veggie patch, natives, green house, herbs and a seating area to enjoy the view. My favourite plant is the passionfruit vine covering the back fence, and the coffee tree to the left of the arch Im trying to grow!
.jpg)
Alex says: My favourite flower I grew from seed - the summery sunflower.
.jpg)
Alex says: I love growing seedlings and sharing excess produce with my neighbours. I put these out the front of my apartment for people to take as they need, so others can enjoy the joy of gardening!
Kerry’s front yard of your dreams (NSW)
.jpg)
Kerry says: Our front yard was an unused plot of dead grass & thriving weeds. I transformed it in winter ‘24 with cardboard, compost & woodchip mulch. The pumpkins are all volunteers, & are sizing up superbly! The trellis for the purple beans was put in after harvesting our first crop of potatoes. I think we got six good ones
HortiKate (WA)
.jpg)
HortiKate says: Using a permaculture approach, I am in the process of transforming a single large area of kikuyu lawn, into a productive patch which invites creatures of all sorts to take up homes! I have sheet mulched and planted onto and into this surface, using containers such as bathtubs and reclaimed pots as well as lasagna type beds.
This is the view from my back porch.
.jpg)
HortiKate says: My bathtub carrot patch, now gone to flower and seed, attracting wild numbers of ants and honeybees!
The bathtub allowed me to create an ideal soil bed needed for carrots, resulting in a great continuous harvest over months, as they were very densely seeded.
Delicious beauty!
.jpg)
HortiKate says: Favourite summer friends! Cheerful cosmos, so delicate yet hardy (thriving in poor sandy soil like mine!) and a sample of several basil varieties grown this season, each a delight in its unique flavour and scent.
One of the many joys of gardening is the constant sense of discovery, and trying out new plants in my patch.
Produce Paradise (QLD)
.jpg)
Produce Paradise says: Built from scratch with lots of love and effort, my garden is my happy place. We turned this grass patch at the back of our house into a sectioned veggie garden complete with large garden bed and herb tubs. The finishing touch is the lemon and lime trees in pots to mark the passing of each of my grandparents - my grandma believed in planting trees to remember people by.
We have learnt so much about growing food and love it! We have had success with spinach, eggplants, tomatoes, snowpeas, zucchini, and all sorts of herbs. We are now patiently waiting to see if our pineapple pots will produce a pineapple in a year or so!
It’s such a nice escape to potter around in this garden on a weekend - always a much needed break from screen time and busy weekdays.
.jpg)
Produce Paradise says: One special feature of my garden is my attempt at growing a pineapple. My aunty’s an avid gardener and gifted me these pineapples to plant and gave me all her tips.
I also had no idea how pineapples actually grow until I started doing this so it’s been good to learn where food really comes from.
It’s been about 10 months, so still some time to go but I’m excited to see what happens!
.jpg)
romahoney grows (VIC)
.jpg)
romahoney grows says: Hello, This is the productive part of our block. Comprising three wicking beds for veg's, a cutting garden with cosmos and zinnias, and a dahlia patch that is a labour of love.
.jpg)
romahoney grows says: This a great part of the dahlia patch. With Hillier Tannunda, Robin Hood, and a cheeky zinnia.
.jpg)
romahoney grows says: This is a small sample of where I would like my garden to be in the future - using flowering perennial plants that are more climate compatible, with a few dahlias tucked in here and there.
John Malipaard (QLD)
.jpg)
.jpg)
John says: Started from scratch. Residents supply bottles, cans and plastic which in turn are exchanged at recycling facilities for money to fund our soil, plants, etc. Edging is courtesy of debris from nearby bushland , stakes and pegs are cut from Crepe Myrtles when cut back, leaf litter is gathered from various sources locally which is placed between beds and is great walk on, then when beds dug up composted leaf litter applied to bottom of beds. Residents supply kitchen waste for compost which allows garden to be totally organic leaving us with a chemical free garden, with a rustic feeling for residents to sow, tend, harvest and share
.jpg)
John says: Garden bed borders are sourced from nearby bushland. Garden soil is a mix of sand, mushroom compost and premium organic compost. Pathways are dug out and filled with leaf litter gathered internally and from appropriate places , gradually filling paths and eventually reused once broken down then placed in bottom of garden beds Stakes and pegs are gathered when Crepe Myrtle shrubs are cut back. This bed has snake beans, butter beans, egg plant, rosemary, basil amongst tomatoe plants. Cosmos flowers home for the bees, 2yr old lemon, lime and mandarin trees in background To achieve this area we had to eradicate “Singapore daisy”, it was dug up and all soil was sieved, a thick sowing of mustard seed sown(purchased from The Seed Collection) and dug into the existing soil
.jpg)
John says: Tomato plants surrounded by basil plants, good mates who look after each other. This companionship had worked and gives us a tasty crop . No pest or disease to contend with . Both are fertilised using liquid seaweed. Butter beans behind to act as shade block from westerly afternoon sun
Linda (QLD)
.jpg)
.jpg)
.jpg)
Linda says: Beautiful Dalia flowers in my garden. I bought dahlia bulbs from the seed collection
.jpg)
Linda says: Okra flowers
.jpg)
Linda says: Hug : )
Sianne (WA)
.jpg)
Sianne says: We decided to remove all of the grass and laid gravel. Hubby built 5 huge raised vege patches, and I filled them with a selection of goodies from The Seed Collection. We installed a cactus garden into the gravel, using pieces salvaged from Owy’s Cactus Nursery and green waste plants, following 2 tornadoes in the area. The garden is 3 months old and doing well, handling the summer heat.
.jpg)
.jpg)
Sianne says: My prize cactus is a variegated piece from the cactus nursery. They sold a lot of pieces of cactus after the tornado that nearly wiped them out. We had an old chiminea that I painted and filled with succulents. They are thriving and are spilling out of the mouth now, and look great.
.jpg)
.jpg)
Sianne says: The vege boxes were so large, we filled the bottom third with broken bricks, then lined it with shade cloth. This reduce the soil needed significantly and provided great drainage. A windmill has provided a trellis for the baby dragon fruit, so it will eventually grow up the middle and drape from the centre stays.
More trees please (VIC)
.jpg)
.jpg)
.jpg)
More trees please says: My garden doesn’t really have a style as such. It’s a bit of an eclectic mix of plants that’s constantly changing. My favourite area at the moment is creating a mini woodland area with silver birches. It’s a very peaceful corner which I hope will become more enclosed as the trees grow
.jpg)
More trees please says: I really enjoy having a shady area for hanging pots and wall pots. The grapevine creates shade in summer and lets sunlight in in winter
.jpg)
More trees please says: An old vege garden has been turned into a frog pond which allows me to grow water lilies while also giving frogs a haven
Kim Wiggins (NSW)
.jpg)
Kim says: This is my vegetable garden, well half of it:) I have a back injury so it is all raised beds that are 600mm high and 600mm wide, so no bending or reaching. The total area is about 5m x 4m. I absolutely love spending time in here and I try to keep the garden full of vegetables, flowers and herbs. Usually by late winter it is absolutely magical, pumping out fresh veggies and herbs. I get enough food out of the garden to cover about 85% of the vegetables my family eat.
.jpg)
Kim says: The hole garden is enclosed and protected from possums by chicken wire which is hard to see in the photo. At the back of all the beds I have used galvinised rio trellises supported by star pickets.This makes it easy to support beans, peas, and in this photo tomatoes.
.jpg)
Kim says: If I run out of space in the beds, I use potato grow bags to gain extra space. In the photo featured they are full of lettuce and bok choy.
Shae Wheeler (VIC)
.jpg)
Shae Wheeler says: I love to plant indigenous natives for my soil type and location, a ‘heathy woodland’ according to the Gardens for Wildlife program. The courtyard garden has flowers for joy and pollinators plus expensive to buy herbs. Our style is edible, natives and joy!
.jpg)
.jpg)
Paradise (QLD)
.jpg)
.jpg)
Paradise says: Our beautiful flower and vege garden.
.jpg)
Paradise says: Lovely flowers and great perennials.
.jpg)
Paradise says: Fruit trees maturing can’t wait to taste the fruit.
Ali (VIC)
.jpg)
Ali says: This is my balcony garden, where I am experimenting with what vegetables can be grown this way. Cherry tomatoes, tomatillos and cape gooseberry are dominant in this picture. I am also growing flowers, I affectionately refer to my balcony as the insect and spider sanctuary, there is so much life here after a short time trying to grow myself a few veggies.
.jpg)
Ali says: Zinnia being visited by a blue banded bee, tomatoes in the background.
.jpg)
Ali says: King parrots enjoying the cherry tomatoes.
Angela J (VIC)
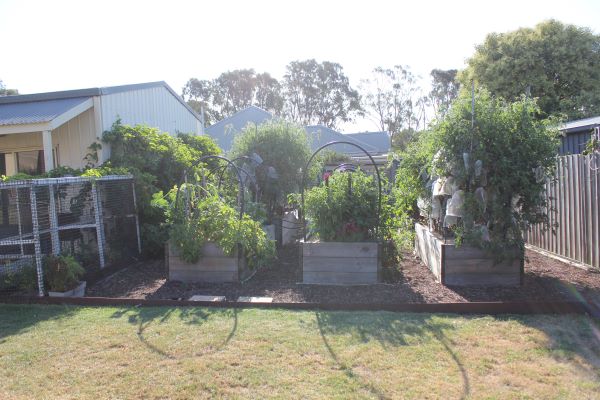
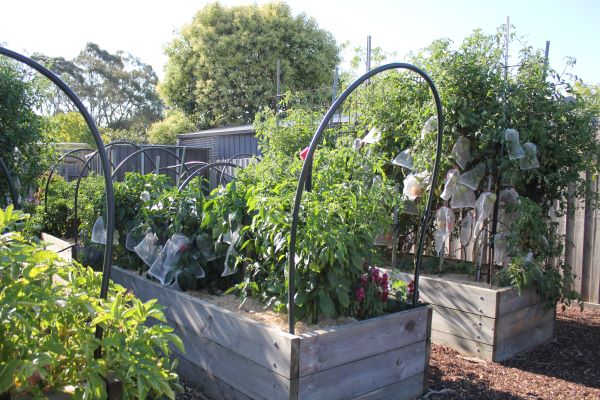
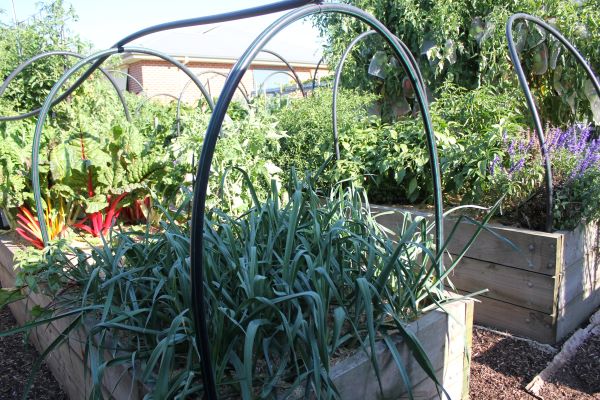
Angela J says: We have 6 veggie beds and love spending time out in the garden, we have to harvest every second day. we share our spoils with family friends and neighbours asd we also have a free box on the side of our property where we share additional produce and seedlings that we haven't planted.
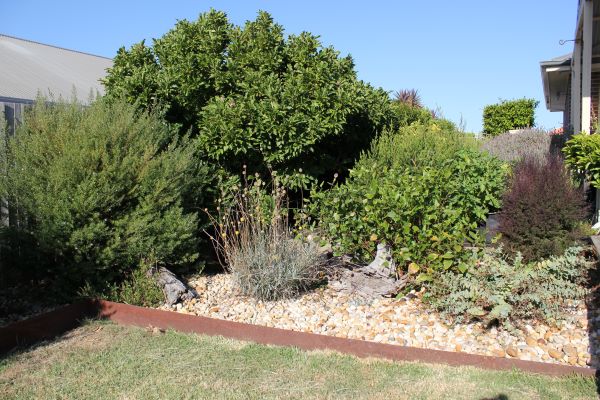
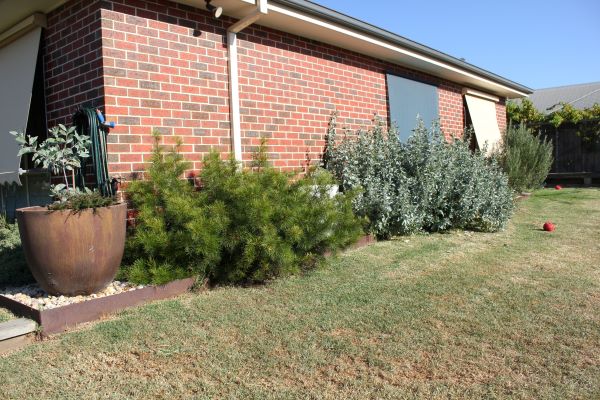
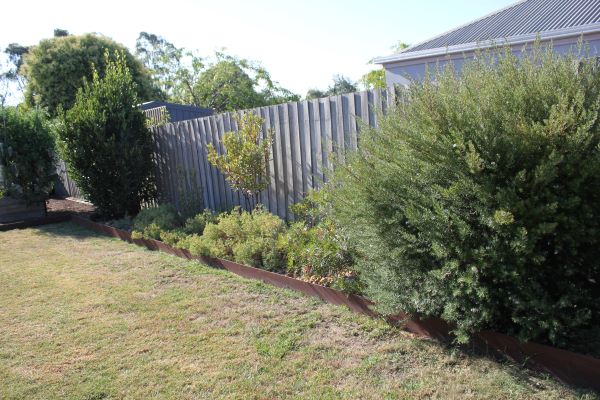
Angela J says: We went with native plants and replaced the cottage garden that was over grown, we have a frog pond and love to sit out in the undercover area and listen to them in the evenings
Jo (VIC)
.jpg)
Jo says: This was a wasteland at the back of my garden with clay soil no bees or other living things.I'm only learning so I built the soil up, with my own compost, put up a fence to stop the dogs getting to it - added a found wash trough and bought some grow bags. Planted cucumbers up the fence, pumpkins along the ground and tomatoes and herbs in the grow bags. I let the grass grown and oregano go to flower to keep lizards and insects safe and made water bowls with rocks hidden in thr pumpkins for bees and insects to drink from
.jpg)
Jo says: Success - I grew something and it was the best tasting cucumber ever
.jpg)
Jo says: I recycle everything I can get my hand on and found this statue on hard rubbish and the calendula on a waste heap and gave them a new home
Emma (VIC)
.jpg)
Emma says: Garden overlooking the chook pen. First year growing capsicums, and the zucchinis are going strong
.jpg)
Emma says: Always win my heart with a sunflower
.jpg)
Emma says: All flowers in the photo were grown from seed from me. Very proud of my flower oasis.
Trial and error
Bunbun (VIC)
.jpg)
Bunbun says: On the left is most of our flowers in the garden bed and on the right is most of our fruit and vegetables. Then scattered around the backyard is my brother in laws potted fruit trees lol. It’s our first year doing a garden so its a little all over the place but we’ve been having fun and learning a lot.
.jpg)
Bunbun says: These are chillies I got that are very pretty, they start off purple then go yellow, orange and then red. Haven’t gotten a chance to eat them yet though but I think they’ll be tasty.
.jpg)
Bunbun says: I saw this flower at bunnings in the clearance section, it was half dead with no flowers so it was only 3$. I don’t have the money to spend on this type of flower normally because they are normally 13$ so I was very happy I was able to save it!
Christine (WA)
.jpg)
.jpg)
.jpg)
Christine says: Beautiful flowers all grown from seed purchased from the Seed collection
.jpg)
Christine says: Sunflowers are my favourite I love watching the birds grazing on them first thing in the morning
Happenstance (NSW)
.jpg)
Happenstance says: Lavender growing well in the dryer, well drained soil on the rock wall and Marshmallow growing in the damper are area around the rainwater tank
.jpg)
Happenstance says: Young heritage fruit trees with strawberries, self seeding annuals, medicinal herbs and perennials. My entire 1/2 acre garden (from totally bare rock and dust) is only 5 years old
.jpg)
Happenstance says: Right outside the yurt is my flourishing heritage veggie garden of many varieties of herbs, nasturtiums and marigolds. This area was ph 9 due to dumped lime mortar in the1800’s. With a bit of hard work it’s now good friable ph 5-6 soil.
Amy Drought (QLD)
.jpg)
Amy says: Large food forest in a retainer wall to protect from summer floods. An archway with be created alongside it with the Surinam Cherries and Gramichamas. Banana trees surround the fire pit. Granny flat at the far end.
.jpg)
Amy says: A Cassava plant is growing beside a Buddha. I created this as a reflection of my visit to Vietnam; I ate Cassava wedges for the first time after the Cu Chi Tunnel tour. I also visited many spiritual places.
.jpg)
Amy says: Growing some tasty watermelons to suppress the weeds by shading them out. It’s great to plant ‘living ground covers’ to lower the maintenance (less manual weed pulling and whipper snipping) and provide flowers for pollinators and fruits for the family. This is especially true in summer or busy times.
Barry Ward (VIC)
.jpg)
Barry Ward says: We are on the top of an exposed, windy hill in Central Victoria. Here we have our front garden of predominantly native plants. There is a small patch of lawn between the house and the plants. The stone work was done by ourselves, using stone collected from our property. Watering is reliant on dam water and rain.
.jpg)
Barry Ward says: We have designed a u-shaped raised garden bed, with a little seat in the middle and covered by a grape vine grown on an old "Hill's Hoist". Behind it is a little green house/seed raising house, built from scraps of wood and recycled windows and tin. We do not have mains water where we are and so rely on dam water for watering. We have a small pond made from a cattle trough to encourage frogs and lizards. We have an old bath for a worm farm and a re-used water tank to grow pumpkins and watermelons in (they are not in the photo).
.jpg)
Barry Ward says: This is what we call our "Covid Nature Walk". During Covid lock-downs, we spent most of our time outside, dedicated to this project.We fenced off a section of a paddock next to our chook pen and started planting a mixture of tube stock natives and cuttings and seeds we had collected and propagated ourselves. This is what we have four to five years later! The diversity and amount of bird life and insects that visit is thrilling. We have had to learn by trial and error what is suited to our climate, and we live daily with the challenges of kangaroos and rabbits. However, we are constantly reminded that even in a "dark time" in Victoria's history, new life and opportunities can grow!
Lai Yee (NSW)
.jpg)
Lai Yee says: My garden is only 6 metres by 4 metres but it sure packs a punch with edibles and ornamentals. I let the garden do its thing and let it create little pockets of surprises when I find a little cucumber or a zucchini hiding amongst the growth.
.jpg)
Lai Yee says: The pathway to my garage at times has felt like a secret garden because the plants offer start to invade the is walkway. The bay leaf tree is not only providing shade in the summer but is also a trellis for my dragon fruit and snake beans.
.jpg)
Lai Yee says: I like to mix edibles with ornamentals to create a diverse garden
Jess (VIC)
.jpg)
Jess says: Our thriving veggie garden is in our tiny backyard in a suburban area. Proving you don't need a lot of space to have a garden! We created a garden bed ege using sleepers along the fence, and installed a mixture of rectangular and round corrugated beds, at different heights. We wanted a sprawling garden that feels lush and packed to the brim with variety. One half of our yard is a productive edible garden, the other end (not pictured) is a Australian flowering native garden to attract wildlife, with some grass for our dog or course!
.jpg)
Jess says: Something we are especially proud of in our garden is our fruit trees, like our two dwarf Cherry trees, grown espalier against our fence line, making full use of every last inch of growing space! We also have a huge passionfruit growing along the fence, which makes use of the narrow space down the side of our house. Limited space is always a challenge, but growing up vertically gives us the best results!
.jpg)
Jess says: Living in a housing estate, without any established trees or gardens, we found it a challenge to attract bees and insects, as well as birds, to our garden for pollination and a healthy ecosystem. We decided to plant giant sunflowers in the raised garden beds, for extra elevation. We also bought mixed flower seeds (along with our Veggie seeds) from The Seed Collection, and grew an abundance of pollinator friendly plants. We noticed after a while, that our flowers attracted so many bees and insects. It is because of this we've been able to have a thriving garden that we love and gives so much back to us!
Stephen King (NSW)
.jpg)
.jpg)
.JPG)
Stephen King says: My 3 vegetable gardens. I live in a caravan park in a very small town in Quinninup in the Southwest of WA. I have lived here for 3 years now as a result of being left homeless from the covid times. I had no soil to start with, as its all clay based. I created all my own soil from leaves and sticks, biochar, food waste and kangaroo poo. I wasn't sure how I would go but I'm happy with most of my plants except I struggle to succeed growing corn.
Thank you for this Opportunity
Stephen
.jpg)
Stephen King says: OMG. I didn't think my Sunflowers would grow so tall. I had quite a lot of trouble keeping the sunflowers upright and at my first attempt all my seedlings the kangaroos ate all my seedings
.jpg)
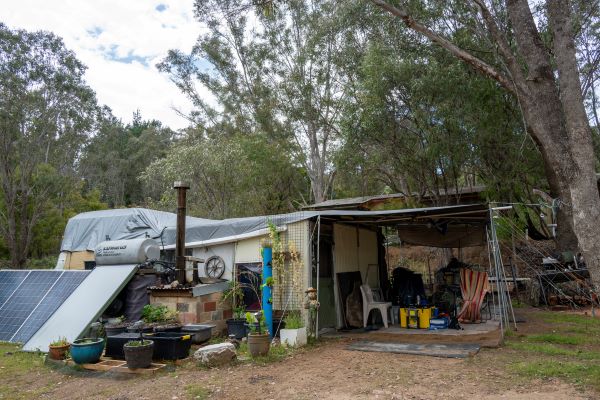
Stephen King says: This are has a lot of water that created flooding, I placed this garden bed there to make good use of the water and stop the flooding and grow some food.
Christine Winton (VIC)
2(1).jpg)
Christine Winton says: My 91 yo Dad posted bean seeds from WA... they are special to me, and watching them grow gives such joy!
Small balc, afternoon sun
.jpg)
Christine Winton says: 39 degrees, hot northerly winds. I used wet towels to shelter my *babies!* They were attacked by minute brown insects, so I made chilli and garlic spray...loss of leaves but still, a few flowering buds remain. My seeds for next season!
.jpg)
Christine Winton says: Proud of my Dad and myself for both our efforts!
The Seed Bomber (VIC)
.jpg)
The Seed Bomber says: There's absolutely nothing big about my garden - it's a collection of pots and this is my culinary veg and herb "shelf" which has all kinds of things growing in it including bush beans, mint, basil, chives, sage and galangal. It's proof you can grow a lot in a small space!
.jpg)
The Seed Bomber says: I love this self-watering planter, and in winter I buried a couple of asparagus crowns in it. As there appeared to be no shoots in December, I scattered cucumber and basil seeds on top. To my surprise, healthy asparagus shoots pushed their way up and filled out the space with a vengeance this January! The basil is a little sulky about the shade, but the cucumber is unfazed.
.jpg)
The Seed Bomber says: Strawberries seem to survive anything I throw at them - last year, my three plants multiplied into ten so our family have all been enjoying a daily strawberry or three this last few weeks.
The Poo’s Patch (VIC)
.jpg)
The Poo’s Patch says: In my garden more is more! There’s always room to experiment with a new plant I haven’t grown before and a mix of edibles and gorgeous florals
.jpg)
The Poo’s Patch says: A mix of dahlias, cosmos, zinnias and many more. The colours are so happy and bee attracting
.jpg)
The Poo’s Patch says: My pumpkin arbour ( look over the powdery mildew hectic weather) and it has many huge Kent pumpkins growing by along with a few other varieties with strawberries either side reusing milk crates and hessian sacks
Christine Yunn-Yu Sun (VIC)
.JPG)
Christine Yunn-Yu Sun says: This is a corner of my greenhouse, where I try to utilise the vertical space above a planter stand. There are 36 spots/pockets, so I put in a variety of succulents that I think look good against a black background. The water used for these plants will drip down to the planter stand below where strawberries and sweet alyssums are grown. Not showing in the photo is an irrigation system that I recently installed, which allows water to drip from the top of the "succulent pocket garden" and again benefit the plants below.
.JPG)
Christine Yunn-Yu Sun says: This is my north-facing kitchen window, where I use the narrow space between the sink and the window frame for propagation. The window itself features the plants outside, which resemble a jungle and often have birds hopping and chirping during the day and possums chewing on new leaves at night. In front of the window are plants such as (left to right) propagated pothos, some sort of flat African Violet, a small aloe vera, a taro grown from tuber, a lettuce and some green onions grown from kitchen leftover, more taro tubers submerged in water, etc. It is a mess, but great for propagation thanks to the heat from the sink and the shaded light.
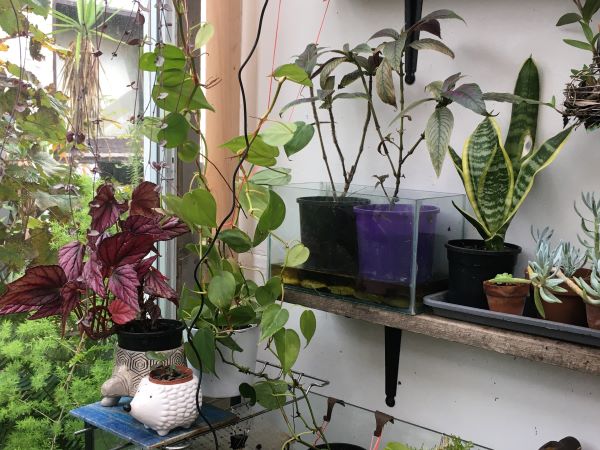
Christine Yunn-Yu Sun says: This is one end of my greenhouse, just above the turtle tank. It is facing south but has strong western sunlight in the afternoon, even when it is roughly shaded by the plants outside the window. So the space above the turtle tank is used for begonia and pothos, where they grow really well. The turtle tank itself helps supporting pothos and sometimes spider plants. The photo shows one of the shelves along the wall, where Persian Shields, snake plant and a variety of succulents are growing.
Jane Kumar (NSW)
.jpg)
Jane Kumar says: This is my garden from the side. I try and do alot of companion planting to get the most of the space. The corn, zucchini, carrots and eggplant are flourishing at the moment. Everything in the garden is easily accessible to my 2 year old and 4 year old.
.jpg)
Jane Kumar says: This is our pumpkin patch/ potatoe patch. Every morning the kids inspect the pumpkins and ensure the bees are thriving. Next to to the patch we have scarlet runner beans, Corn, Cucmbers, carrots an eggplant..
.jpg)
Jane Kumar says: This zuchinni plant was wiltered down to nothing, after some trimming of the leaves and rain it has come back with vigour. We have picked 3 large zuchinni's from this plant in the last week.
Sue (QLD)
.jpg)
Sue says: I have handmade wicking beds for vegies (old tank cut in 3). 23 fruit trees, 3rd year. I have 4 chickens who have free rein around the enclosed orchard.
.jpg)
Sue says: With the lack of rain and excessive heat here in the Mid North it’s been a battle getting seedlings going this year. I grew my seeds in a greenhouse then moved them to my wicking beds, only 50/50 success. I do love to grow our own food. This is my 3rd year of our 23 fruit trees, some have done better than others. We are battling the wind here also, most of my spring blooms are in the wind! Having only had gardens in the North Brisbane area and Cairns, Queensland, this has been of a learning curve for me.
Knomor Garden (VIC)
.jpg)
Knomor Garden says: This is a quarter of our veggie garden!! Our veggie garden is 20 rows, 20m long!! To help with maintenance this year I have repurposed some corrugated iron tanks and made raised garden beds. Right now it is abundant with tomatoes, corn, beans, cucumber, zucchini, potatoes, beetroot, Mexican Sour Gherkin, carrots, fennel Strawberries and of course flowers!! We love dahlias!! And borage (or "porridge" as the kids call it) has self seeded. We love spending time as a family in the garden.
.jpg)
Knomor Garden says: This is one of the raised beds installed with the help of our neighbour. We have put livestock mesh for a trellis which has snow peas growing up it. We have just begun harvesting corn. It creates shade for lettuce and basil growing beneath it. Celosia adds colour, as does the flower garden stake made by my brother and his family who gifted it to us. Cattle ear tags make great plant markers!
Leonie (QLD)
.jpg)
Leonie says: The overall style of my garden is a casual mix of Indigenous plants, hardy introduced species combined with productive fruit trees and vegetables. I aim for a loose, lush feel, which is no mean feat considering where I live (1 hr north west of Toowoomba) gets drought & frosts. In this photo we've got Lomandra, Jacaranda, Pepperina, tea tree, dwarf lemon (hiding), and geramium
.jpg)
Leonie says: This area is a bit of a sun trap. I've used plants that don't mind hot, dry environments. Hardy things like lomandra, saltbush, pigface, callistamon, Grevillea, acacia, Leucospermum, succulents, Melaleuca bracteata etc. There are a couple of self seeded eucalypts that are growing up & providing welcome shade. I enjoy seeing how this space changes as plants mature.
.jpg)
Leonie says: This photo shows that no matter how dry it gets out here there is still beauty in abundance. This whole property uses tank water only.
Allawah Cottage (VIC)
.jpg)
Allawah Cottage says: We have created a garden with clean lines, showcasing exotic plants and native plants in separate areas. We have mixed in edible yet ornamental plants such as citrus trees in amongst the exotic plant garden beds. We have built an outdoor cinema at the end of our lawn area. The garden is well lit at night with spot lights. There's always something to enjoy in our garden no matter what season nor what time of a day
.jpg)
Allawah Cottage says: Our new kitchen garden with arches for climbers and fairy lights. We have chosen higher rasied beds to stop our pooches from getting in. They are deterring not only our pooches but also the rats we had a problem with last year so we are very happy about that! 95% of the plants are grown from the great quality seeds from The Seed Collection which are all doing very well. We have planted Lebanese cucumber, Marketmore cucumber and Small Sugar pumpkin on the arches.
.jpg)
Allawah Cottage says: This is our first year growing eggplants and we just can't get over how beautiful eggplants are. They shine like jewells amongst the sea of green, we are so in love with them!
]]>