
Summer and the holiday season present their own challenges when it comes to watering your garden, especially if you want to go away for a couple of weeks. Your friends have offered to water your plants while you’re away, although they are going to be away for a few days too. Normally that wouldn’t be a problem but your plants, particularly your summer veggies, are at the stage where a day or two without water, especially if there’s a heatwave, could completely ruin your harvest, so, what to do?
I had this same dilemma a few summers ago, so I decided to set up a temporary, automatic watering system connected to a timer. It was the perfect solution. I was happy, my plants were happy and my friends, while still very happy to come and water my plants, were relieved not to have full responsibility for my summer veggie harvest!
Setting up the system was easy, especially as it was designed to be temporary and as low-cost as possible. I was also able to customise the system to my particular garden and plants. My garden is tiny, so I garden almost exclusively in pots, and because pots can dry out very quickly, I used a combination of spray and dripper heads to ensure each plant received the right amount of water. Being able to tailor the amount of water given to the different plants also reduced the chance of either over- or underwatering them. Another advantage of this system is that it is highly portable, so it is an ideal DIY project if you live in a rental property and don’t want to set up, or spend money on, something more permanent.
I’ve left my system in place for a few summers now and it works like a dream. I adjust the timer settings depending on the predicted weather before I go away, then change those settings when I come back and can be more hands-on with my garden again. I switch it off over winter and give it a quick check, clean and flush before the weather starts warming up again.
With summer on our doorstep, here’s a list of the things you’ll need to set up your own automatic watering system, along with some ‘handy things to know’ so you can summer-proof your garden and enjoy your holidays without worrying about your plants.
What You Will Need
Starter irrigation kits are available but they sometimes include components you don’t want or won’t use, so it’s often more cost effective to figure out what will work best for your garden and then only purchase the pieces you’ll actually need.
The main components you’ll need for your own automatic irrigation system include the following: tap timer, tap adaptor, poly pipe, flexible tubing, ratchet clamps, tee, straight, elbow and 3mm connectors, end plugs for the main pipe, punch tool and sealing plugs, and your choice of spray and dripper heads.
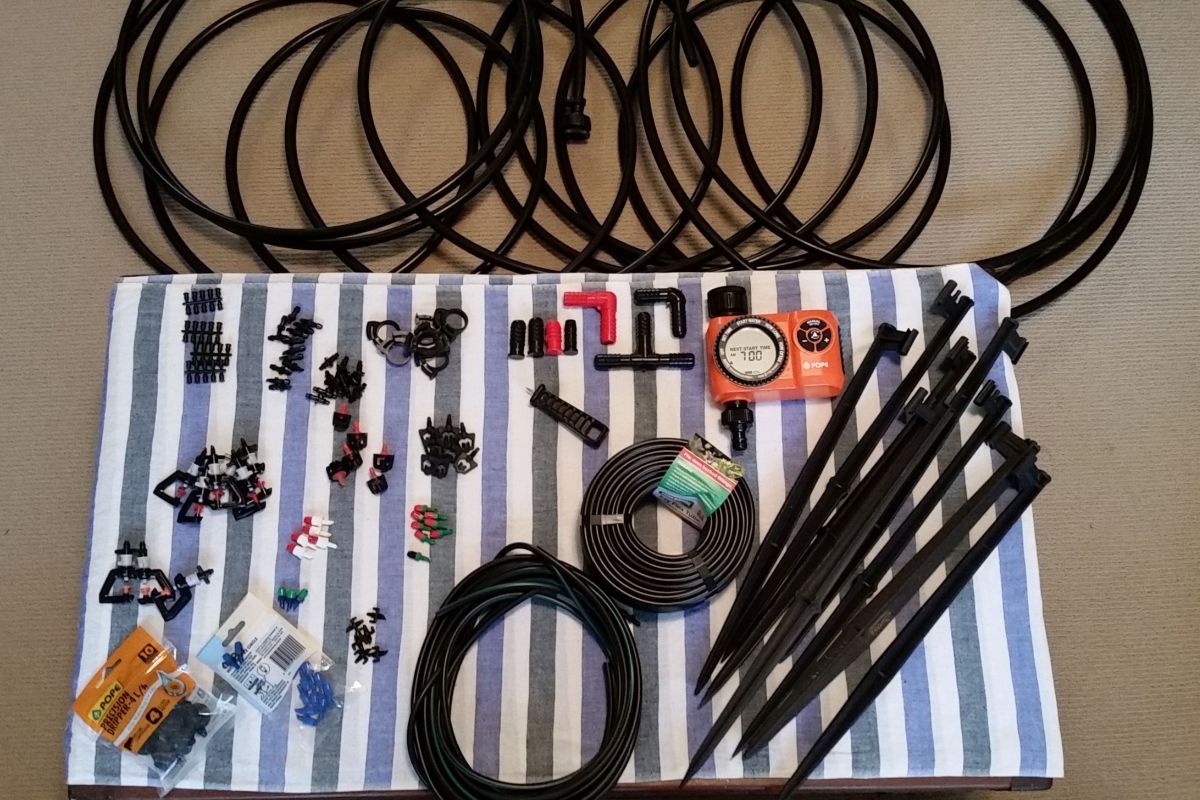 Customised collection of irrigation equipment.
Tap Adaptor And Timer
The timer is what makes your system automatic, and the two-way tap adaptor isn’t vital but very useful. The tap adaptor allows you to attach the timer and irrigation system to one side, and a regular hosepipe to the other. It means you don’t have to disconnect the whole timer assembly if you need to use the tap to fill a watering can or attach a hose to do some spot watering.
Different configurations of tap adaptors are available.
A timer is of course the key component of an automatic system. A programmable, battery-operated timer is simple, effective and the battery lasts a long time. I do replace the battery before each summer just in case it goes flat during peak hot weather or while I’m away. Choose a timer that has automatic, manual or rain-delay modes, flexible time scheduling from 1 to 12 hours or 1 to 7 days, and watering duration options from 1 minute to 4 hours. The manual setting is useful to set short times so that you can quickly check if your spray heads are clear, unblocked and spraying in the right direction before switching it to automatic.
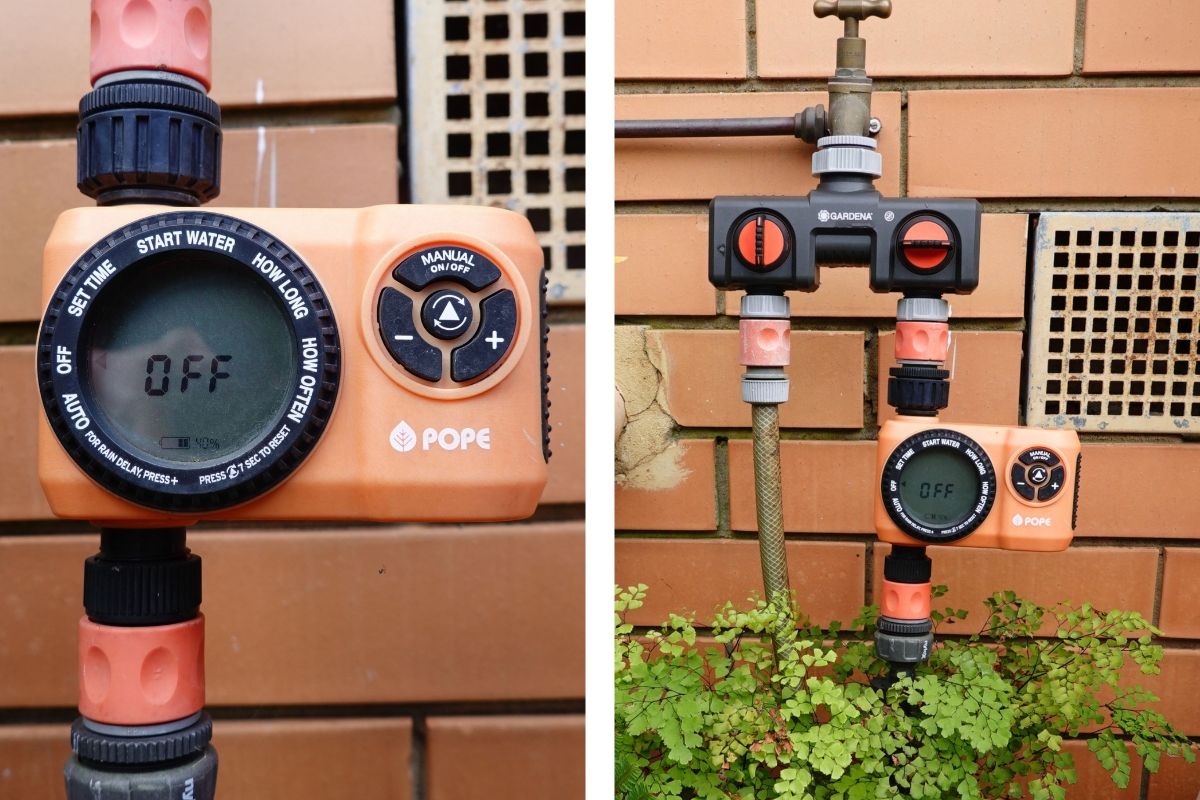 Programmable battery-operated timer with tap adaptor and timer set-up.
Pipes
You’ll need two types of pipes for this project. Poly pipe with either a 13mm or 19mm diameter which is the main water line you’ll run through and around your garden. To work out how much poly pipe you’ll need, decide where you want to lay it and if you want to run any extra main lines off it.
The other type of pipe is 4mm diameter flexible irrigation tubing. This is run off the main pipe and the spray heads are fitted into this tubing. A roll of the flexible irrigation tubing is more useful than precut lengths, which are often already attached to a stake and spray head, because you’ll have more flexibility as to where you can put your spray or dripper heads.
In my small garden, I used the narrower 13mm black poly pipe for the main line because it is lighter and more flexible which made it easier to run between and around my pots. Although my system is temporary/portable, I also wanted to be able to leave it up year-round and for my garden to still look neat and visually appealing, so I laid the main poly pipe around the perimeter of my garden behind my pots and then ran the flex pipes off that.
If you have a larger garden, then choose the larger 19mm diameter poly pipe as it can deliver a larger volume of water and feed a higher number of spray heads over a greater area.
It also helps to try set your system up on a warm sunny day rather than a cold day. Leaving the pipes out in the sun warms and softens the plastic which makes it easier to handle. It also makes slipping the connectors or spray heads onto the pipes, and poking holes into the poly tube for the flex tube connectors, much easier. If you have no choice, try dipping the ends of the pipes into a bucket of hot water to soften them first.
Adaptors, Connectors And Clamps
Adaptors and connectors are used to connect your main pipe to the tap, to lengthen or run extra lines off the main pipe and to connect the flex tube to the main line. They can be barbed or threaded, with the inbuilt barbs on the barbed connectors helping prevent the pipe sliding off the adaptor or connector.
Elbow connectors can be used if you want to fit the poly pipe neatly into or around any corners instead of trying to force the pipe to bend. Forcing a sharp bend in the pipe is not a good idea as it kinks and pinches the pipe and slows or even stops the water flow. A tee or ‘T’ connector can be used to split a single main line so that it can branch off in a different direction, and straight connectors allow you to join two pieces of piping.
Small 3mm connectors are used to attach the flex tube to the main pipe. These barbed connectors are pushed into the end of the flex tube and then pushed into a small hole made in the main poly pipe with a hole punch.
Use locking or ratchet clamps to secure the main poly pipe to the tap connectors or where you might join two sections of pipe together. You may be tempted to avoid using clamps, but they help stop the pipe slipping off the connector if there is a sudden surge in water pressure or if the pipes start working loose for whatever reason. If you don’t have clamps, then use a short length of wire to secure the pipe to the connector.
Hole Punch Or Spanner, Sealing Plugs And End Plugs
A purpose-made hole punch is useful because it is the correct size for making holes for the small connectors. A nail or other sharp round object can be used but there is the risk of making the hole too big, in which case it might leak.
Small sealing plugs or hole blockers are your friend. Definitely get some! It’s easy to make a mistake or find you want to move a tube further along the pipe. They are flanged and barbed, and you simply push them into the hole to seal it.
Use end plugs, secured with a ratchet clamp, to seal the end of the main pipe. A temporary fix if you don’t have an end plug is to fold the pipe and secure it with wire. The folded end may however become a weak spot and get brittle and crack with time, especially if it is in the sun, and start to leak, so be sure to regularly check for leaks if you have closed the ends of the pipes like this.
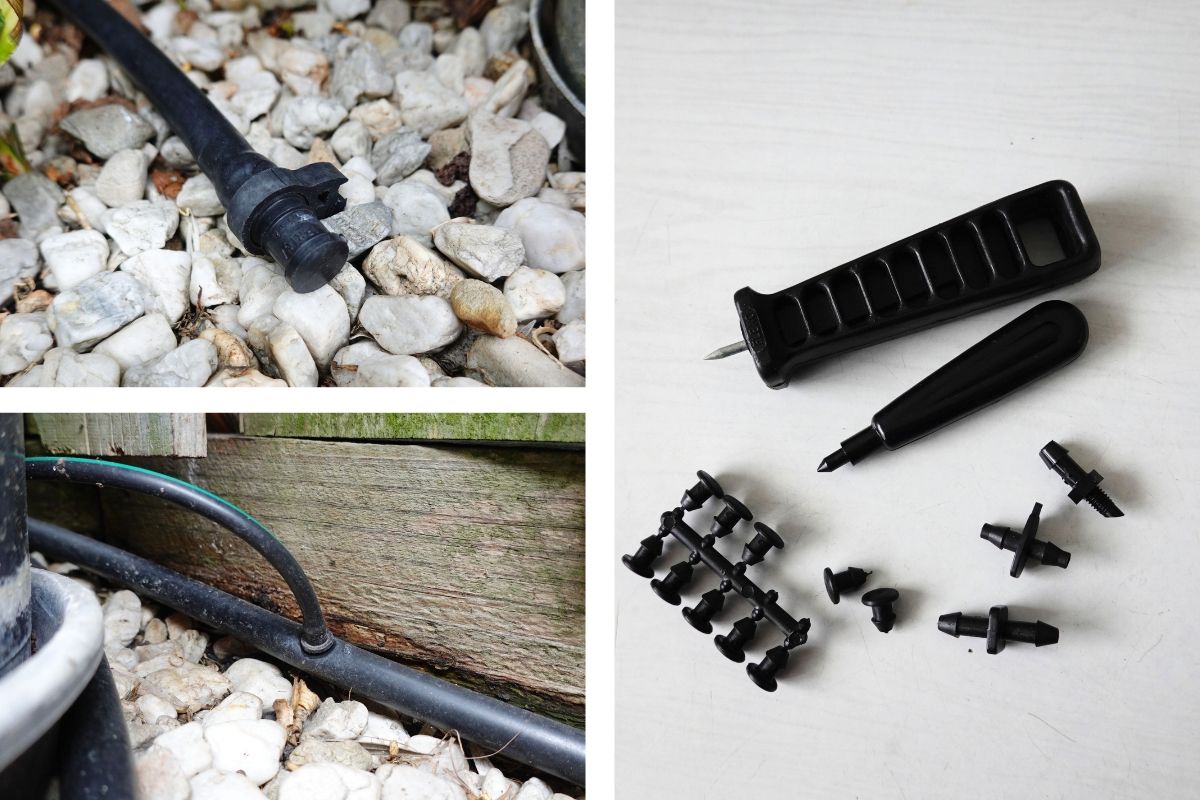 Poly pipe neatly sealed with end plug and ratchet clamp; hole punches, flanged sealing plugs and 3mm connectors to attach flex tube to the poly pipe.
Riser Stakes
You will need some form of stake to hold your spray heads. For a temporary or portable system, a spray head attached to flex tube supported by a riser stake allows more flexibility in placement than a rigid plastic riser. It also allows you to alter the height of the spray head more easily to ensure water reaches all your plants.
Ready-made plastic riser stakes are handy as you simply slot the tube with the spray head into the holder at the top and push it into the ground or pot. Like rigid risers, these stakes are of limited height but can be affixed to a longer stake if you need them to be taller.
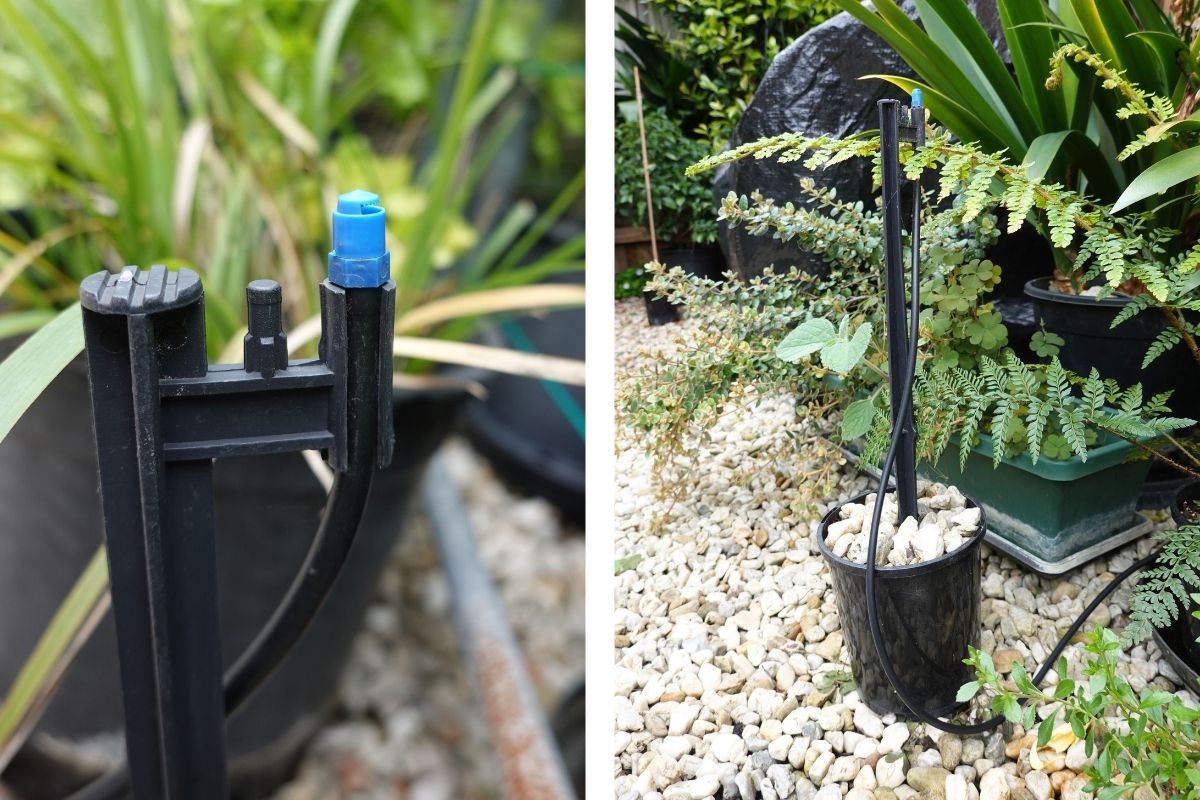 Plastic riser stake with tube slot at the top.
I only had a handful of plastic riser stakes, so simply attached the remaining flex tubes directly to some bamboo stakes. I then made the bamboo stakes as tall or short as I needed. When using bamboo stakes it is important to tie the flex tube to the stake in at least two or three places to prevent the tube moving and causing the spray head to no longer direct water to where it is needed. Cable or zip ties work excellently to keep the flex tube snug and tight against the bamboo stake. Just don’t cinch the ties too tight or you’ll restrict water flow. Position the spray head so that it is just clear of the top of the stake. In this way you can still easily remove and replace the spray head if needed, but the flex tube doesn’t extend above the stake and cause the spray head part to flop about.
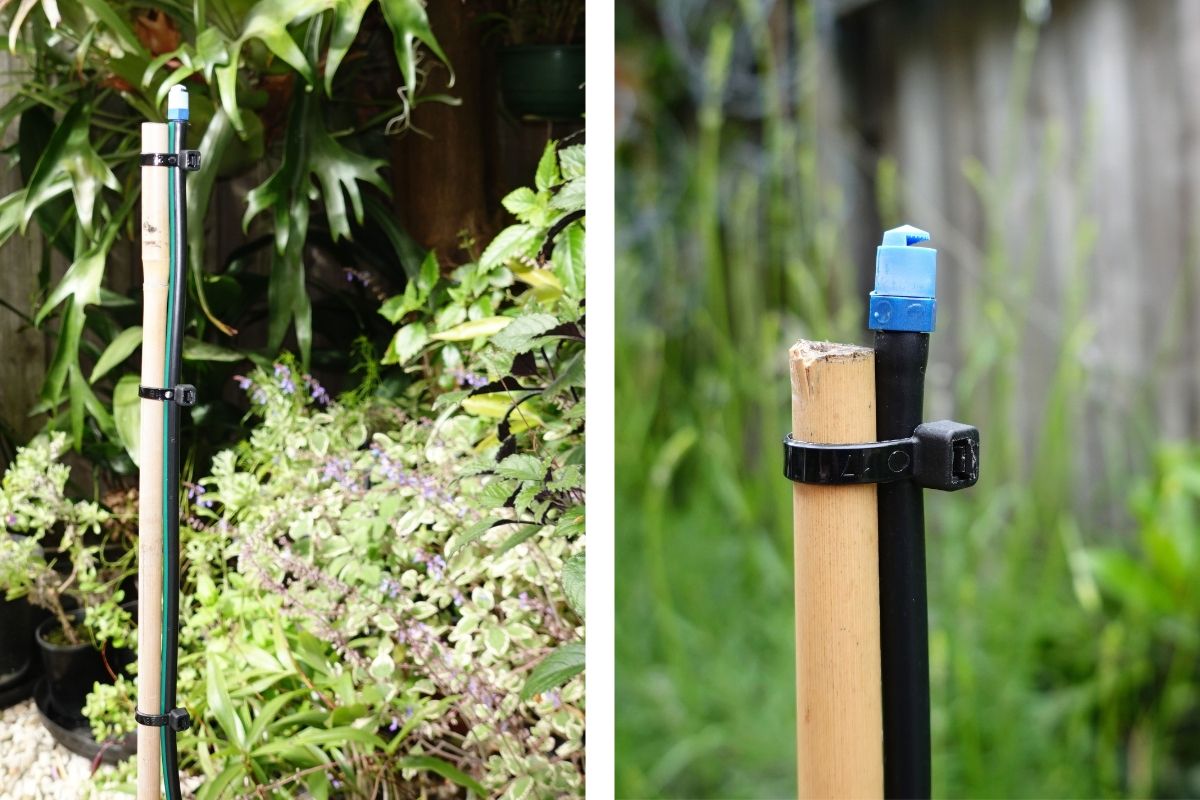 Cable ties holding the flex tube snug against the stake.
Home-made riser stakes can be pushed into the ground or plant pots but if you want even more flexibility, or have a solid courtyard floor, then placing the stake in a pot filled with pebbles, stones or sand works exceptionally well. Just be sure that whatever you use is heavy enough so that it doesn’t blow over in the wind or when a bird decides to cling to it! The size of the pebbles must be small enough to be able to bed tightly around the bamboo stake to hold it upright.
Filling a pot with pebbles to secure a bamboo stake to hold the flex tube and spray head.
Spray Heads
There is a huge variety of spray heads to choose from, and I found a mix of spray and dripper heads works best in my garden.
Spray head patterns vary from a narrow 45o angle through to 180o and even 360o to give a much wider coverage. Some provide a ‘misty’ spray while others deliver skinny lines of water.
Dripper heads are ideal for delivering water right to the base of the plant and are handy for ensuring individual plants get either more or less water according to their needs or pot size. In my garden I use drippers in the larger pots and hanging baskets, and spray heads set at various heights for the plants in smaller pots. Adjustable vortex drippers heads are perfect as the flow to each plant can be adjusted from a wider circular flow to just a slow gentle bubble, or they can be shut off entirely. The flow rate through the main water pipe remains constant so spray heads will still operate effectively in conjunction with dripper heads.
Adjustable vortex drippers in hanging baskets and large pots delivering different amounts of water depending on the pot size.
Handy Things To Know
- Set the automatic timer for when there is little demand for water in the house, e.g. before people are having a shower in the morning. The best time to water is early morning before the heat of the day and before hot winds start blowing.
- Aim for the plants to be watered deeply and not for them to just get a superficial sprinkle.
- The length of time, and how often you water, depends on how quickly the soil in your garden or pots becomes drenched or saturated. In the height of a hot summer, I find that just 10-12 minutes every day at about 6.30am works well for my pots which tend to dry out quite quickly in the hot weather. For in-ground plants, a longer watering time at less frequent intervals may be more suitable because there’ll be some moisture stored deeper in the surrounding soil that will be available to plants. If it is very hot or if you are expecting a heatwave, then increase the amount of time, and maybe even the frequency because if you’re only watering every second day it might not be sufficient. It’s a case of trial and error and finding the sweet spot.
- Test the system when you’ve finished setting it up to ensure that all plants will receive adequate water and that none of them are in a rain shadow. Also make a note of how quickly the plants take up that water. If you do this at least a few days or a week or so before your holiday, then you’ll be able to make any necessary adjustments before you go away.
- To check the flow, open the tap just a little and set the timer to manual. When the water starts flowing through irrigation system, adjust the tap until you have the all the sprinklers spraying water where and how you want it. It may not be necessary or advisable to open the tap fully, especially if it is a high-pressure mains tap, so only open the tap as much as required to get a good flow throughout the system. Water pressure will drop further down the line due to friction in the pipe, if there are any significant elevation differences, and from water being drawn by spray heads along the way, so ensure the sprinklers at the furthest end of the line are providing adequate water to your plants.
- Frequent watering, or accidental overwatering, will leach nutrients out of pots, so top-ups with slow-release or liquid fertiliser may be required, especially during the growing season.
- Remember that plants grow quickly in summer and when the weather is warm, so large-leafed plants like zucchini can cause rain shadows and plants growing behind them may not get watered, especially if you have opted for spray heads only. Plan for this growth and adjust the height of the sprinklers before you go away.
Maintenance
Once set up, maintenance is minimal but it’s a good idea to regularly check the whole system for leaks and to see if any spray heads are blocked or damaged to keep the system in good and reliable working order. Uneven spray patterns, or low to no flow through the spray heads will alert you to any problems.
Spray heads are attractive to tiny spiders and small insects when they are not in daily use or during winter, and dripper heads on short spikes can get clogged with dirt that may splash onto them. Brush the spray heads with a soft, old toothbrush then switch on the water to see if they are still blocked. If they don’t flow freely after brushing, remove the spray head from the tube. Sometimes blowing into it can dislodge whatever is blocking it, otherwise use a toothpick or pin to gently dislodge the dirt… or bug!
Due for maintenance, these spray and dripper heads are covered in webs and debris.
Spray heads that have been out in the sun for some years may start to degrade and become brittle from UV exposure. Small pieces of the spray head may break off and when this happens the spray pattern will become uneven or water may gush out instead of spraying out, so these spray heads will have to be replaced.
Dislodging some debris from this spray head has restored the flow and spray pattern.
A DIY system like this need not be expensive, and can be as temporary, portable or permanent as you like. The best part is you won’t have to worry about your plants not being watered while you’re on holidays, although you may have to think about what you’re going to do with your summer veggie bounty and all those zucchinis when you get home!
Article & Photographs by Janet Hodgkiss