Climate Zones for Australian Gardeners
Knowing your climate zone will help you decide the best time to sow the vegetables, herbs and flowers you want to grow, and which varieties should perform well in your garden. Growing plants that are suited to your climate zone will usually give you the best results in your garden.
How to Use Climate Zones
First, find your climate zone using the map or descriptions below. Next, refer to our sowing chart, which provides approximate sowing times for our most popular seeds for each climate zone.
While knowing your climate zone is helpful when planning your garden, there are many other factors that may affect how your plants grow, including unseasonal weather conditions, the specific microclimate of your garden and how you care for your plants. You know your garden better than us, so if a different climate zone seems to ‘fit’ your garden better, go ahead and use it as a guide.
Our climate zones cover huge areas of Australia, so we recommend gardeners also consider their local conditions when planning what and when to plant. For example, gardeners in alpine areas have shorter growing seasons than gardeners in cool coastal areas, even though both alpine and coastal areas are included in our ‘Cool Temperate’ climate zone. We recommend gardeners in cool regions look at the ‘days to maturity’ information provided for each variety and choose those that will mature in a short (6-12 week) growing season.

Tropical
- Includes: Darwin, Cairns, Townsville, Exmouth
- High humidity summers with most rainfall in summer and dry, warm winters. Includes northern Australia from Exmouth (WA) across to south of Townsville (Qld).
- Set as my climate
Arid
- Includes: Alice Springs, Mildura, Albury-Wodonga, Shepparton, Wagga Wagga, Dubbo
- Hot dry summers, winters can be warm or cool depending on the region. Includes a large area of central Australia from the WA coast to Charleville (Qld), Tamworth (NSW) and Albury-Wodonga (NSW/Vic).
- Set as my climate
Subtropical
- Includes: Brisbane, Bundaberg, Coffs Harbour, Gold Coast, Hervey Bay, Mackay, Rockhampton, Sunshine Coast
- Warm humid summers with high summer rainfall and mild winters. Includes coastal Queensland and northern NSW from north of Mackay to just south of Coffs Harbour.
- Set as my climate
Temperate
- Includes: Sydney, Perth, Adelaide, Newcastle, Toowoomba, Central Coast NSW, Wollongong, Bunbury
- Moderate humidity and reliable rainfall, with four distinct seasons. Includes coastal areas from north of Port Macquarie to south of Woollongong in NSW, coastal SA and the southeastern coast of WA.
- Set as my climate
Cool Temperate
- Includes: Melbourne, Canberra, Hobart, Launceston, Ballarat, Bendigo, Geelong, Mt Gambier
- Low humidity with most rainfall in winter; hot dry summers and cold winters. Some regions will experience frosts and snow. Includes coastal areas of south-eastern Australia and alpine areas of Victoria, NSW and Tasmania.
- Set as my climate
Climate Zones FAQ
What if I can’t find my climate zone?
If you can’t locate your zone from looking at the map or the descriptions on this page, we suggest that you think of
an area that has a climate that’s similar to yours and use the zone for that area as a guide.
What if I live on the border of two zones?
If you live near the border between two zones we suggest you read the descriptions for both zones and decide which
best describes the climate where you live. Depending on the microclimate in your garden, you may be able to grow a
wider range of plants over a longer season than others in your zone. Lucky you!
What is a microclimate?
A microclimate is a small area where the temperature or humidity differs to the climate of the surrounding area. For
example, if you live in a climate zone where frosts are common but your garden is protected by buildings or large
trees, your garden may be frost-free. Similarly, if you live in a warm temperate zone but your garden is at a high
altitude your microclimate may have more in common with the cool temperate zone, so use this as a guide when
deciding which zone is relevant to you.
Can I grow varieties not listed for my climate zone?
While our climate zones and sowing chart will help you decide what is suitable to plant in your garden, they provide
general guidance only. We recommend you start by sowing seed that’s recommended for your climate zone; once you get
a few successes under your belt you can experiment with varieties in neighbouring zones and see how you go –
gardening is all about experimenting after all!

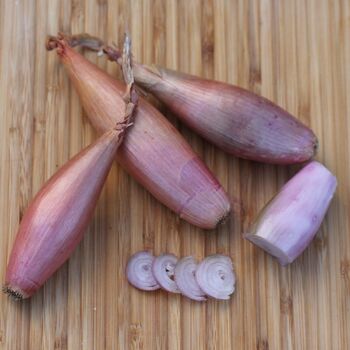
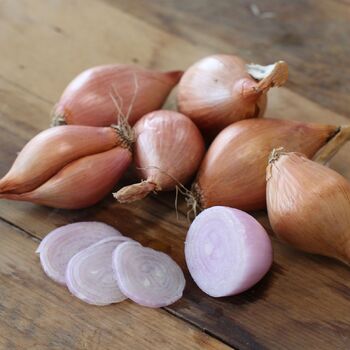
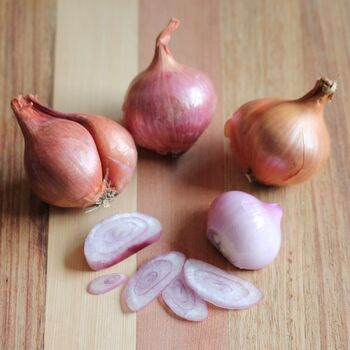
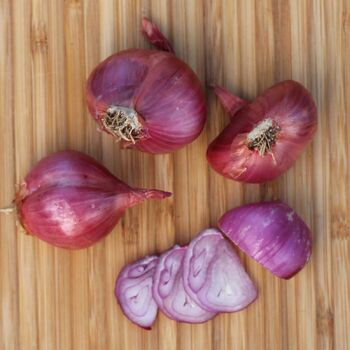
How to Grow Shallot from Bulbs
Grow Guide #2317
Family: Amaryllidaceae
Binomial name: Allium cepa var. aggregatum
Life Cycle: perennial (usually grown as an annual)
This 'How to Grow' guide details everything a home gardener needs to know to plant, grow and care for Shallots (Allium cepa var. aggregatum).
When to Plant Shallots
Shallot is a cool season crop. Use the table below to identify the best time of year to sow shallot in your climate.
| JAN | FEB | MAR | APR | MAY | JUN | JUL | AUG | SEP | OCT | NOV | DEC | |
|---|---|---|---|---|---|---|---|---|---|---|---|---|
| Cool | ||||||||||||
| Temperate | ||||||||||||
| Sub-Tropical | ||||||||||||
| Tropical | ||||||||||||
| Arid |

.png)


Preparation
Shallot plants are best grown in full sun. Choose a location that will receive at least 6 hours of full sun each day.
Shallot plants need a loose, well drained soil enriched with organic matter. Prepare soil by weeding it thoroughly, digging it over to at least a spade’s depth to loosen the soil, and adding aged animal manure or compost. Organic matter can be dug into heavy soil to lighten it so roots can grow freely. Keep the area free of weeds until planting. Learn more about preparing soil for planting here.
How to Plant Shallot Bulbs
Shallot bulbs are best planted directly in the garden.
- Plant individual bulbs 20cm apart with the pointed tip facing upwards and just visible above the surface of the soil.
- Cover with soil and water in well.
- Keep soil moist but not wet until shoots emerge.
How to Grow Shallots
Shallot plants may need watering during the growing season. Water when the soil is dry about 5cm below the surface (test this by scratching away a little soil with your finger). Water deeply in the early morning or late afternoon. Avoid watering the leaves of plants to avoid fungal diseases. Learn more about watering here.
If soil was well prepared no extra fertiliser should be necessary. Fertilising can result in excessive leaf growth at the expense of roots forming. In poor soil use a fertiliser low in nitrogen and high in phosphorus, such as blood and bone, applied at the recommended rate.
How to Harvest Shallots
Shallots should be ready to harvest in approximately 120 days.
Shallots are ready to harvest when the neck between the bulb and the leaves becomes soft and the leaves begin to fall over. Use a fork to gently lift the entire plant from the bed, shaking off the excess soil. It is a good idea to harvest a single plant first to make sure a bulb has formed; if the bulb is small or unformed, leave the remaining plants for 2-3 weeks then harvest and check another bulb.
Place the whole plants on wire racks or hang them in bunches, leaving them in a dry cool place for 2-3 weeks to cure. Bulbs with thick necks will not store well and should be eaten soon after harvest. For other bulbs, cut the dried leaves off 3-4cm above the bulb. Shallot bulbs can be stored in a cool dry place for up to 6 months.
Common Problems when Growing Shallots
Like all plants, shallot is susceptible to some pests, diseases and other problems. Below is a list of the most common problems gardeners encounter when growing shallot plants:
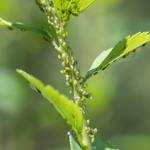 Aphids are small (2-4mm long) sap-sucking insects that congregate on the new shoots or the undersides of leaves. They can cause leaves to wilt or become discoloured, and also excrete honeydew which can attract ants and other insect pests. To manage aphids, remove them by spraying with a garden hose, apply a soap or alcohol spray, or encourage predatory insects to your garden. Read more about aphids here.
 Bulbs not forming can be caused by harvesting too early, inconsistent watering or weather, planting bulbs or cloves that are too small, or too much nitrogen during the growing season. Plant varieties suited to your climate, do not over fertilise, water regularly and harvest after the leaves have started to die down.
 Bolting is when a plant prematurely flowers and goes to seed. Bolting can be caused by a period of extreme weather. Avoid sowing seed until after the danger of frosts has passed or in very hot weather. Water plants regularly and deeply in hot weather to prevent them suffering heat stress.
 Rust (Puccinia sp.) is a fungal disease that causes brown to orange raised spots or patches to appear on foliage. Fungal spores are spread by wind or water to neighbouring plants, especially in temperatures of 10-20C and when humidity is high. To manage rust, space plants to avoid overcrowding, grow them in the recommended amount of light (eg full sun), do not over fertilise crops, remove dead plants and practice crop rotation. Read more about rust fungus here.
 Onion thrips (Thrips tabaci) are flying insects less than 1.5mm long with slender pale yellow to light brown bodies. They suck sap from plants, leaving silver patches on the leaves and reducing the productivity and yield of plants. Thrips can live in the inner leaves and leaf folds of alliums, and may also infest bulbs. Wash thrips from affected plants using a garden hose, spread an organic mulch around plants, and encourage predatory mites and lacewings with companion planting.
.jpg) Rotten bulbs or corms are caused by pathogens entering bulbs or corms after sitting in cold, wet soil, being temporarily waterlogged or being exposed to warm temperatures in winter. They may show obvious signs of rot, have no roots or shoots, or produce stunted yellow leaves but no flowers. Plant bulbs and corms in free-draining soil, raised garden beds or containers; do not water while dormant; and lift and store them if recommended for your climate.
Rotten bulbs or corms are caused by pathogens entering bulbs or corms after sitting in cold, wet soil, being temporarily waterlogged or being exposed to warm temperatures in winter. They may show obvious signs of rot, have no roots or shoots, or produce stunted yellow leaves but no flowers. Plant bulbs and corms in free-draining soil, raised garden beds or containers; do not water while dormant; and lift and store them if recommended for your climate.