Seed paper offers a creative and eco-conscious way to repurpose paper waste while using up a few excess seeds. The paper can be used to make unique cards, gift tags or event keepsakes, and it’s also a good craft project for kids to get them involved in recycling. Let's get started!
What is Seed Paper?
Seed paper is a type of handmade paper embedded with tiny seeds. The paper can be planted in soil and watered to germinate the seeds. Seed paper is a sustainability double whammy, reusing waste paper and finding a use for excess seeds while encouraging people to grow and nurture plants.
Professionally made seed paper uses very fine paper pulp dried between two screens, and is fine enough to write on. Our method uses common household items and is suited to making with children. It will produce a more rustic finish that can be used to make swing tags, cards or labels.
Selecting the Paper and Seeds
You don't need fancy paper for this project. Any recyclable, non-glossy paper will do the trick - think old newspapers, schoolwork, egg cartons, or even shredded paper. It's all about giving new life to those old scraps. The colour of the paper and printing determines the finished colour of the seed paper, so keep this in mind when selecting your supplies.
When it comes to seeds, go for ones that are small, hard and easy to germinate. Herbs like basil and chamomile and flowers such as forget me not and brachyscome work well. These small seeds will attach to the paper without swelling and should sprout with minimal fuss, making them suitable for non-gardeners who may be growing from seed for the first time.
How to Make Seed Paper
Materials
- scrap paper
- water
- seeds
Equipment
- blender
- splatter guard or old window screen
- cookie cutters (optional)
- old towel
- cloth or piece of cotton fabric
Method
Making paper is a messy process; work outdoors or in an area where water and spills can be cleaned up easily.
- Cut or tear the paper into small pieces and place them in a bowl. The smaller the pieces, the smoother the finished seed paper will be. It doesn’t take as much paper as you may expect to make a few cards or tags; 2 cups of firmly packed shredded paper is plenty for a first batch.
.jpg)
- Cover the paper with the water and leave it to soak overnight. Stirring the mixture every now and again will help it break down. Once soaked through it should be soft and mushy.
- Pour off any excess water and transfer the paper pulp to the bowl of a blender. Add the same volume of water as pulp and blend. If required, add more water a little at a time until you achieve a workable consistency. Aim for a paste that will spread a little when spooned onto a surface, similar to thick custard. The runnier the mixture, the longer it will take to dry. You’ll find that a little mixture goes a long way, so take care not to overfill the blender.
.jpg)
- Place the splatter guard on a flat surface on top of a folded old towel. The towel will be used to soak up excess water.
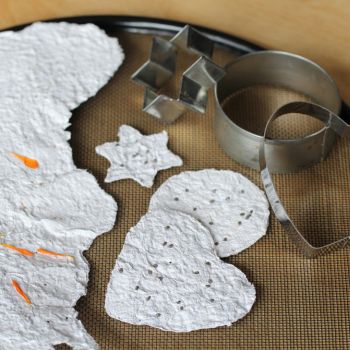
If using cookie cutters: Position the cookie cutters on the splatter guard. Spoon the paper pulp into the cookie cutters and use your fingers to press the pulp into an even layer.
If making a sheet of paper: Spoon the paper pulp directly onto the splatter guard to make a sheet of paper. Then use your fingers or the back of a spoon to press the pulp into an even layer.
.jpg)
- Use a cloth or piece of fabric to gently press down on the pulp to remove excess water. You’ll find that the water drains through to the towel quickly; if the paper breaks during this process, add a little more pulp to repair the damage.
- Sprinkle your chosen flower or herb seeds sparsely onto the paper pulp and gently press the seeds into the surface using your fingers or a dry cloth.
.jpg)
- If you are making large quantities of seed paper, work in batches and transfer the finished paper onto a towel once it is partially dry. Do this by turning the splatter guard over and gently pressing to release the paper; this will free up the splatter guard for the next batch of pulp.
- Allow the seed paper to air dry for a day or two. Ensure it's completely dry before moving to the next step. It’s important to dry the paper reasonably quickly to prevent the seeds from absorbing the moisture in the paper and germinating - a fan on low speed or a hair dryer on a cool setting can help to dry the paper if the weather isn’t favourable for drying it naturally.
.jpg)
- Once your seed paper is dry, trim and neaten the edges or cut large pieces of paper into smaller, usable shapes. If using the paper for gift tags, make a hole using a hole punch.
Don’t forget to include growing instructions with the seed paper. Here are some basic instructions that you can use:
How to Plant Your Seed Paper
- Fill a small pot with potting mix to about 5cm below the rim of the pot.
- Place the paper on the surface of the soil and cover with 1cm of soil.
- Water in well.
- Keep the soil consistently moist until seedlings emerge, then place the pot in a sunny position.
Making seed paper is not only a fantastic way to recycle and reduce waste, but it’s also a great way to add a unique and thoughtful homemade touch to gifts. Happy crafting and gardening!
.jpg)