
Dividing Dahlias is an essential part of caring for these prolific bloomers. By splitting up the tuber clumps that form underground during the growing season, you not only multiply your plant stock for free but also keep your dahlias healthy for many more seasons to come!
Overcrowded tubers can lead to weaker plants and fewer flowers. It's a highly rewarding task that ensures an impressive garden display year after year.
When To Divide
There are two windows, and both work well:
- Autumn to early winter, once the foliage has died back. The tubers are still soft, so the necks cut cleanly. The trade-off is that the eyes are harder to spot.
- Late winter to early spring, as the tubers break dormancy the eyes are much easier to see, which makes this the better option if it's your first time.
Do you need to lift at all? It depends on your soil, not the calendar. If drainage is good and you don't get severe frosts, the clump will happily stay in the ground over winter. In heavy clay, a high-rainfall area or a frost pocket, lift the tubers in autumn and store them, or they will rot where they sit.
Either way you'll need to lift the clump every year or two to divide it. An undivided clump gets congested and produces smaller plants with poorer blooms.
What You'll Need
To divide your dahlia tuber clumps, you will need the following supplies:
- A mature dahlia tuber clump (dug up after the foliage dies back)
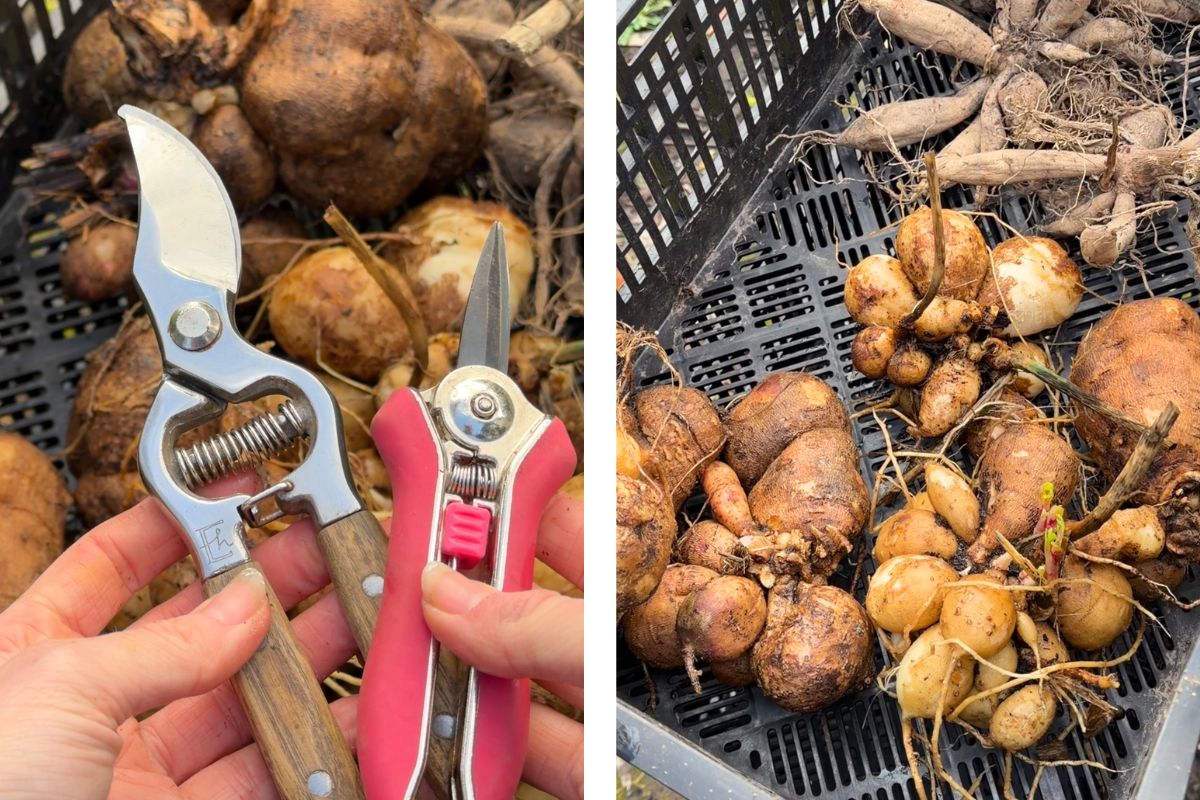
- Sharp, sterilised secateurs, snips or knife
- A garden hose or bucket of water
- Garden labels and a permanent marker
- (Optional) Sulfur dust or cinnamon to prevent rot on the fresh cuts
Washing The Tubers
If you are dividing your tubers fresh from the ground, follow this step. If you washed them at lifting time and stored them over winter, skip straight to finding the eyes.
Carefully dig up your dahlia clump using a garden fork rather than a shovel, as this reduces the risk of damaging the tubers. Use a hose to gently wash away the excess garden soil, as it is much easier to see what you are doing and to locate the vital growth points on clean tubers. Let them air dry slightly before you begin cutting.
Finding The Eyes
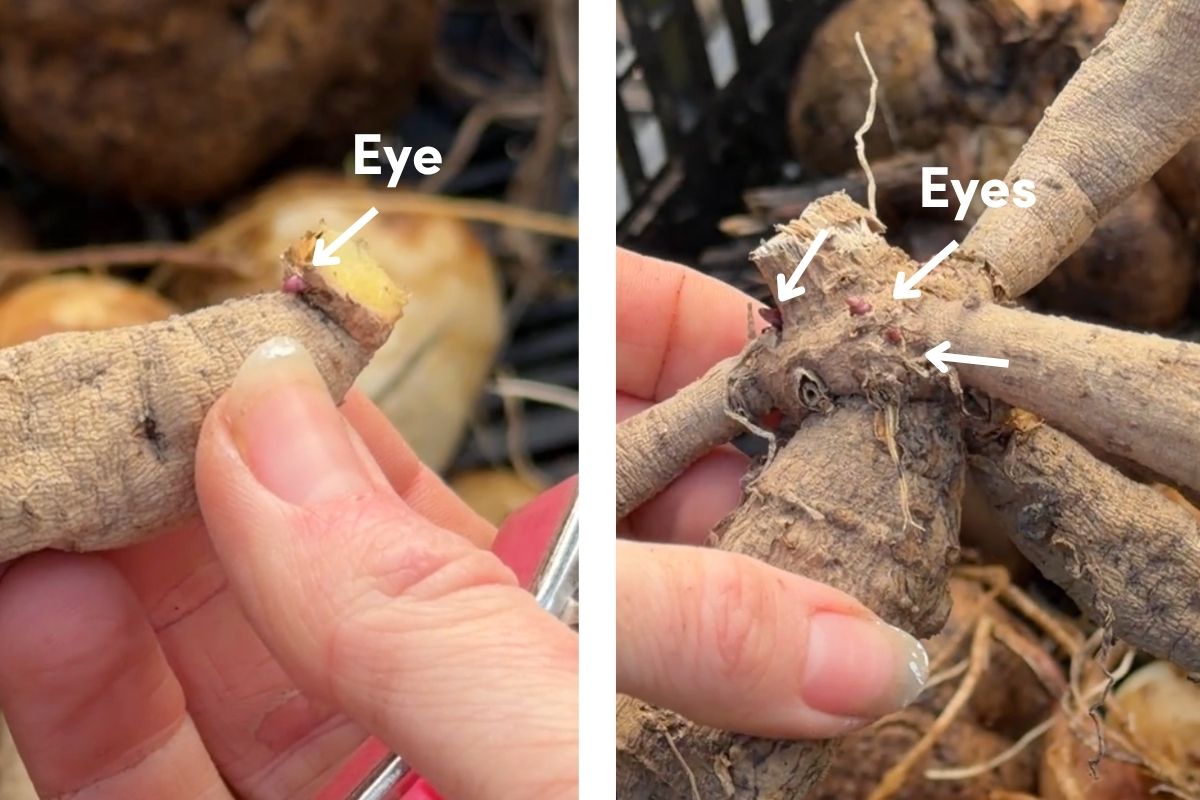
This is the most critical step of the entire process. For a divided tuber to successfully grow into a new plant, it must have an "eye" or multiple "eyes". The eyes are small, raised bumps or dimples located on the crown, the swollen area where the tuber's neck attaches to the old stem. They look a bit like the eyes on a sprouting potato but can be tricky to spot when dormant, so take your time examining the crown area.
You can see the anatomy of a tuber in the image below.
.jpg)
Making Your Cuts
Using your sterilised snips or knife, carefully slice through the old stem/crown to separate the tubers. Ensure that each division you make contains at least one healthy tuber body, an intact neck, and a piece of the central crown containing at least one visible eye.
Be extremely gentle: if the narrow neck snaps or bends during this process, the tuber will most likely not grow, even if it has an eye.
Wipe your blades with methylated spirits, 70% alcohol or a diluted bleach solution between each clump. Dahlia viruses spread in sap left on blades, so one infected plant can pass it down the line. Two pairs of snips works well, with one soaking while you use the other.
Trimming and Labelling
Trim away any broken, squishy, or rotting pieces, as well as long, stringy roots. Discard the old mother tuber and any divisions without an eye, as these will never produce a plant. Most importantly, label your tubers immediately! It is impossible to tell what colour or variety a dahlia is just by looking at the tuber.
Tip: Tag them while they are still flowering and use a marker to identify each tuber for next season.
Dahlia Tuber Care Guide
Taking care of your freshly divided tubers ensures they survive until planting time. Here is how to keep them viable:
- Curing: Dust the cut surfaces with sulfur or cinnamon if you are using it, then let the freshly cut tubers sit in a cool, dry, and shaded place for 24 to 48 hours. This allows the cut surfaces to dry out and callous over, which acts as a protective seal against rot.
- Storing: If dividing in autumn/winter, pack your cured tubers in a cardboard box or crate filled with sawdust or vermiculite. Keep them in a cool, dark, and frost-free location (around 4-10°C) until spring. Check on them once a month to ensure they aren't shrivelling or rotting.
- Planting: Once the danger of frost has completely passed in spring, you can plant your tubers. Choose a spot that receives bright, direct sunlight. Plant the tuber horizontally about 10-15cm deep, with the eye pointing upwards towards the sky.
.png)
Browse Our Collection Of Dahlias Here